Unity着色器 - 如何高效地重新着色特定坐标?

7

首先,请允许我解释一下我已经得到的内容,然后我将介绍我接下来要解决的问题。

我已经得到的内容

我拥有一个在Unity中与整数世界坐标完全对齐的纹理自定义网格。 我添加了自己粗糙但有效的自定义表面着色器到网格上,如下所示:

    Shader "Custom/GridHighlightShader"
{
    Properties
    {
        [HideInInspector]_SelectionColor("SelectionColor", Color) = (0.1,0.1,0.1,1)
        [HideInInspector]_MovementColor("MovementColor", Color) = (0,0.205,1,1)
        [HideInInspector]_AttackColor("AttackColor", Color) = (1,0,0,1)
        [HideInInspector]_GlowInterval("_GlowInterval", float) = 1
        _MainTex("Albedo (RGB)", 2D) = "white" {}
        _Glossiness("Smoothness", Range(0,1)) = 0.5
        _Metallic("Metallic", Range(0,1)) = 0.0
    }
        SubShader
        {
            Tags { "RenderType" = "Opaque" }
            LOD 200

            CGPROGRAM
            // Physically based Standard lighting model, and enable shadows on all light types
            #pragma surface surf Standard fullforwardshadows

            // Use shader model 3.0 target, to get nicer looking lighting
            #pragma target 3.0

            struct Input
            {
                float2 uv_MainTex;
                float3 worldNormal;
                float3 worldPos;
            };

            sampler2D _MainTex;
            half _Glossiness;
            half _Metallic;
            fixed4 _SelectionColor;
            fixed4 _MovementColor;
            fixed4 _AttackColor;
            half _GlowInterval;
            half _ColorizationArrayLength = 0;
            float4 _ColorizationArray[600];
            half _isPixelInColorizationArray = 0;

            // Add instancing support for this shader. You need to check 'Enable Instancing' on materials that use the shader.
            // See https://docs.unity3d.com/Manual/GPUInstancing.html for more information about instancing.
            // #pragma instancing_options assumeuniformscaling
            UNITY_INSTANCING_BUFFER_START(Props)
                // put more per-instance properties here
            UNITY_INSTANCING_BUFFER_END(Props)

                void surf(Input IN, inout SurfaceOutputStandard o)
                {
                fixed4 c = tex2D(_MainTex, IN.uv_MainTex);

                // Update only the normals facing up and down
                if (abs(IN.worldNormal.x) <= 0.5 && (abs(IN.worldNormal.z) <= 0.5))
                {
                    // If no colors were passed in, reset all of the colors
                    if (_ColorizationArray[0].w == 0)
                    {
                        _isPixelInColorizationArray = 0;
                    }
                    else
                    {
                        for (int i = 0; i < _ColorizationArrayLength; i++)
                        {
                            if (abs(IN.worldPos.x) >= _ColorizationArray[i].x && abs(IN.worldPos.x) < _ColorizationArray[i].x + 1
                                && abs(IN.worldPos.z) >= _ColorizationArray[i].z && abs(IN.worldPos.z) < _ColorizationArray[i].z + 1
                                )
                            {
                                _isPixelInColorizationArray = _ColorizationArray[i].w;
                            }
                        }
                    }

                    if (_isPixelInColorizationArray > 0)
                    {
                        if (_isPixelInColorizationArray == 1)
                        {
                            c = tex2D(_MainTex, IN.uv_MainTex) + (_SelectionColor * _GlowInterval) - 1;
                        }
                        else if (_isPixelInColorizationArray == 2)
                        {
                            c = tex2D(_MainTex, IN.uv_MainTex) + (_MovementColor * _GlowInterval);
                        }
                        else if (_isPixelInColorizationArray == 3)
                        {
                            c = tex2D(_MainTex, IN.uv_MainTex) + (_AttackColor * _GlowInterval);
                        }
                    }
                }
                o.Albedo = c.rgb;
                o.Metallic = _Metallic;
                o.Smoothness = _Glossiness;
                o.Alpha = c.a;

            }
            ENDCG
        }
            FallBack "Diffuse"
}

我将一个浮点数输入到着色器中,这个浮点数会随着时间使用一些数学方法在2和3之间简单地振荡。这是从Unity中的一个简单更新函数中完成的:

private void Update() 
{
    var t = (2 + ((Mathf.Sin(Time.time))));
    meshRenderer.material.SetFloat("_GlowInterval", t);
}

我还向着色器提供了一个名为_ColorizationArray的Vector4数组,其中存储了0到600个坐标,每个坐标代表运行时要着色的一个图块。这些图块在运行时可能会根据它们的selectionMode值而被高亮或不被高亮。以下是我使用的方法:
    public void SetColorizationCollectionForShader()
    {
        var coloredTilesArray = Battlemap.Instance.tiles.Where(x => x.selectionMode != TileSelectionMode.None).ToArray();

        // https://docs.unity3d.com/ScriptReference/Material.SetVectorArray.html                
        // Set the tile count in the shader's own integer variable
        meshRenderer.material.SetInt("_ColorizationArrayLength", coloredTilesArray.Length);

        // Loop through the tiles to be colored only and grab their world coordinates
        for(int i = 0; i < coloredTilesArray.Length; i++)
        {
            // Also grab the selection mode as the w value of a float4
            colorizationArray[i] = new Vector4(coloredTilesArray[i].x - Battlemap.HALF_TILE_SIZE, coloredTilesArray[i].y, coloredTilesArray[i].z - Battlemap.HALF_TILE_SIZE, (float)coloredTilesArray[i].selectionMode);            
        }

        // Feed the overwritten array into the shader
        meshRenderer.material.SetVectorArray("_ColorizationArray", colorizationArray);
    }

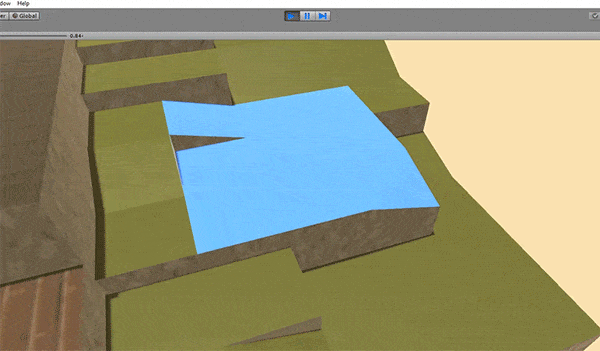
这就是在运行时动态设置和更改的蓝色发光瓷砖集合的结果:

enter image description here

我的目标是在基于网格的战术游戏中突出显示正方形(或瓦片),使得单位可以移动到突出显示区域内的任何一个瓦片上。每个单位移动后可以进行攻击,此时会将瓦片突出显示为红色,然后下一个单位接替行动,以此类推。由于我预计人工智能、移动计算和粒子效果将占用大部分处理时间,因此需要在运行时以动态且高效的方式突出显示瓦片。
接下来,我想做的是:使用特定的瓦片索引告诉着色器“只在这些瓦片内部着色为蓝色”,并以对GPU和CPU都高效的方式完成此操作。嗯,好的。现在,如果你对着色器有所了解(而我昨天才开始看cg代码),你可能会想,“哦,天啊,这多么低效的代码!你在干什么?!还有if语句?!在着色器里?”我也不怪你。
我应该如何实现这一点?我已经在C#代码中计算瓦片世界坐标并将其提供给着色器,但除此之外,我一无所知。我意识到我应该可能切换到顶点/片段着色器,但我也想尽可能避免失去网格上的任何默认动态照明。
此外,是否有一种类型的变量可以使着色器使用局部网格坐标而不是世界坐标来将网格涂成蓝色?如果可能的话,能够移动网格而无需担心着色器代码会很好。
编辑:在发布此问题的两周内,我通过传递Vector4数组和half来表示实际处理数组的数量_ColorizationArrayLength,来编辑了着色器,它工作得很好,但几乎没有更高效 - 这会产生GPU峰值,需要大约17ms才能在相当现代的图形卡上处理。我已更新上面的着色器代码以及原始问题的某些部分。

1
我对着色器并不是很了解,但我找到了一本书开始阅读,它教你如何高效编写着色器,并且你想要做的事情也有涉及,看一下这个链接:https://thebookofshaders.com。 - janavarro
1
我不禁想知道是否可以使用模板或阴影缓冲区来代替传递数组。但是,如果您要传递这样的数组,应该考虑按某种唯一标识x-z坐标组合(例如abs(x)*P+abs(z),其中P是某个常数> max abs(z))对数组进行排序,然后在hlsl中使用二分搜索,以便在最坏情况下只需索引log(n)次而不是n次。 - Ruzihm
@shingo 这些瓦片的网格不是由代码生成的,我使用了Blender。即使是这么简单的网格,生成起来也相当困难,因为你需要将相当多的顶点拼接在一起。如果有简单的方法可以做到这一点,我会很乐意知道,但我觉得这很难。 - Mir
@Ruzihm,这实际上是个好主意。我可以先按X排序,然后再按Y进行着色器的二分查找。我很快就会尝试一下。谢谢! - Mir
@Mir 这可能已经足够了,特别是如果您还消除了对 tex2d 的重复调用并消除了分支。但作为完全避免在着色器中迭代的替代方案,我提交了一个使用纹理采样而不是迭代索引的答案。这应该在着色器中更快。 - Ruzihm
显示剩余2条评论
1个回答

7

由于你的着色只关心等大小正方形网格中的2D位置,这些网格都对齐到同一网格,因此我们可以传入一个2D纹理,其着色方式表明了地面应该被着色成什么样子。

在着色器中,添加一个2D_ColorizeMap和一个Vector_WorldSpaceRange。着色图将用于传递哪些部分应该被着色,而范围将告诉着色器如何在世界空间和UV(纹理)空间之间进行转换。由于游戏网格对齐于世界x/y轴,因此我们只需要线性缩放从世界空间到UV空间的坐标。

然后,当法线朝上时(如果法线的y足够高,你可以检查),获取世界位置的反插值,并从_ColorizeMap中采样以获取它应该如何/是否被着色。

Shader "Custom/GridHighlightShader"
{
    Properties
    {
        [HideInInspector]_GlowInterval("_GlowInterval", float) = 1
        _MainTex("Albedo (RGB)", 2D) = "white" {}
        _Glossiness("Smoothness", Range(0,1)) = 0.5
        _Metallic("Metallic", Range(0,1)) = 0.0
        [HideInInspector]_ColorizeMap("Colorize Map", 2D) = "black" {} 
        _WorldSpaceRange("World Space Range", Vector) = (0,0,100,100)
    }
        SubShader
        {
            Tags { "RenderType" = "Opaque" }
            LOD 200

            CGPROGRAM
            // Physically based Standard lighting model, 
            // and enable shadows on all light types
            #pragma surface surf Standard fullforwardshadows

            // Use shader model 3.0 target, to get nicer looking lighting
            #pragma target 3.0

            struct Input
            {
                float2 uv_MainTex;
                float3 worldNormal;
                float3 worldPos;
            };

            sampler2D _MainTex;
            half _Glossiness;
            half _Metallic;
            half _GlowInterval;

            sampler2D _ColorizeMap;
            fixed4 _WorldSpaceRange;


            // Add instancing support for this shader. 
            // You need to check 'Enable Instancing' on materials that use the shader.
            // See https://docs.unity3d.com/Manual/GPUInstancing.html 
            // for more information about instancing.
            // #pragma instancing_options assumeuniformscaling
            UNITY_INSTANCING_BUFFER_START(Props)
                // put more per-instance properties here
            UNITY_INSTANCING_BUFFER_END(Props)

            void surf(Input IN, inout SurfaceOutputStandard o)
            {
                fixed4 c = tex2D(_MainTex, IN.uv_MainTex);

                // Update only the normals facing up and down
                if (abs(IN.worldNormal.y) >= 0.866)) // abs(y) >= sin(60 degrees)
                {
                    fixed4 colorizedMapUV = (IN.worldPos.xz-_WorldSpaceRange.xy) 
                            / (_WorldSpaceRange.zw-_WorldSpaceRange.xy);

                    half4 colorType = tex2D(_ColorizeMap, colorizedMapUV);

                    c = c + (colorType * _GlowInterval); 
                }
                o.Albedo = c.rgb;
                o.Metallic = _Metallic;
                o.Smoothness = _Glossiness;
                o.Alpha = c.a;

            }
            ENDCG
        }
    FallBack "Diffuse"
}

移除分支:

Shader "Custom/GridHighlightShader"
{
    Properties
    {
        [HideInInspector]_GlowInterval("_GlowInterval", float) = 1
        _MainTex("Albedo (RGB)", 2D) = "white" {}
        _Glossiness("Smoothness", Range(0,1)) = 0.5
        _Metallic("Metallic", Range(0,1)) = 0.0
        [HideInInspector]_ColorizeMap("Colorize Map", 2D) = "black" {}
        _WorldSpaceRange("World Space Range", Vector) = (0,0,100,100)
    }
        SubShader
        {
            Tags { "RenderType" = "Opaque" }
            LOD 200
            CGPROGRAM
            // Physically based Standard lighting model, 
            // and enable shadows on all light types
            #pragma surface surf Standard fullforwardshadows

            // Use shader model 3.0 target, to get nicer looking lighting
            #pragma target 3.0

            struct Input
            {
                float2 uv_MainTex;
                float3 worldNormal;
                float3 worldPos;
            };

            sampler2D _MainTex;
            half _Glossiness;
            half _Metallic;
            half _GlowInterval;

            sampler2D _ColorizeMap;
            fixed4 _WorldSpaceRange;

            // Add instancing support for this shader.
            // You need to check 'Enable Instancing' on materials that use the shader.
            // See https://docs.unity3d.com/Manual/GPUInstancing.html 
            // for more information about instancing.
            // #pragma instancing_options assumeuniformscaling
            UNITY_INSTANCING_BUFFER_START(Props)
                // put more per-instance properties here
            UNITY_INSTANCING_BUFFER_END(Props)

            void surf(Input IN, inout SurfaceOutputStandard o)
            {

                half4 c = tex2D(_MainTex, IN.uv_MainTex);
                float2 colorizedMapUV = (IN.worldPos.xz - _WorldSpaceRange.xy)
                        / (_WorldSpaceRange.zw - _WorldSpaceRange.xy);
                half4 colorType = tex2D(_ColorizeMap, colorizedMapUV);

                // abs(y) >= sin(60 degrees) = 0.866
                c = c + step(0.866, abs(IN.worldNormal.y)) * colorType * _GlowInterval;

                o.Albedo = c.rgb;
                o.Metallic = _Metallic;
                o.Smoothness = _Glossiness;
                o.Alpha = c.a;

            }
            ENDCG
        }
            FallBack "Diffuse"
}

然后,在您的C#代码中,创建一个没有过滤器的纹理。将纹理全部设置为黑色,然后根据需要进行高亮处理添加颜色到纹理中。同时,告诉着色器颜色映射表示的世界空间范围(minX,minZ,maxX,maxZ):

    public void SetColorizationCollectionForShader()
{   
    Color[] selectionColors = new Color[4] { Color.clear, new Color(0.5f, 0.5f, 0.5f, 0.5f), Color.blue, Color.red };
    float leftMostTileX = 0f + Battlemap.HALF_TILE_SIZE;
    float backMostTileZ = 0f + Battlemap.HALF_TILE_SIZE;

    float rightMostTileX = leftMostTileX + (Battlemap.Instance.GridMaxX - 1)
            * Battlemap.TILE_SIZE;
    float forwardMostTileZ = backMostTileZ + (Battlemap.Instance.GridMaxZ - 1)
            * Battlemap.TILE_SIZE;

    Texture2D colorTex = new Texture2D(Battlemap.Instance.GridMaxX, Battlemap.Instance.GridMaxZ);
    colorTex.filterMode = FilterMode.Point;

    Vector4 worldRange = new Vector4(
            leftMostTileX - Battlemap.HALF_TILE_SIZE,
            backMostTileZ - Battlemap.HALF_TILE_SIZE,
            rightMostTileX + Battlemap.HALF_TILE_SIZE,
            forwardMostTileZ + Battlemap.HALF_TILE_SIZE);

    meshRenderer.material.SetVector("_WorldSpaceRange", worldRange);        

    // Loop through the tiles to be colored only and grab their world coordinates
    for (int i = 0; i < Battlemap.Instance.tiles.Length; i++)
    {
        // determine pixel index from position
        float xT = Mathf.InverseLerp(leftMostTileX, rightMostTileX,
                Battlemap.Instance.tiles[i].x);
        int texXPos = Mathf.RoundToInt(Mathf.Lerp(0f, Battlemap.Instance.GridMaxX - 1.0f, xT));

        float yT = Mathf.InverseLerp(backMostTileZ, forwardMostTileZ,
                Battlemap.Instance.tiles[i].z);
        int texYPos = Mathf.RoundToInt(Mathf.Lerp(0f, Battlemap.Instance.GridMaxZ - 1.0f, yT));

        colorTex.SetPixel(texXPos, texYPos, selectionColors[(int)Battlemap.Instance.tiles[i].selectionMode]);
    }
    colorTex.Apply();

    // Feed the color map into the shader
    meshRenderer.material.SetTexture("_ColorizeMap", colorTex);
}

可能会出现一些平铺边界的问题,纹理空间/世界空间之间可能存在一些对齐问题,但这应该可以让你开始工作了。

1
@Mir 假设每个瓷砖都是相同大小的正方形,并且它们都对齐于相同的x/z网格。但不同类型选择的形状可以是任何瓷砖的组合。 - Ruzihm
1
@Mir,关于瓦片网格本身的大小/形状的主要假设是,如果你在它周围画一个矩形,那么这个矩形足够小,可以放入纹理中 :) - Ruzihm
1
我解决了这个问题——我只需要调用colorTex.Apply()将像素应用到内存中的纹理上。它可以工作了!非常感谢你! - Mir
1
@Mir 很酷!我很高兴能帮到你!你认为你可以编辑答案,包括你最终使用的代码,这样它就没有错别字,并且有colorTex.Apply()吗? :) - Ruzihm
1
当你考虑到采样纹理的成本时,数组通常会更快。但是,像所有情况一样:进行性能分析并查看硬件告诉你什么。 - 3Dave
显示剩余5条评论

网页内容由stack overflow 提供, 点击上面的
可以查看英文原文,
原文链接