在SwiftUI中创建一个透明模糊视图

6
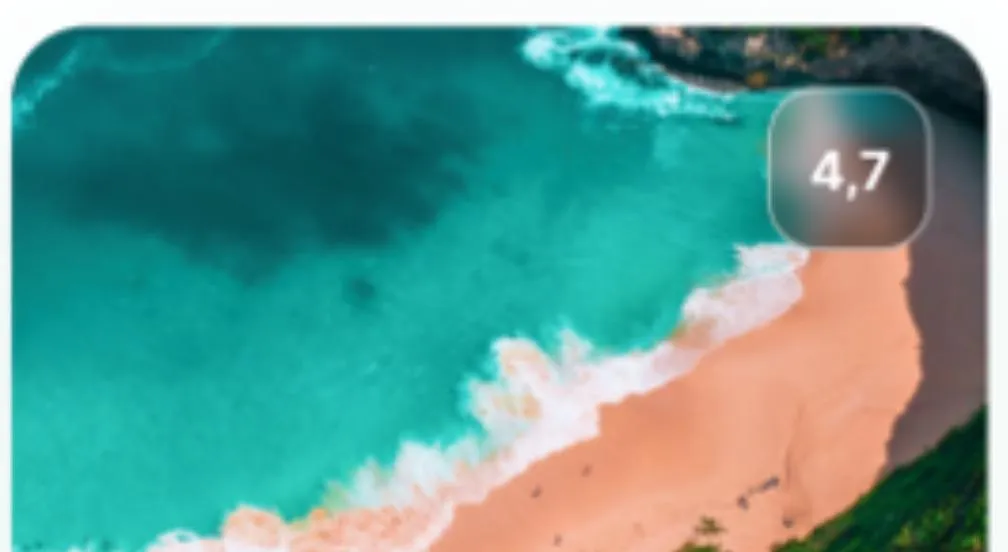
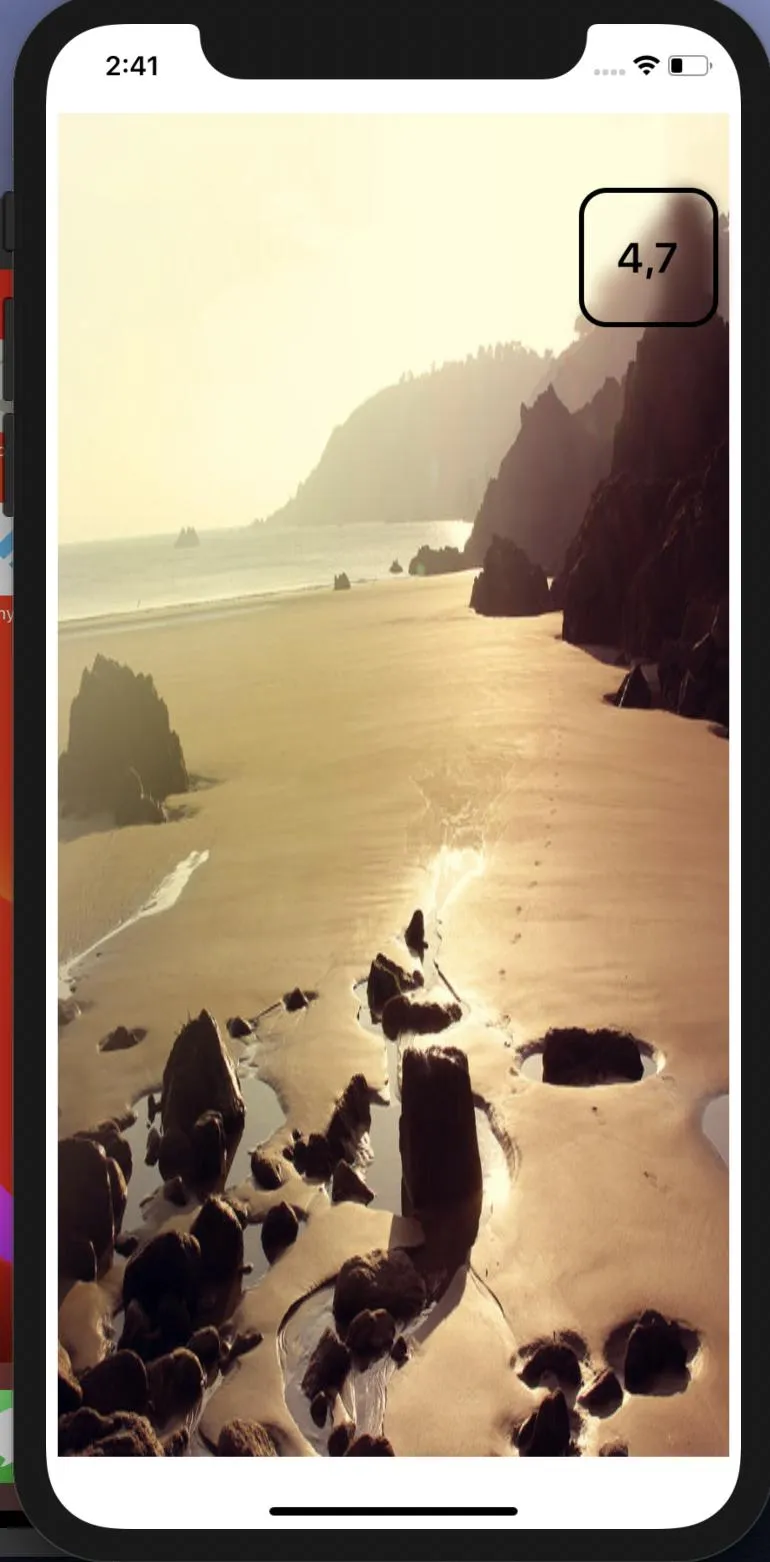
我的目标是创建一个模糊视图,就像下面图片右上角的视图一样。 transparent view on top of ocean and sand 
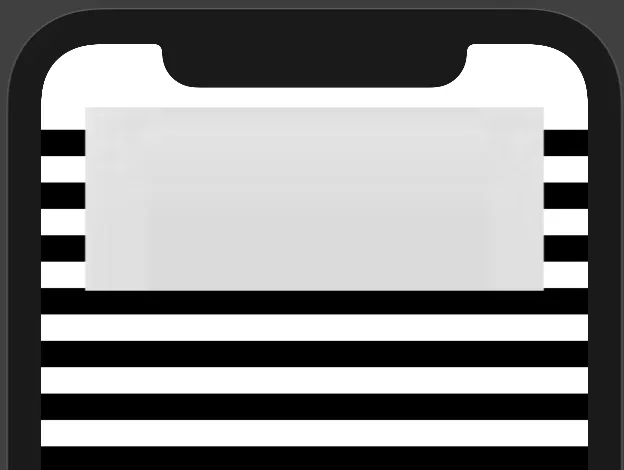
我尝试了这篇帖子中的前三个答案,但它们都有同样的问题——当底部有多种颜色时,模糊视图只有一种颜色。这是我尝试过的解决方案之一:
import SwiftUI

struct ContentView: View {
    var body: some View {
        ZStack {
            VStack{
                ForEach(0..<20, id: \.self){ num in
                    Rectangle()
                        .frame(height: 20)
                        .padding(.vertical, 6)
                }
            }
            Blur(style:  .systemThinMaterialLight)
                .mask(
                    VStack(spacing: 0) {
                        Rectangle()
                            .frame(width: 347, height: 139)
                            .padding(.top, 0)
                        Spacer()
                    }
                )
                .allowsHitTesting(false)
        }
    }
}

struct Blur: UIViewRepresentable {
    var style: UIBlurEffect.Style = .systemMaterial
    func makeUIView(context: Context) -> UIVisualEffectView {
        return UIVisualEffectView(effect: UIBlurEffect(style: style))
    }
    func updateUIView(_ uiView: UIVisualEffectView, context: Context) {
        uiView.effect = UIBlurEffect(style: style)
    }
}

blur view on top of black and white stripes

正如您所看到的,模糊视图只是一个灰色的单一视图。您甚至无法看到模糊视图下面的黑白条纹。
我希望模糊视图更加透明,就像您在第一张图片中看到的那样,海洋、沙滩和阴影仍然可以通过模糊视图看到。我该如何在SwiftUI中创建这样的视图?

1
添加你的代码。 - Joannes
这个回答解决了你的问题吗?https://stackoverflow.com/a/65595112/12299030? - Asperi
@Asperi 不是的,那是我已经尝试过的解决方案之一,我只是添加了自己的代码到问题中并指出了这个解决方案存在的问题。 - SmoothPoop69
UIBlurEffect.Style.systemMaterial 可能会太过 "浓重",尝试使用其他值来减轻背景模糊。 - EmilioPelaez
你解决了这个问题吗?我有一个类似的Swift设计。 - o1xhack
5个回答

3

这段代码非常接近你的问题,但它只适用于IOS15及以上版本:

ZStack{
  Image("background")
  //then comes your look trough button, here just a Rectangle:
  Rectangle()
 .foregroundColor(.secondary)
 .background(.ultraThinMaterial)
 .frame(width: 100, height: 100)
 //then you can add opacity to see a bit more of the background:
 .opacity(0.95)
}

1

我希望使用绑定而不是两个图像。为此,我将一个名为“lyon”的图像添加到资源中。

这是我的解决方案,省略了一些数学内容:

ContentView

struct ContentView: View {
    @State private var image: UIImage = UIImage(named: "lyon")!
    var body: some View {
        ZStack{
            Image(uiImage: image)
                .resizable()
                .aspectRatio(contentMode: .fill)
            IceCube(image: image)
        }
        .ignoresSafeArea(.all)
    }
}

IceCube()

这个视图承担了所有的工作:

struct IceCube: View {

    @State private var rectPosition = CGPoint(x: 150, y: 150)
    
    @State private var cutout: UIImage?

    let image: UIImage

    let frameSide: CGFloat = 180

    var body: some View {
        
        Image(uiImage: cutout ?? image)
            .frame(width: frameSide, height: frameSide)
            .blur(radius: 5)
            .clipShape(RoundedRectangle(cornerRadius: 12, style: .continuous))
            .overlay(RoundedRectangle(cornerRadius: 12, style: .continuous).stroke(Color.red, lineWidth: 3))
            .onAppear(perform: {
                processImage()
            })
            .position(rectPosition)
            .gesture(DragGesture().onChanged({ value in
                self.rectPosition = value.location
                processImage()
            }))
        
    }
    
    func processImage() {
        
        //TODO: - Find the image scale size from ContentView and also figure out how much it begins to the left/top of the screen.
        
        cutout = croppedImage(from: image, croppedTo: CGRect(x: rectPosition.x, y: rectPosition.y, width: frameSide, height: frameSide))
    }
}


//MARK: - image processing functions.

func croppedImage(from image: UIImage, croppedTo rect: CGRect) -> UIImage {
    
    UIGraphicsBeginImageContext(rect.size)
    let context = UIGraphicsGetCurrentContext()
    
    let drawRect = CGRect(x: -rect.origin.x, y: -rect.origin.y, width: image.size.width, height: image.size.height)
    
    context?.clip(to: CGRect(x: 0, y: 0, width: rect.size.width, height: rect.size.height))
    
    image.draw(in: drawRect)
    
    let subImage = UIGraphicsGetImageFromCurrentImageContext()
    
    UIGraphicsEndImageContext()
    return subImage!
}


显然,在实际项目中应避免强制解包。
如果您需要一些有关数学的想法,请查看我在GitHub上裁剪和调整图像的存储库。

https://github.com/Rillieux/PhotoSelectAndCrop/blob/main/Sources/ImageMoveAndScaleSheet%2BExtensions.swift

基本思路是,当您想从原始图像中裁剪正方形时,该原始图像可能与屏幕上看到的大小和尺寸并不完全相同。例如,如果您使用 .aspectRatio(contentMode: .fit),则图像可能会缩小,因此您需要考虑这一点。我还没有做到这一点,这就是为什么模糊效果实际上与所在位置不太匹配的原因。但是,我认为您会明白这个思路。

Blurred overlay

此外,我的示例可以通过使用视图构建器来针对您的情况进行大幅改进,类似于这样:
struct SafeEdgesBlurContainer<V: View>: View {

    var containedView: V 

    //Snipped code

    var body: some View {
        ZStack {
            Image(uiImage: cutout ?? image)
            containedView
    }

 ...

然后像这样使用它:

0

这个方法将高斯模糊应用于视图。

func blur(radius: CGFloat, opaque: Bool = false) -> some View

参数:

  • radius:模糊的半径大小。当其半径较大时,模糊更加扩散。
  • opaque:一个布尔值,指示模糊渲染器是否允许模糊输出中的透明度。设置为true以创建不透明的模糊,或设置为false以允许透明度。
Image("your_Image")
   .resizable()
   .frame(width: 300, height: 300)
   .blur(radius: 20)

1
请在答案中添加一些解释并正确格式化您的代码。 - koen
我不想给整张图片添加模糊效果。我想在图片顶部放置一个小的模糊透明视图,就像我帖子中第一张图片中所看到的那样。我尝试将模糊修饰符添加到圆角矩形上,并将其放置在图片上方,但效果并不理想。 - SmoothPoop69
你可以先创建你的图片,然后在图片顶部添加一个透明的模糊效果视图(addsubview),以此来实现模糊效果。 - Ilahi Charfeddine
@IlahiCharfeddine 我已经尝试过了,不起作用。它看起来与我在第一张图片中展示的模糊视图完全不同。 - SmoothPoop69

0
我编写了一个可配置的“视图扩展”用于tvOS(但可能也适用于iOS),请保存下面这两个文件:
import Foundation
import SwiftUI

extension View
{
    /**
     function that creates the background color that "shines" through the 'IceCube'
     */
    func createColorBGLayer(at: CGRect,
                            background: Color,
                            cornerRadius: CGFloat) -> some View
    {
        return background
            .clipShape(
                RoundedRectangle(cornerRadius: cornerRadius)
                    .offset(x: at.minX + 5, y: at.minY + 5)
                    .size(CGSize(width: at.width - 10, height: at.height - 10))
            )
    }
    
    /**
     function that creates the 'IceCube' (a clipped image with blur)
     */
    func createIceLayer(at: CGRect,
                        backgroundOpacity: CGFloat,
                        cornerRadius: CGFloat,
                        blurRadius: CGFloat) -> some View
    {
        return self
            .opacity(backgroundOpacity)
            .clipShape(
                RoundedRectangle(cornerRadius: cornerRadius)
                    .offset(x: at.minX, y: at.minY)
                    .size(CGSize(width: at.width, height: at.height))
            )
            .blur(radius: blurRadius)
    }
    
    /**
     function that creates the text layer in the center of the 'IceCube'
     */
    func createTextLayer(at: CGRect,
                         textString: String,
                         fontSize: CGFloat,
                         fontDesign: Font.Design,
                         fontWeight: Font.Weight,
                         foregroundColor: Color) -> some View
    {
        // calculate render width and height of text using provided font (without actually rendering)
        let sizeOfText: CGSize = textString.sizeUsingFont(fontSize: fontSize, weight: fontWeight)
        let textOffsetX = at.minX + ((at.width - sizeOfText.width) / 2)
        let textOffsetY = at.minY + ((at.height - sizeOfText.height) / 2)
        
        // render text in center of iceCube
        return GeometryReader { proxy in
            Text(textString)
                .font(Font.system(size: fontSize, design: fontDesign))
                .fontWeight(fontWeight)
                .foregroundColor(foregroundColor)
                // put the text in the middle of the blured rectangle
                .offset(x: textOffsetX, y: textOffsetY)
        }
    }
    
    /**
     main function to create the ice cube ontop of this extended view
     */
    func iceCube(at: CGRect,
                 textString: String = "",
                 fontSize: CGFloat = 40,
                 fontWeight: Font.Weight = Font.Weight.regular,
                 fontDesign: Font.Design = Font.Design.rounded,
                 foregroundColor: Color = Color.white,
                 background: Color = Color.white,
                 backgroundOpacity: CGFloat = 0.9,
                 cornerRadius: CGFloat = 30,
                 blurRadius: CGFloat = 8) -> some View
    {
        
        // clipped image at the original position blurred and rounded corner
        return self
            .overlay(
                ZStack {
                // first layer color white for a beat of glare
                createColorBGLayer(at: at, background: background, cornerRadius: cornerRadius)
                
                // second layer a blur round corner clip from the image
                createIceLayer(at: at, backgroundOpacity: backgroundOpacity, cornerRadius: cornerRadius, blurRadius: blurRadius)
                
                // text on top of the blurred part (use geometry to reset text position)
                createTextLayer(at: at, textString: textString, fontSize: fontSize, fontDesign: fontDesign, fontWeight: fontWeight, foregroundColor: foregroundColor)
            })
    }
}

字符串扩展,用于计算文本的渲染宽度和高度(无需渲染),以便可以从扩展内部使用

import Foundation
import UIKit
import SwiftUI

extension String
{
    func sizeUsingFont(fontSize: CGFloat, weight: Font.Weight) -> CGSize
    {
        var uiFontWeight = UIFont.Weight.regular
        
        switch weight {
        case Font.Weight.heavy:
            uiFontWeight = UIFont.Weight.heavy
        case Font.Weight.bold:
            uiFontWeight = UIFont.Weight.bold
        case Font.Weight.light:
            uiFontWeight = UIFont.Weight.light
        case Font.Weight.medium:
            uiFontWeight = UIFont.Weight.medium
        case Font.Weight.semibold:
            uiFontWeight = UIFont.Weight.semibold
        case Font.Weight.thin:
            uiFontWeight = UIFont.Weight.thin
        case Font.Weight.ultraLight:
            uiFontWeight = UIFont.Weight.ultraLight
        case Font.Weight.black:
            uiFontWeight = UIFont.Weight.black
        default:
            uiFontWeight = UIFont.Weight.regular
        }
        
        let font = UIFont.systemFont(ofSize: fontSize, weight: uiFontWeight)
        let fontAttributes = [NSAttributedString.Key.font: font]
        return self.size(withAttributes: fontAttributes)
    }
}

并像这样使用它:

import Foundation
import SwiftUI

struct TestView: View
{
    let iceCubePos1: CGRect = CGRect(x: 1100, y: 330, width: 500, height: 200)
    let iceCubePos2: CGRect = CGRect(x: 400, y: 130, width: 300, height: 200)
    let iceCubePos3: CGRect = CGRect(x: 760, y: 50, width: 200, height: 150)

    var body: some View
    {
        Image("SomeImageFromAssets")
            .resizable()
            .iceCube(at: iceCubePos1, textString: "Hello again")
            .iceCube(at: iceCubePos2, textString: "One", fontSize: 60.0, fontWeight: Font.Weight.heavy, fontDesign: Font.Design.rounded, foregroundColor: Color.black, background: Color.black, backgroundOpacity: 0.8, cornerRadius: 0, blurRadius: 9)
            .iceCube(at: iceCubePos3, textString: "U2")
            .ignoresSafeArea(.all)
            .scaledToFit()
    }
}

而它应该看起来像这样:

iceCube code result


-2

只需添加两张图片,一张名为“beach”,另一张名为“beach1”,然后尝试这个。在此输入图像描述

            ZStack {
                
                Image("beach").resizable().frame(width: 400, height: 800, alignment: .center)
                
                VStack{
                    
                    HStack{
                        Spacer()
                        Text(" 4,7 ")
                            .font(Font.system(size:25).bold())
                            .foregroundColor(Color.black)
                            .background(
                       
                                Image("beach1").resizable().frame(width: 80, height: 80, alignment: .center)
                                    .blur(radius: 5)
                                )
                            .frame(width: 80, height: 80, alignment: .center)
                            .overlay(
                                RoundedRectangle(cornerRadius: 15).stroke(Color.black, lineWidth: 3)
                                    )
                            .padding(.top,55.0)
                            .padding(.trailing,15.0)
                    }
                    
                    Spacer()
                }

            }

网页内容由stack overflow 提供, 点击上面的
可以查看英文原文,
原文链接