我想要模糊一个视图的背景,但不想必须使用UIKit来实现它(例如:使用UIVisualEffectView)。我查阅了文档,但没有找到合适的方法,看起来似乎不能够将背景限制在范围内并对其应用效果。我是否错了或者方法不对?
10个回答
229
1. 使用原生的SwiftUI方法:
只需在需要模糊效果的任何内容上添加.blur()修饰符,例如:
Image("BG")
   .blur(radius: 20)
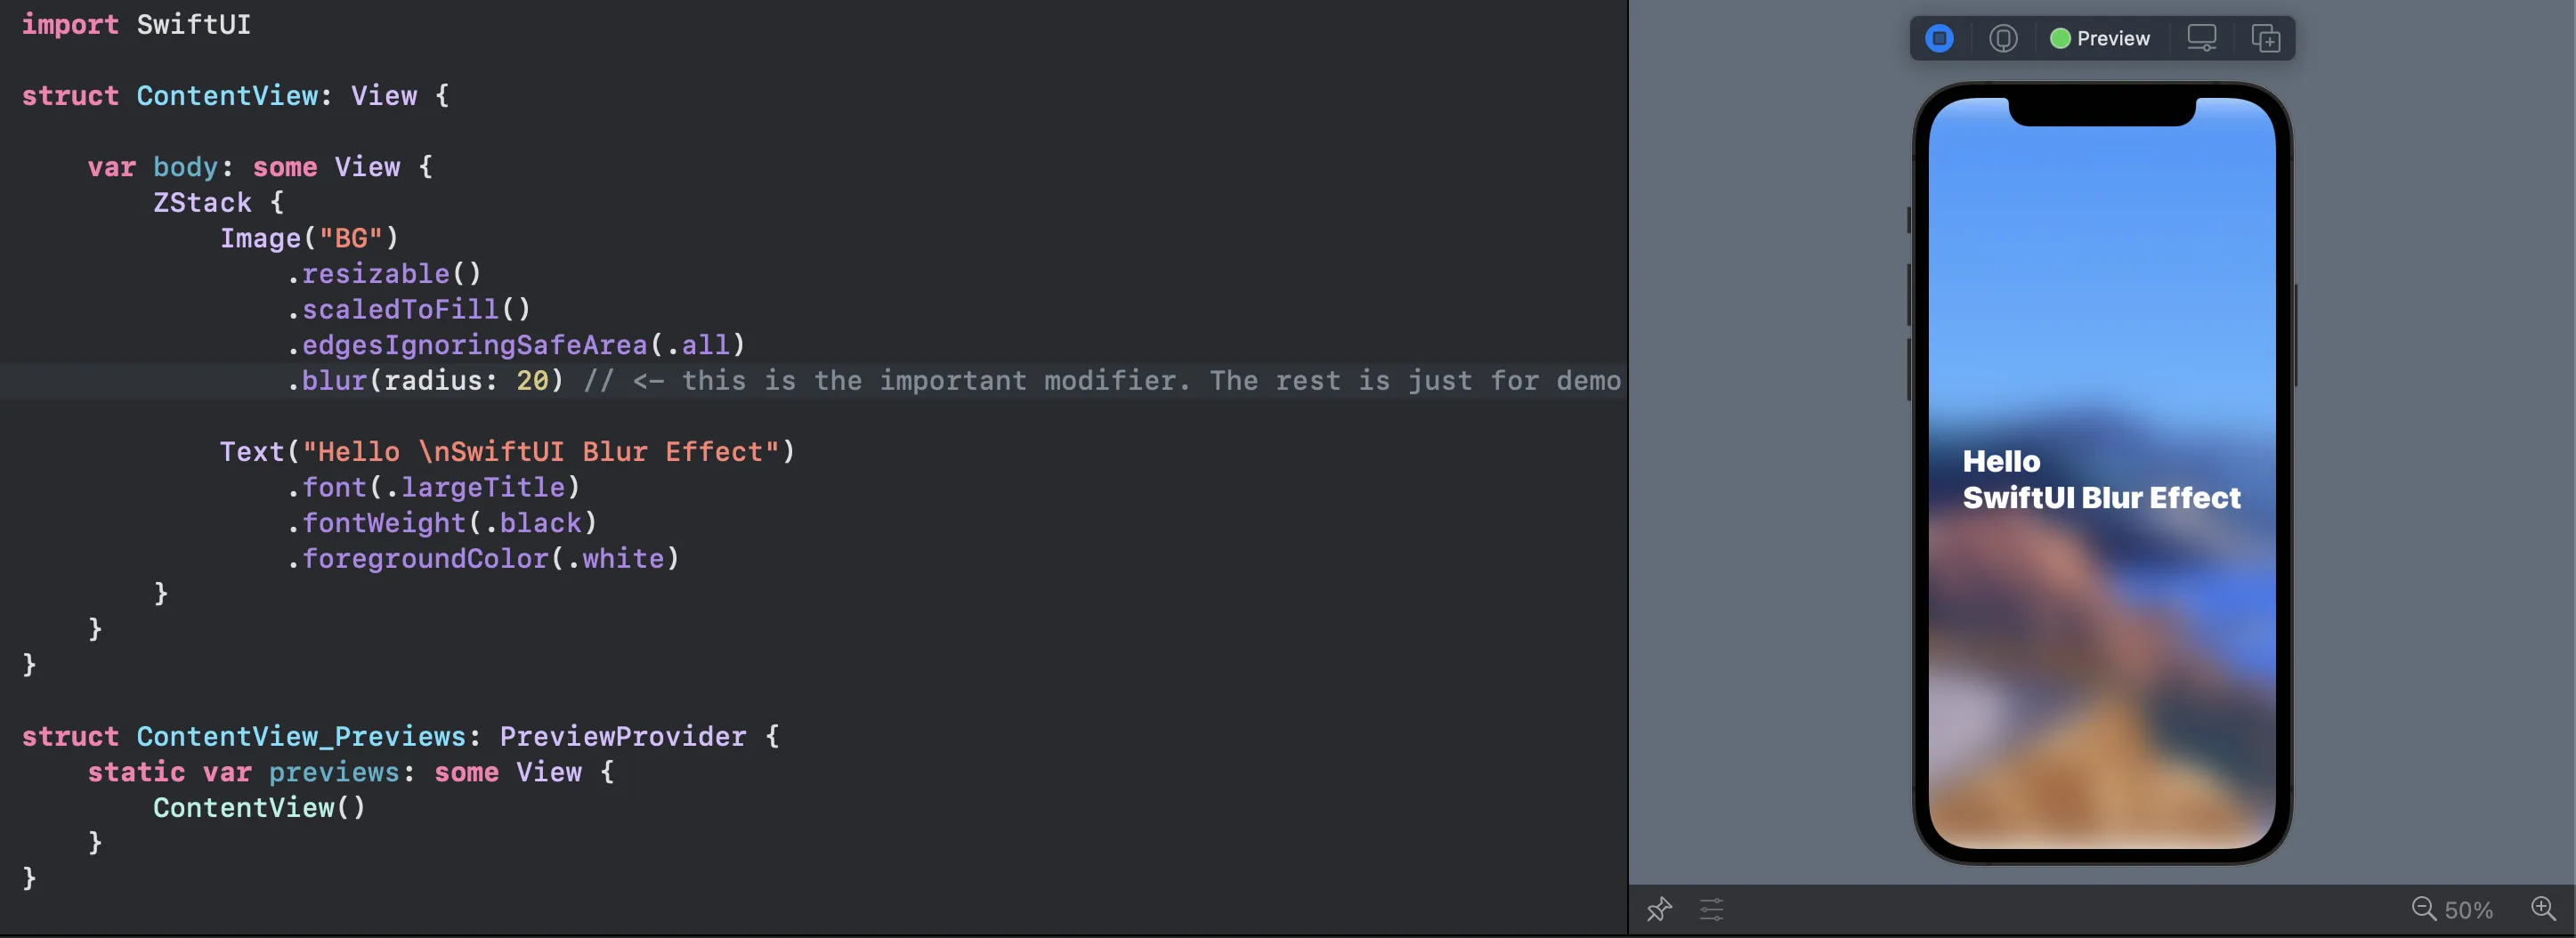 请注意视图的顶部和底部
请注意,您可以将多个视图分组并将它们一起模糊。
2. 视觉效果视图:
您可以从UIKit中带来完美的UIVisualEffectView:
VisualEffectView(effect: UIBlurEffect(style: .dark))
有了这个小结构体:
struct VisualEffectView: UIViewRepresentable {
    var effect: UIVisualEffect?
    func makeUIView(context: UIViewRepresentableContext<Self>) -> UIVisualEffectView { UIVisualEffectView() }
    func updateUIView(_ uiView: UIVisualEffectView, context: UIViewRepresentableContext<Self>) { uiView.effect = effect }
}

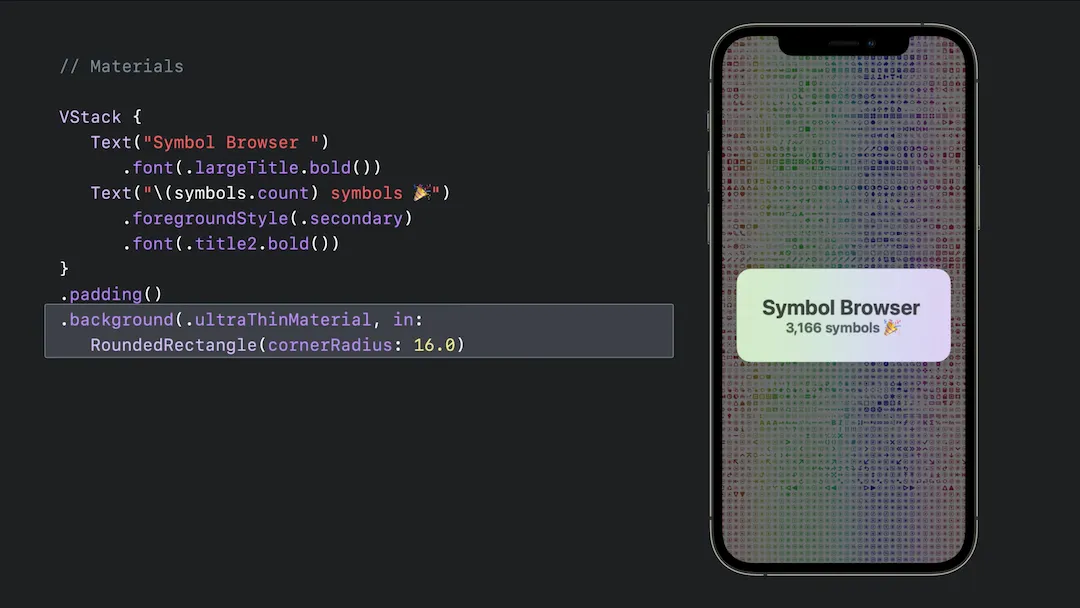
3. iOS 15: 材料
你可以使用一行代码来使用iOS预定义的材料:
.background(.ultraThinMaterial)
- Mojtaba Hosseini
3
29
我还没有找到在SwiftUI中实现这个的方法,但是你可以通过UIViewRepresentable协议来使用UIKit。
struct BlurView: UIViewRepresentable {

    let style: UIBlurEffect.Style

    func makeUIView(context: UIViewRepresentableContext<BlurView>) -> UIView {
        let view = UIView(frame: .zero)
        view.backgroundColor = .clear
        let blurEffect = UIBlurEffect(style: style)
        let blurView = UIVisualEffectView(effect: blurEffect)
        blurView.translatesAutoresizingMaskIntoConstraints = false
        view.insertSubview(blurView, at: 0)
        NSLayoutConstraint.activate([
            blurView.heightAnchor.constraint(equalTo: view.heightAnchor),
            blurView.widthAnchor.constraint(equalTo: view.widthAnchor),
        ])
        return view
    }

    func updateUIView(_ uiView: UIView,
                      context: UIViewRepresentableContext<BlurView>) {

    }

}
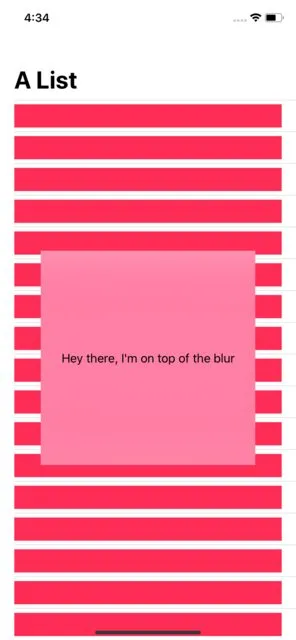
示例:
struct ContentView: View {

    var body: some View {
        NavigationView {
            ZStack {
                List(1...100) { item in
                    Rectangle().foregroundColor(Color.pink)
                }
                .navigationBarTitle(Text("A List"))
                ZStack {
                    BlurView(style: .light)
                        .frame(width: 300, height: 300)
                    Text("Hey there, I'm on top of the blur")

                }
            }
        }
    }

}
我使用了ZStack将视图放在其上方。
ZStack {
 // List
 ZStack {
    // Blurred View
    // Text
 }
}
最终呈现效果如下:
- Matteo Pacini
6
6这会在视图中模糊内容,但我正在寻找一些可以模糊底层内容的东西,就像UI VisualEffectView或navigationController工作方式一样,您可以拥有一个项目来模糊它覆盖的内容,并且仅在BlurringView的框架内,而不是BlurringView的子内容。
我想更像BlendMode的工作方式。 - Sonicjet
1这不就是在做这个吗? - Chad Parker
1如何减少模糊的数量? - Peter Schorn
当我第二次导航到页面时,模糊视图不会出现。这是因为updateUIView函数为空吗? - C.Aglar
太厉害了!它能正常工作 - 如果你使用'systemChromeMaterial'样式,它会模仿菜单栏的模糊/透明效果。干得好。 - FontFamily
能否让模糊视图下面的白线更加清晰可见? - SmoothPoop69
26
最简单的方法是来自Richard Mullinix的这里:
struct Blur: UIViewRepresentable {
    var style: UIBlurEffect.Style = .systemMaterial

    func makeUIView(context: Context) -> UIVisualEffectView {
        return UIVisualEffectView(effect: UIBlurEffect(style: style))
    }

    func updateUIView(_ uiView: UIVisualEffectView, context: Context) {
        uiView.effect = UIBlurEffect(style: style)
    }
}
然后只需要在代码中像背景一样使用它:
    //...
    MyView()
        .background(Blur(style: .systemUltraThinMaterial))
- cyber-bot
11
iOS 15 中的新功能,SwiftUI 提供了一个非常简单的替代方法来实现 UIVisualEffectView,它结合了 ZStack、background() 修饰符以及一系列内置的材料。
ZStack {
    Image("niceLook")

    Text("Click me")
        .padding()
        .background(.thinMaterial)
}
您可以通过使用以下几种材料类型之一来调整您的材料的“厚度”——即背景内容透过的程度。从最薄到最厚,它们依次为:
.ultraThinMaterial
.thinMaterial
.regularMaterial
.thickMaterial
.ultraThickMaterial
- Sh_Khan
1
这正是我很久以前一直在寻找的东西。 - Sonicjet
6
我找到了一个有趣的技巧来解决这个问题。我们可以使用
我没有发现这个技巧有任何副作用。你可以在这里找到我的解决方案:我的 GitHub Gist
UIVisualEffectView 来实时“快照”其背景。但是这个“快照”会应用 UIVisualEffectView 的效果。我们可以使用 UIViewPropertyAnimator 来避免应用这个效果。我没有发现这个技巧有任何副作用。你可以在这里找到我的解决方案:我的 GitHub Gist
代码
/// A View in which content reflects all behind it
struct BackdropView: UIViewRepresentable {

    func makeUIView(context: Context) -> UIVisualEffectView {
        let view = UIVisualEffectView()
        let blur = UIBlurEffect()
        let animator = UIViewPropertyAnimator()
        animator.addAnimations { view.effect = blur }
        animator.fractionComplete = 0
        animator.stopAnimation(false)
        animator.finishAnimation(at: .current)
        return view
    }

    func updateUIView(_ uiView: UIVisualEffectView, context: Context) { }

}

/// A transparent View that blurs its background
struct BackdropBlurView: View {

    let radius: CGFloat

    @ViewBuilder
    var body: some View {
        BackdropView().blur(radius: radius)
    }

}
使用方法
ZStack(alignment: .leading) {
    Image(systemName: "globe")
        .resizable()
        .frame(width: 200, height: 200)
        .foregroundColor(.accentColor)
        .padding()
    BackdropBlurView(radius: 6)
        .frame(width: 120)
}

- Rukh
3
这很好,因为它使用旧的
.blur(radius:),比新的材料样式更能控制模糊的程度。即使是ultraThinMaterial相对于.blur(radius:3)也会有相当大的模糊效果。.blur的正常用法是将其应用于要模糊的视图,但这里的方法提供了一个视图,您可以将其插入到ZStack中并模糊下面的内容。其他实现此功能的方法使用新的(强烈模糊)材料。 - James Toomey很遗憾,它无法达到屏幕边缘以实现全屏效果。 - undefined
1加上
opaque: true 参数到模糊函数里,就搞定了! - undefined6
正如@mojtaba所提到的,当你在设置resizable()和blur()时,在图像顶部看到白色阴影是非常奇怪的。
一个简单的技巧是将图像的 padding 值设为负值。
 var body: some View {

        return
            ZStack {

                Image("background_2").resizable()
                    .edgesIgnoringSafeArea(.all)
                    .blur(radius: 5)
                    .scaledToFill()
                    .padding(-20) //Trick: To escape from white patch @top & @bottom


        }
  }
结果:
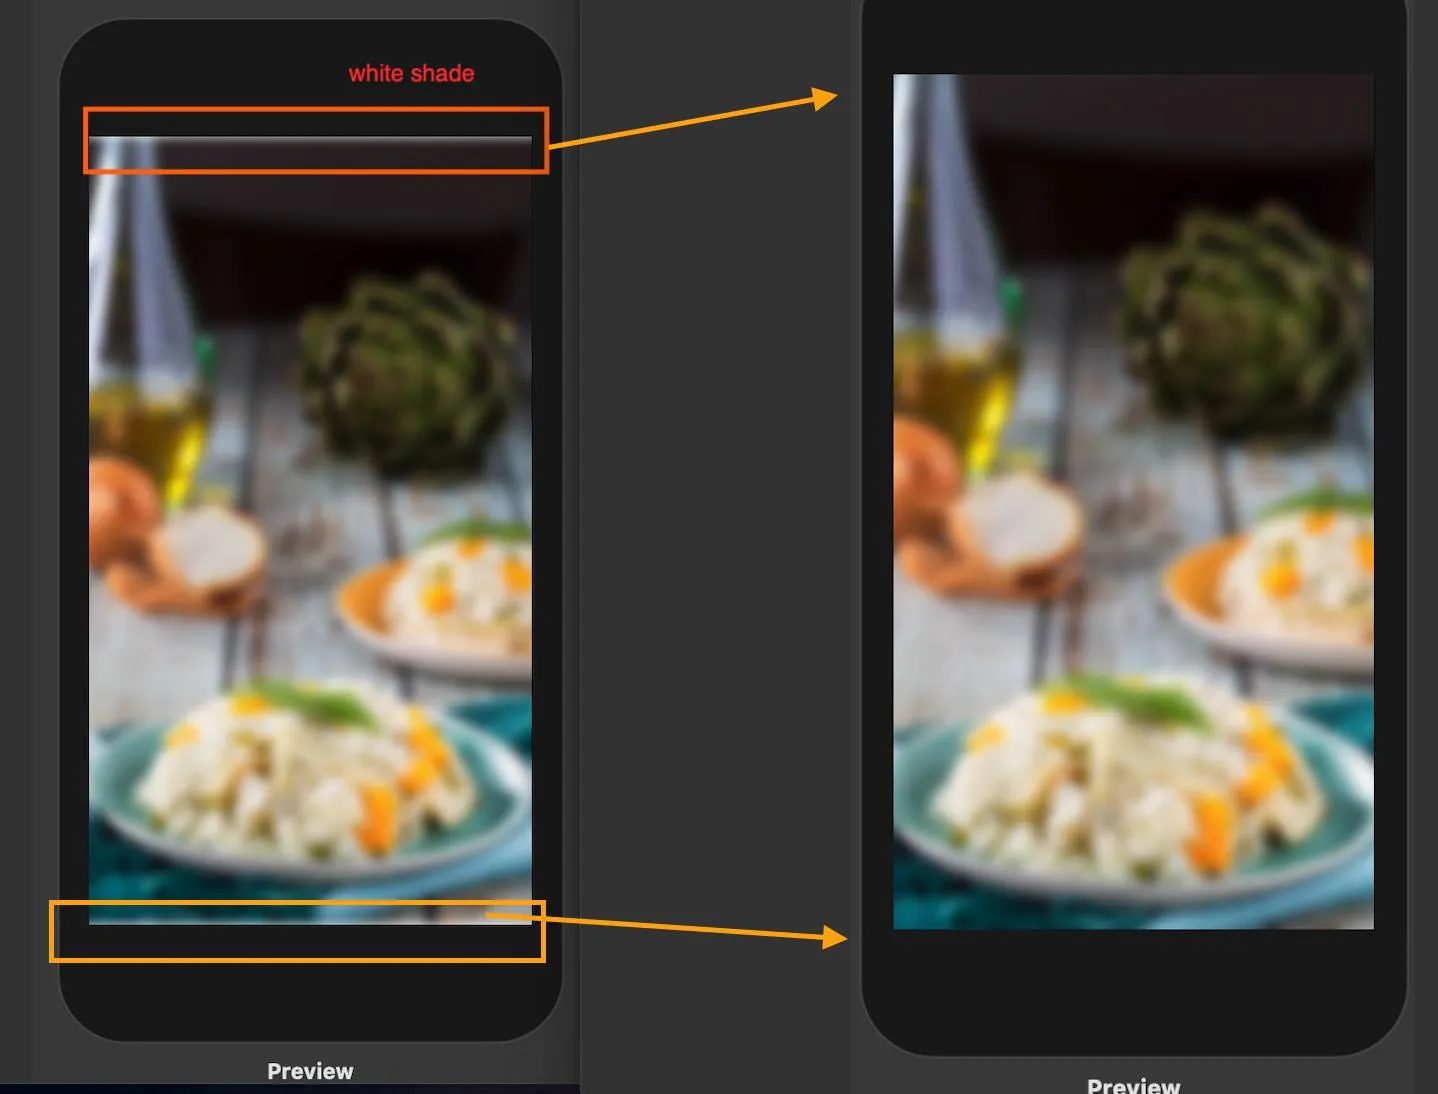
- byJeevan
2
6你可以在
.blur 修饰符中添加另一个参数。如果你使用 .blur(radius: 5, opaque: true),它应该会去除那个白色阴影。 - Gareth Lewis添加一个忽略安全区域的黑色可以修复白色光晕效应。 - S. Kaan Özkaya
2
@State private var amount: CGFLOAT = 0.0

var body: some View {
    VStack{
       Image("Car").resizable().blur(radius: amount, opaque: true)
    }
}
使用“Opaque: true”与模糊功能一起使用可以消除白噪声。
- Sheikh Wahab Mahmood
1
有一个非常有用但不幸的是私有的(感谢苹果)类CABackdropLayer
它可以绘制下面的图层的副本,当使用混合模式或滤镜时我发现它很有用,也可以用于模糊效果
代码
open class UIBackdropView: UIView {

  open override class var layerClass: AnyClass {
    NSClassFromString("CABackdropLayer") ?? CALayer.self
  }
}

public struct Backdrop: UIViewRepresentable {

  public init() {}

  public func makeUIView(context: Context) -> UIBackdropView {
    UIBackdropView()
  }

  public func updateUIView(_ uiView: UIBackdropView, context: Context) {}
}

public struct Blur: View {

  public var radius: CGFloat
  public var opaque: Bool

  public init(radius: CGFloat = 3.0, opaque: Bool = false) {
    self.radius = radius
    self.opaque = opaque
  }

  public var body: some View {
    Backdrop()
      .blur(radius: radius, opaque: opaque)
  }
}
使用方法
struct Example: View {

  var body: some View {
    ZStack {
      YourBelowView()
      YourTopView()
        .background(Blur())
        .background(Color.someColor.opacity(0.4))
    }
  }
}
来源
- Данил Войдилов
0
有时候我们需要一个透明模糊效果。这里将提供一个解决方案。
struct TransparentBlurView: UIViewRepresentable {
    typealias UIViewType = UIVisualEffectView

    func makeUIView(context: Context) -> UIVisualEffectView {
        let view = UIVisualEffectView(effect: UIBlurEffect(style: .systemUltraThinMaterialLight))

        return view
    }

    func updateUIView(_ uiView: UIVisualEffectView, context: Context) {
        DispatchQueue.main.async {
            if let backdropLayer  = uiView.layer.sublayers?.first {
                backdropLayer.filters?.removeAll(where: { filter in
                    String(describing: filter) != "gaussianBlur"
                })
            }
        }
    }
}
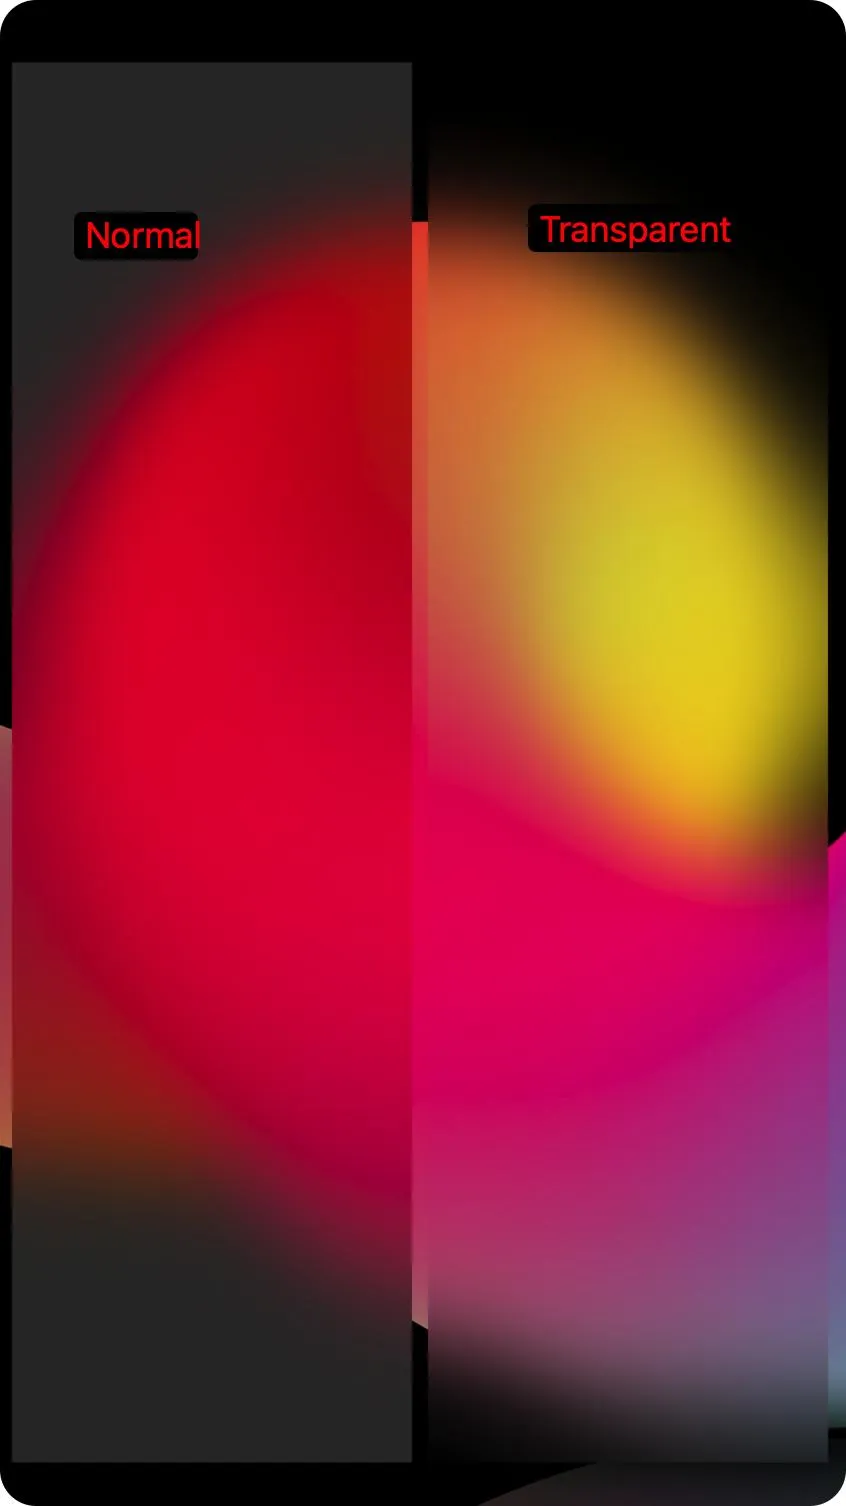
- ZYiOS
-2
Button("Test") {}
        .background(Rectangle().fill(Color.red).blur(radius: 20))
- Fatemeh
网页内容由stack overflow 提供, 点击上面的可以查看英文原文,
原文链接
原文链接
- 相关问题
- 5 如何在SwiftUI中设置背景模糊效果?
- 4 在SwiftUI中,是否有一种方法可以更改字符串中特殊字符的颜色?
- 3 是否有一种方法在自定义的SwiftUI ButtonStyle中设置字体追踪(即间距)?
- 8 如何在SwiftUI的macOS应用程序中模糊背景?
- 9 是否有一种方法可以在显示计时器时使SwiftUI文本标签保持不会轻微移动?
- 7 有没有一种方法可以在SwiftUI中更改List的背景颜色?2020(iOS 14)
- 11 SwiftUI:是否有一种方法将按钮放在另一个按钮内部?
- 7 在SwiftUI中是否有一种方法可以无动画地关闭模态视图?
- 3 在Realm数据库中是否有一种方法可以更改数据类型?
- 3 在SwiftUI中,是否有一种方法可以根据一个可选绑定是否有值返回不同的视图?
Material背景的模糊颜色。 - JAHelia