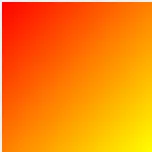
这里是在Paint事件中使用多色LinearGradientBrush的示例:
LinearGradientBrush linearGradientBrush =
   new LinearGradientBrush(panel4.ClientRectangle, Color.Red, Color.Yellow, 45);

ColorBlend cblend = new ColorBlend(3);
cblend.Colors = new Color[3]  { Color.Red, Color.Yellow, Color.Green };
cblend.Positions = new float[3] { 0f, 0.5f, 1f };

linearGradientBrush.InterpolationColors = cblend;

e.Graphics.FillRectangle(linearGradientBrush, panel4.ClientRectangle);
您可以自由地改变颜色的数量、角度或停止点的分布。只需确保你始终拥有相同数量的颜色和停止点,并让它们从0开始,到1结束。
构造函数中的颜色被忽略了,顺便说一下。
要获取点击颜色,您可以编写 MouseClick 代码:
Color clickedColor = Color.Empty;

private void panel_MouseClick(object sender, MouseEventArgs e)
{
    using (Bitmap bmp = new Bitmap( panel.ClientSize.Width, panel4.ClientSize.Height))
    {
        panel.DrawToBitmap(bmp,panel.ClientRectangle);
        clickedColor = bmp.GetPixel(e.X, e.Y);
    }
}
如果您想捕获许多点击,最好将
Bitmap保存为类级变量,而不是每次重新创建它。将其设置为面板的背景图像(如Kala的答案所假定的那样)也是一个好选择。
这应该回答了标题中的问题。但是,您的第一张图片并没有展示出三种颜色的渐变效果,它展示了一种带有四种颜色的二维渐变效果。对于这种更昂贵的着色方法,您应该将颜色放在
Bitmap中,并将其设置为
Panel的
BackgroundImage。
更新1:这是一个创建2D渐变的代码片段:
Bitmap Gradient2D(Rectangle r, Color c1, Color c2, Color c3, Color c4)
{
    Bitmap bmp = new Bitmap(r.Width, r.Height);

    float delta12R = 1f * (c2.R - c1.R) / r.Height;
    float delta12G = 1f * (c2.G - c1.G) / r.Height;
    float delta12B = 1f * (c2.B - c1.B) / r.Height;
    float delta34R = 1f * (c4.R - c3.R) / r.Height;
    float delta34G = 1f * (c4.G - c3.G) / r.Height;
    float delta34B = 1f * (c4.B - c3.B) / r.Height;
    using (Graphics G = Graphics.FromImage(bmp) )
    for (int y = 0; y < r.Height; y++)
    {
        Color c12 = Color.FromArgb(255,  c1.R + (int)(y * delta12R),
              c1.G + (int)(y * delta12G), c1.B + (int)(y * delta12B));
        Color c34 = Color.FromArgb(255, c3.R + (int)(y * delta34R),
              c3.G + (int)(y * delta34G), c3.B + (int)(y * delta34B));
        using ( LinearGradientBrush lgBrush = new LinearGradientBrush(
              new Rectangle(0,y,r.Width,1), c12, c34, 0f) )
        {  G.FillRectangle(lgBrush, 0, y, r.Width, 1);  }
    }
    return bmp;
}
以下是使用方法:
    public Form1()
    {
        InitializeComponent();
        panel.BackgroundImage = Gradient2D(panel.ClientRectangle,
               Color.Black, Color.FromArgb(255, 0, 255, 0), Color.Red, Color.Yellow);
    }
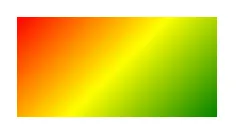
这使用简单的LinearGradientBrushes,没有额外的颜色列表沿着Panel的高度向下。
请注意,Color.Green是相当暗的色调,所以我使用FromRgb来获得更亮的绿色。如果您的Panel大于256像素,您可能希望通过填充更大的条纹来进行优化;如果它是垂直的,您可能希望更改循环以遍历x而不是y。
这是结果:
现在,要通过单击选择颜色,只需从BackgroundImage中读取颜色:
private void panel_MouseClick(object sender, MouseEventArgs e)
{
    clickedColor = ((Bitmap)panel.BackgroundImage).GetPixel(e.X, e.Y);
}
更新2:
在查看此MSDN页面时,我们可以发现实际上有一个内置工具可用于创建2D渐变。
它是PathGradientBrush
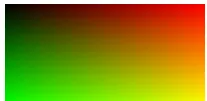
以下是一个示例..:
.. 和代码:
Bitmap Gradient2D(Rectangle r, Color c1, Color c2, Color c3, Color c4)
{
    List<Color> colors = new List<Color> {  c1, c3, c4, c2 };
    Bitmap bmp = new Bitmap(r.Width, r.Height);
    using (Graphics g = Graphics.FromImage(bmp))
    for (int y = 0; y < r.Height; y++)
    {

        using (PathGradientBrush pgb = new PathGradientBrush(getCorners(r).ToArray()))
        {
            pgb.CenterColor = medianColor(colors);
            pgb.SurroundColors = colors.ToArray();
            g.FillRectangle(pgb, 0, y, r.Width, 1);
        }
    }
    return bmp;
}
这个使用了两个简单的辅助函数。一个返回矩形的角点:
public List<PointF> getCorners(RectangleF r)
{
    return new List<PointF>() { r.Location, new PointF(r.Right, r.Top),
        new PointF(r.Right, r.Bottom), new PointF(r.Left, r.Bottom)};
}
另一个计算从List<Color>中的中间颜色作为CenterColor.
public static Color medianColor(List<Color> cols)
{
    int c = cols.Count;
    return Color.FromArgb(cols.Sum(x => x.A) / c, cols.Sum(x => x.R) / c,
        cols.Sum(x => x.G) / c, cols.Sum(x => x.B) / c);
}
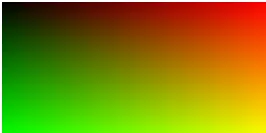
结果与使用线性渐变刷子(LinearGradientBrushes)条纹的结果几乎相同。这种方法更简单,性能应该更好;显然这是我推荐的方法。
请注意颜色(或角落)的顺序已经更改!SurroundColors 应用于矩形相对的角落。
注意:
在研究该页面时,您会发现实际上有四个不同的用途适用于该刷子。
它们在设置方式(GraphicsPath 或 Point[])、要填充的颜色集合(SurroundColors 或 InterpolationColors.Colors)以及如何调用它(使用形状或路径)方面不同。而且结果也非常不同。
还要注意,尽管提供了所有四种方法的代码,但只显示了其中三种结果!