我正在使用ConstraintLayout v 1.0.1。
我想在我的xml中包含一个子ConstraintLayout,对应于我的全局布局的一部分(这个全局布局本身是一个ConstraintLayout)。我将布局拆分为两个xml文件,以便在其他地方使用这个子部分。
我尝试过这样做,但我无法控制在父元素中放置我的子constraint layout的位置。我想知道我是否必须将所有内容放在同一个xml文件中,或者是否有一个解决方案可以使用单独的文件。
tmp_1.xml
<android.support.constraint.ConstraintLayout
    xmlns:android="http://schemas.android.com/apk/res/android"
    xmlns:app="http://schemas.android.com/apk/res-auto"
    android:orientation="vertical"
    android:layout_width="match_parent"
    android:layout_height="match_parent"
    >
    <TextView
        android:id="@+id/label"
        android:layout_width="wrap_content"
        android:layout_height="wrap_content"
        android:text="LABEL1"
        app:layout_constraintStart_toStartOf="parent"
        app:layout_constraintEnd_toEndOf="parent"
        app:layout_constraintTop_toTopOf="parent"
        android:layout_marginTop="16dp"
        />
    <TextView
        android:id="@+id/label_2"
        android:layout_width="wrap_content"
        android:layout_height="wrap_content"
        android:text="LABEL2"
        app:layout_constraintStart_toStartOf="@id/label"
        app:layout_constraintEnd_toEndOf="@id/label"
        app:layout_constraintTop_toBottomOf="@id/label"
        android:layout_marginTop="16dp"
        />

    <include layout="@layout/tmp_2" />
</android.support.constraint.ConstraintLayout>
tmp_2.xml
<android.support.constraint.ConstraintLayout
    xmlns:android="http://schemas.android.com/apk/res/android"
    xmlns:app="http://schemas.android.com/apk/res-auto"
    android:orientation="vertical"
    android:layout_width="match_parent"
    android:layout_height="wrap_content"
    >
    <TextView
        android:id="@+id/view_80"
        android:layout_width="wrap_content"
        android:layout_height="wrap_content"
        android:text="80th element"
        app:layout_constraintStart_toStartOf="parent"
        app:layout_constraintTop_toTopOf="parent"
        android:layout_marginTop="10dp"
        android:layout_marginStart="12dp"
        />
</android.support.constraint.ConstraintLayout>
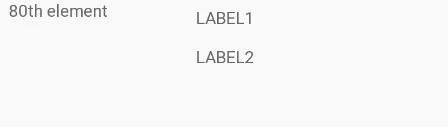
结果是这样的
但我希望它变成这样

我尝试了这个,但它不起作用
<include
    app:layout_constraintTop_toBottomOf="@id/label_2"
    layout="@layout/tmp_2" />