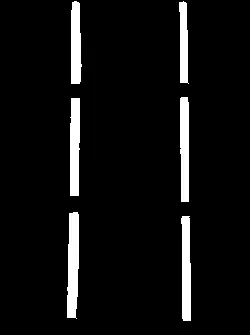
一种方法是使用cv::inRange()函数对输入图像进行阈值处理:
cv::Mat image = cv::imread(argv[1]);
if (image.empty())
{
std::cout << "!!! Failed imread()" << std::endl;
return -1;
}
cv::Mat red_image;
cv::inRange(image, cv::Scalar(40, 0, 180), cv::Scalar(135, 110, 255), red_image);
输出:
我们可以使用 cv::findContours 来检索阈值图像的轮廓,以便能够为它们创建边界框,这是一种在此处描述的技术。
std::vector<std::vector<cv::Point> > contours;
std::vector<cv::Vec4i> hierarchy;
cv::findContours( red_image,
contours,
hierarchy,
CV_RETR_TREE,
CV_CHAIN_APPROX_SIMPLE,
cv::Point(0, 0) );
std::vector<std::vector<cv::Point> > contours_poly( contours.size() );
std::vector<cv::Rect> boundRect( contours.size() );
for( int i = 0; i < contours.size(); i++ )
{
cv::approxPolyDP( cv::Mat(contours[i]), contours_poly[i], 3, true );
boundRect[i] = cv::boundingRect( cv::Mat(contours_poly[i]) );
}
输出:

上图中展示的所有矩形都以 boundRect 向量中的 cv::Rect 对象的形式存储。每个 矩形 都由2个相反的 cv::Point 对象组成,因此我们迭代该向量以创建一个仅由 cv::Point 对象组成的新向量:
std::vector<cv::Point> rect_points;
for( int i = 0; i < contours.size(); i++ )
{
rect_points.push_back(boundRect[i].tl());
rect_points.push_back(boundRect[i].br());
}
cv::Mat drawing = image.clone();
寻找白色方块的逻辑是:假设距离在25x25以内的两个像素定义了一个白色方块:
for( int i = 0; i < rect_points.size(); i++ )
{
for( int j = 0; j < rect_points.size(); j++ )
{
if (i == j)
continue;
int x_distance = (rect_points[i].x - rect_points[j].x);
if (x_distance < 0)
x_distance *= -1;
int y_distance = (rect_points[i].y - rect_points[j].y);
if (y_distance < 0)
y_distance *= -1;
if ( (x_distance < 25) && (y_distance < 25) )
{
std::cout << "Drawing rectangle " << i << " from "
<< rect_points[i] << " to " << rect_points[j]
<< " distance: " << x_distance << "x" << y_distance << std::endl;
cv::rectangle( drawing,
rect_points[i],
rect_points[j],
cv::Scalar(255, 50, 0),
2 );
break;
}
}
}
cv::imshow("white rectangles", drawing);
cv::waitKey();
输出:
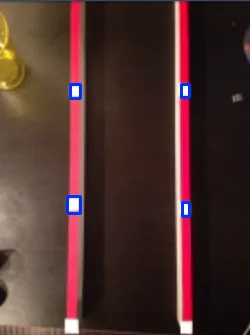
该算法比较基础,因为下方没有红色的墙壁,只有上方的墙壁,所以错过了底部的2个白色正方形。
因此,我把改进这种方法的任务交给你 :)
祝你好运。