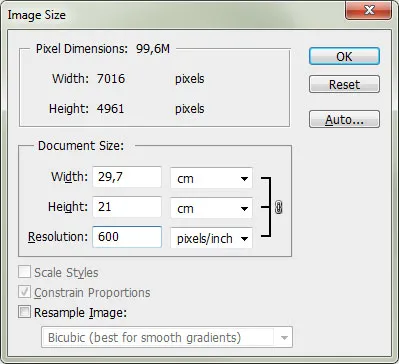
我已经计算出,如果我想要生成的图像是A4纸大小@ 600dpi,用于打印目的,它需要是7016x4961px @ 72dpi。因此,我通过编程生成它,然后在Photoshop中进行测试,看起来很好,所以如果我调整大小,它会得到正确的大小和分辨率。
 .
.
我想知道的是是否可以通过编程方式进行此调整大小,最好使用PIL,但不一定非要使用它。我需要将其提高DPI。
我已经计算出,如果我想要生成的图像是A4纸大小@ 600dpi,用于打印目的,它需要是7016x4961px @ 72dpi。因此,我通过编程生成它,然后在Photoshop中进行测试,看起来很好,所以如果我调整大小,它会得到正确的大小和分辨率。
.
我想知道的是是否可以通过编程方式进行此调整大小,最好使用PIL,但不一定非要使用它。我需要将其提高DPI。
from PIL import Image

im = Image.open("test.png")
im.save("test-600.png", dpi=(600,600))
这段代码使用PIL将PNG图像调整为7016x4961:
size = 7016, 4961
im = Image.open("my_image.png")
im_resized = im.resize(size, Image.ANTIALIAS)
im_resized.save("my_image_resized.png", "PNG")
也许更好的方法是在打印之前将你的画布放大 x 倍,其中 x 是你需要确定的因子 (对于这个特定图像的大小为7016x4961)。
以下是如何批量调整大小(按文件夹)并跳过其他文件类型和 Mac 系统文件(如 .DS_Store)的方法
from PIL import Image
import os

Image.MAX_IMAGE_PIXELS = None

path = "./*your-source-folder*"

resize_ratio = 2  # where 0.5 is half size, 2 is double size


def resize_aspect_fit():
    dirs = os.listdir(path)
    for item in dirs:
        print(item)
        if item == '.DS_Store':
            continue

        if item == 'Icon\r':
            continue

        if item.endswith(".mp4"):
            continue

        if item.endswith(".txt"):
            continue

        if item.endswith(".db"):
            continue

        if os.path.isfile(path+item):
            image = Image.open(path+item)
            file_path, extension = os.path.splitext(path+item)
            new_image_height = int(image.size[0] / (1/resize_ratio))
            new_image_length = int(image.size[1] / (1/resize_ratio))

            image = image.resize((new_image_height, new_image_length), Image.ANTIALIAS)

            image.save("./*your-output-folder*/" + item)


resize_aspect_fit()