锐化掩模
如果您想要绘制一个由形状(或一系列形状)组成的路径,作为另一个形状中的孔,关键几乎总是使用“奇偶环绕规则”。
来自Cocoa绘图指南的环绕规则部分:
环绕规则只是一种算法,用于跟踪组成路径整体填充区域的每个连续区域的信息。从给定区域内的点到任何在路径边界外的点绘制射线,然后使用确定区域是否应该填充的规则解释穿过的路径线的总数(包括隐式线)和每条路径线的方向。
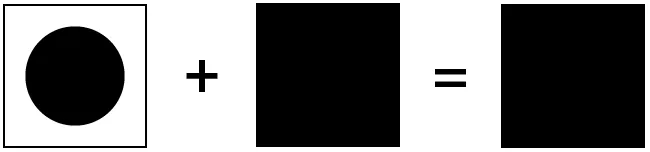
我明白仅有描述可能不是很有帮助,因为缺少上下文和图表解释,所以我建议您阅读我提供的链接。为了创建我们的圆形遮罩层,以下图表描述了甚至/奇偶填充规则允许我们完成的内容:
非零填充规则
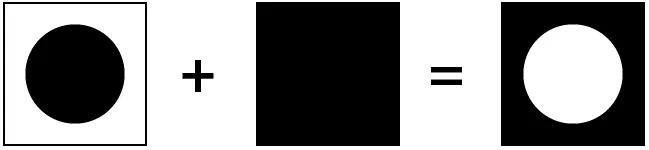
奇偶数填充规则
现在,我们只需要使用
CAShapeLayer创建半透明遮罩,用户可以通过交互重新定位、扩大和收缩。
代码
#import <QuartzCore/QuartzCore.h>
@interface ViewController ()
@property (strong, nonatomic) IBOutlet UIImageView *imageView;
@property (strong) CAShapeLayer *blurFilterMask;
@property (assign) CGPoint blurFilterOrigin;
@property (assign) CGFloat blurFilterDiameter;
@end
@implementation ViewController
- (void)beginBlurMasking
{
self.blurFilterOrigin = self.imageView.center;
self.blurFilterDiameter = MIN(CGRectGetWidth(self.imageView.bounds), CGRectGetHeight(self.imageView.bounds));
CAShapeLayer *blurFilterMask = [CAShapeLayer layer];
blurFilterMask.actions = [[NSDictionary alloc] initWithObjectsAndKeys:[NSNull null], @"path", nil];
blurFilterMask.fillColor = [UIColor blackColor].CGColor;
blurFilterMask.fillRule = kCAFillRuleEvenOdd;
blurFilterMask.frame = self.imageView.bounds;
blurFilterMask.opacity = 0.5f;
self.blurFilterMask = blurFilterMask;
[self refreshBlurMask];
[self.imageView.layer addSublayer:blurFilterMask];
UITapGestureRecognizer *tapGesture = [[UITapGestureRecognizer alloc] initWithTarget:self action:@selector(handleTap:)];
[self.imageView addGestureRecognizer:tapGesture];
UIPinchGestureRecognizer *pinchGesture = [[UIPinchGestureRecognizer alloc] initWithTarget:self action:@selector(handlePinch:)];
[self.imageView addGestureRecognizer:pinchGesture];
}
- (void)handleTap:(UITapGestureRecognizer *)sender
{
self.blurFilterOrigin = [sender locationInView:self.imageView];
[self refreshBlurMask];
}
- (void)handlePinch:(UIPinchGestureRecognizer *)sender
{
self.blurFilterDiameter += sender.velocity;
[self refreshBlurMask];
}
- (void)refreshBlurMask
{
CGFloat blurFilterRadius = self.blurFilterDiameter * 0.5f;
CGMutablePathRef blurRegionPath = CGPathCreateMutable();
CGPathAddRect(blurRegionPath, NULL, self.imageView.bounds);
CGPathAddEllipseInRect(blurRegionPath, NULL, CGRectMake(self.blurFilterOrigin.x - blurFilterRadius, self.blurFilterOrigin.y - blurFilterRadius, self.blurFilterDiameter, self.blurFilterDiameter));
self.blurFilterMask.path = blurRegionPath;
CGPathRelease(blurRegionPath);
}
...
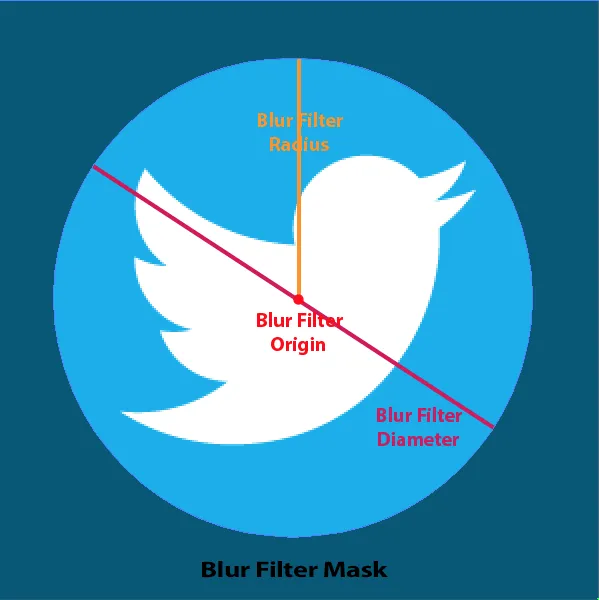
(这个图表可能有助于理解代码中的命名约定)
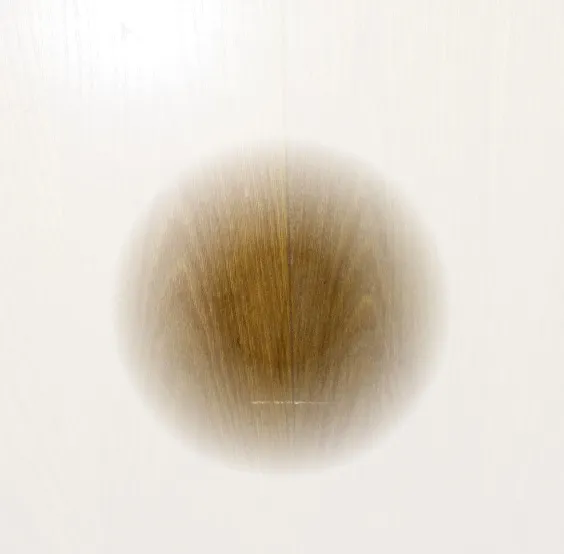
渐变蒙版
Quartz 2D编程指南的渐变部分详细介绍了如何绘制径向渐变,我们可以使用它来创建具有羽化边缘的蒙版。这涉及通过子类化或实现其绘图委托直接绘制CALayer的内容。在这里,我们对其进行子类化以封装与其相关的数据,即起点和直径。
代码
BlurFilterMask.h
#import <QuartzCore/QuartzCore.h>
@interface BlurFilterMask : CALayer
@property (assign) CGPoint origin;
@property (assign) CGFloat diameter;
@end
BlurFilterMask.m
#import "BlurFilterMask.h"
CGFloat const GRADIENT_WIDTH = 50.0f;
@implementation BlurFilterMask
- (void)drawInContext:(CGContextRef)context
{
CGFloat clearRegionRadius = self.diameter * 0.5f;
CGFloat blurRegionRadius = clearRegionRadius + GRADIENT_WIDTH;
CGColorSpaceRef baseColorSpace = CGColorSpaceCreateDeviceRGB();
CGFloat colours[8] = { 0.0f, 0.0f, 0.0f, 0.0f,
0.0f, 0.0f, 0.0f, 0.5f };
CGFloat colourLocations[2] = { 0.0f, 0.4f };
CGGradientRef gradient = CGGradientCreateWithColorComponents (baseColorSpace, colours, colourLocations, 2);
CGContextDrawRadialGradient(context, gradient, self.origin, clearRegionRadius, self.origin, blurRegionRadius, kCGGradientDrawsAfterEndLocation);
CGColorSpaceRelease(baseColorSpace);
CGGradientRelease(gradient);
}
@end
ViewController.m(无论您在何处实现模糊过滤器遮罩功能)
#import "ViewController.h"
#import "BlurFilterMask.h"
#import <QuartzCore/QuartzCore.h>
@interface ViewController ()
@property (strong, nonatomic) IBOutlet UIImageView *imageView;
@property (strong) BlurFilterMask *blurFilterMask;
@end
@implementation ViewController
- (void)beginBlurMasking
{
BlurFilterMask *blurFilterMask = [BlurFilterMask layer];
blurFilterMask.diameter = MIN(CGRectGetWidth(self.imageView.bounds), CGRectGetHeight(self.imageView.bounds));
blurFilterMask.frame = self.imageView.bounds;
blurFilterMask.origin = self.imageView.center;
blurFilterMask.shouldRasterize = YES;
[self.imageView.layer addSublayer:blurFilterMask];
[blurFilterMask setNeedsDisplay];
self.blurFilterMask = blurFilterMask;
UITapGestureRecognizer *tapGesture = [[UITapGestureRecognizer alloc] initWithTarget:self action:@selector(handleTap:)];
[self.imageView addGestureRecognizer:tapGesture];
UIPinchGestureRecognizer *pinchGesture = [[UIPinchGestureRecognizer alloc] initWithTarget:self action:@selector(handlePinch:)];
[self.imageView addGestureRecognizer:pinchGesture];
}
- (void)handleTap:(UITapGestureRecognizer *)sender
{
self.blurFilterMask.origin = [sender locationInView:self.imageView];
[self.blurFilterMask setNeedsDisplay];
}
- (void)handlePinch:(UIPinchGestureRecognizer *)sender
{
self.blurFilterMask.diameter += sender.velocity;
[self.blurFilterMask setNeedsDisplay];
}
...
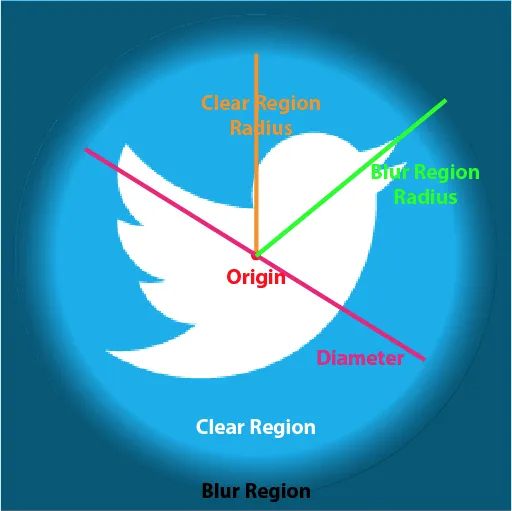
(这个图表可能有助于理解代码中的命名约定)
注意
确保承载图像的UIImageView的multipleTouchEnabled属性设置为YES/true:

注意
为了清晰地回答问题,本答案继续使用最初使用的命名约定。这可能会对他人造成轻微的误导。在这种情况下,“掩码”不是指图像掩码,而是更一般意义上的掩码。本答案不使用任何图像掩码操作。
 而且非常重要的是以良好的性能获得此效果,我成功地使用