如何给圆形UIImageView或UIView添加阴影?

22

我正在尝试制作一个圆形的 UIImageView,并且它成功了。以下是我使用的方法:

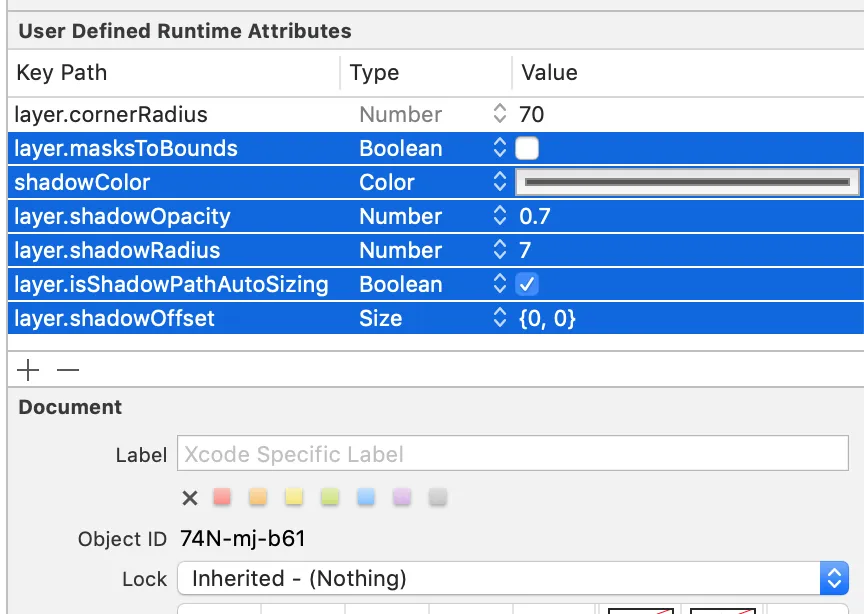
[self.pic.layer setMasksToBounds:YES];
[self.pic.layer setCornerRadius:50.0];

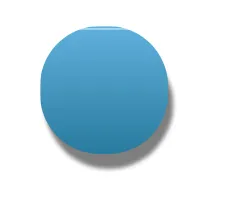
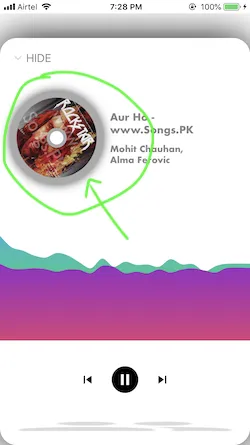
我想给UIImageView添加一些阴影。下面的代码确实给我的图像视图添加了一些阴影,但是图像视图会变回正方形。有人可以给我一些指点来解决这个问题吗?以下是我用来添加阴影的代码:

self.pic.layer.shadowColor = [UIColor purpleColor].CGColor;
self.pic.layer.shadowOffset = CGSizeMake(0, 1);
self.pic.layer.shadowOpacity = 1;
self.pic.layer.shadowRadius = 1.0;
self.pic.clipsToBounds = NO;
6个回答

51

使用CALayershadowPath属性,并添加一个带有圆角矩形的UIBezierPath

self.pic.layer.shadowPath = [UIBezierPath bezierPathWithRoundedRect:self.pic.frame cornerRadius:50.0].CGPath;

编辑

对于近似正方形的图像视图,此技术不能直接使用,因为当你设置 clipsToBounds = NO 来显示阴影时,图像视图会回到正方形。原因是这会移除圆角的裁剪,其中 imageViewcontainer 的子视图。

解决方法:
将您的图像视图添加到一个容器视图中,然后将层阴影应用于该容器。以下是我尝试过的代码:

[self.imageView.layer setCornerRadius:60.0];
[self.imageView.layer setMasksToBounds:YES];
self.imageView.clipsToBounds = YES;

self.container.backgroundColor = [UIColor clearColor];
self.container.layer.shadowColor = [UIColor blackColor].CGColor;
self.container.layer.shadowOffset = CGSizeMake(5,15);
self.container.layer.shadowOpacity = 0.5;
self.container.layer.shadowRadius = 2.0;
self.container.layer.shadowPath = [UIBezierPath bezierPathWithRoundedRect:self.container.bounds cornerRadius:100.0].CGPath;

最终效果如截图所示,

enter image description here


1
我已经将你建议的代码行添加到我的代码中,但它没有起作用。你能详细说明如何使用上面的代码吗?谢谢。 - Newbie
请注意,当他说“将您的ImageView添加到容器视图中”时,他指的是将其作为普通UIView的子视图添加;使用IB的“容器视图”对象会使事情变得复杂。 - mkc842
阴影半径如何影响实际的圆形阴影? - CoderNinja

6

没有容器但有背景视图,这是我的两分钱意见。

作为一个Swift 2.2扩展

    image?.applyCircleShadow(5, shadowOpacity: 1)

extension UIView {
    func applyCircleShadow(shadowRadius: CGFloat = 2,
                           shadowOpacity: Float = 0.3,
                           shadowColor: CGColor = UIColor.blackColor().CGColor,
                           shadowOffset: CGSize = CGSize.zero) {
        layer.cornerRadius = frame.size.height / 2
        layer.masksToBounds = false
        layer.shadowColor = shadowColor
        layer.shadowOffset = shadowOffset
        layer.shadowRadius = shadowRadius
        layer.shadowOpacity = shadowOpacity
    }
}
extension UIImageView {
    override func applyCircleShadow(shadowRadius: CGFloat = 2,
                                    shadowOpacity: Float = 0.3,
                                    shadowColor: CGColor = UIColor.blackColor().CGColor,
                                    shadowOffset: CGSize = CGSize.zero) {

        // Use UIImageView.hashvalue as background view tag (should be unique)
        let background: UIView = superview?.viewWithTag(hashValue) ?? UIView()
        background.frame = frame
        background.backgroundColor = backgroundColor
        background.tag = hashValue
        background.applyCircleShadow(shadowRadius, shadowOpacity: shadowOpacity, shadowColor: shadowColor, shadowOffset: shadowOffset)
        layer.cornerRadius = background.layer.cornerRadius
        layer.masksToBounds = true
        superview?.insertSubview(background, belowSubview: self)
    }
}

很棒的解决方案,但我不知道为什么在7+的情况下它不起作用。 - Fayza Nawaz

3

如果有人需要适用于Swift 3或4的解决方案:

    let imageSize: CGFloat = 64.0

    // Create a container which has a shadow
    let imageCotainer = UIView(frame: CGRect(x: 0, y: 0, width: imageSize, height: imageSize))
    imageCotainer.clipsToBounds = false
    imageCotainer.layer.shadowColor = UIColor.black.cgColor
    imageCotainer.layer.shadowOpacity = 0.2
    imageCotainer.layer.shadowOffset = CGSize(width: 0, height: 1)
    imageCotainer.layer.shadowRadius = 2

    // Create an image view that will be inserted into the container view
    let imageView = UIImageView(frame: imageCotainer.bounds)
    imageView.image = yourImage
    imageView.clipsToBounds = true
    let cornerRadius = imageView.frame.height / 2
    imageView.layer.cornerRadius = cornerRadius

    // Draw a shadow
    imageCotainer.layer.shadowPath = UIBezierPath(roundedRect: imageCotainer.bounds, cornerRadius: cornerRadius).cgPath
    // Add image into container
    imageCotainer.addSubview(imageView)

有时候你需要为容器内的图片设置约束条件,但在某些情况下也可以不设置。但如果没有设置的话,就需要添加以下内容:

    // Set constraints for the image inside the container view
    imageView.translatesAutoresizingMaskIntoConstraints = false
    imageView.topAnchor.constraint(equalTo: imageCotainer.topAnchor).isActive = true
    imageView.leftAnchor.constraint(equalTo: imageCotainer.leftAnchor).isActive = true
    imageView.rightAnchor.constraint(equalTo: imageCotainer.rightAnchor).isActive = true
    imageView.bottomAnchor.constraint(equalTo: imageCotainer.bottomAnchor).isActive = true
    imageView.heightAnchor.constraint(equalToConstant: imageSize).isActive = true
    imageView.widthAnchor.constraint(equalToConstant: imageSize).isActive = true

1
我创建了自定义类(Swift 3或4),它运行得非常好:
class RoundShadowImageView: RoundView {

    var imageView = RoundImageView()

    var image: UIImage!  {
        didSet {
            imageView.image = image
        }
    }

    override init(frame: CGRect) {
        super.init(frame: frame)
        addSubview(imageView)
        needsUpdateConstraints()
    }

    required init?(coder aDecoder: NSCoder) {
        super.init(coder: aDecoder)
        addSubview(imageView)
        needsUpdateConstraints()
    }

    override func layoutSubviews() {
        super.layoutSubviews()

        clipsToBounds = false
        layer.shadowColor = UIColor.black.cgColor
        layer.shadowOpacity = 0.1
        layer.shadowOffset = CGSize(width: 0, height: 10)
        layer.shadowRadius = 10
        layer.shadowPath = UIBezierPath(roundedRect: bounds, cornerRadius: frame.height / 2.0).cgPath
    }

    override func updateConstraints() {
        super.updateConstraints()

        imageView.snp.makeConstraints { (make) -> Void in
            make.height.width.equalTo(self)
            make.center.equalTo(self)
        }
    }
}

class RoundImageView: UIImageView {

    override func layoutSubviews() {
        super.layoutSubviews()
        let radius: CGFloat = self.bounds.size.height / 2.0
        layer.cornerRadius = radius
        clipsToBounds = true
    }
}

class RoundView: UIView {

    override func layoutSubviews() {
        super.layoutSubviews()
        let radius: CGFloat = self.bounds.size.height / 2.0
        layer.cornerRadius = radius
        clipsToBounds = true
    }
}

有两个类可以将容器和图像视图变成圆形。而主要的类将两者结合在一起:这是您将要调用的类。


1
我可能会有点迟到。
您可以在故事板属性检查器上轻松设置所需的属性。

enter image description here

结果会像这样。

Round Image


我仍然可以。请检查您是否选择了数字类型。 - Sandeep Rana
我认为使用“isShadowPathAutosizing”需要这个pod:https://github.com/CosmicMind/Material - Shai Balassiano
如何在阴影后面添加环,使其看起来类似于SwiftUI风格?谢谢。 - Antonio Adrian Chavez

-3
extension UIImageView {
    func addShadow() {
        self.layer.shadowColor = UIColor.black.cgColor
        self.layer.shadowOffset = CGSize(width: 2, height: 5)
        self.layer.shadowOpacity = 0.5
        self.layer.shadowRadius = 1.0
        self.clipsToBounds = false
    }
}
try this code. hope it will help you....

虽然这段代码可能回答了问题,但是提供关于为什么和/或如何回答问题的额外上下文可以提高其长期价值。 - A. Bandtock
这并没有回答作者的问题,因为作者想要将图像视图裁剪为圆形,而这段代码禁用了裁剪。 - akaralar

网页内容由stack overflow 提供, 点击上面的
可以查看英文原文,
原文链接