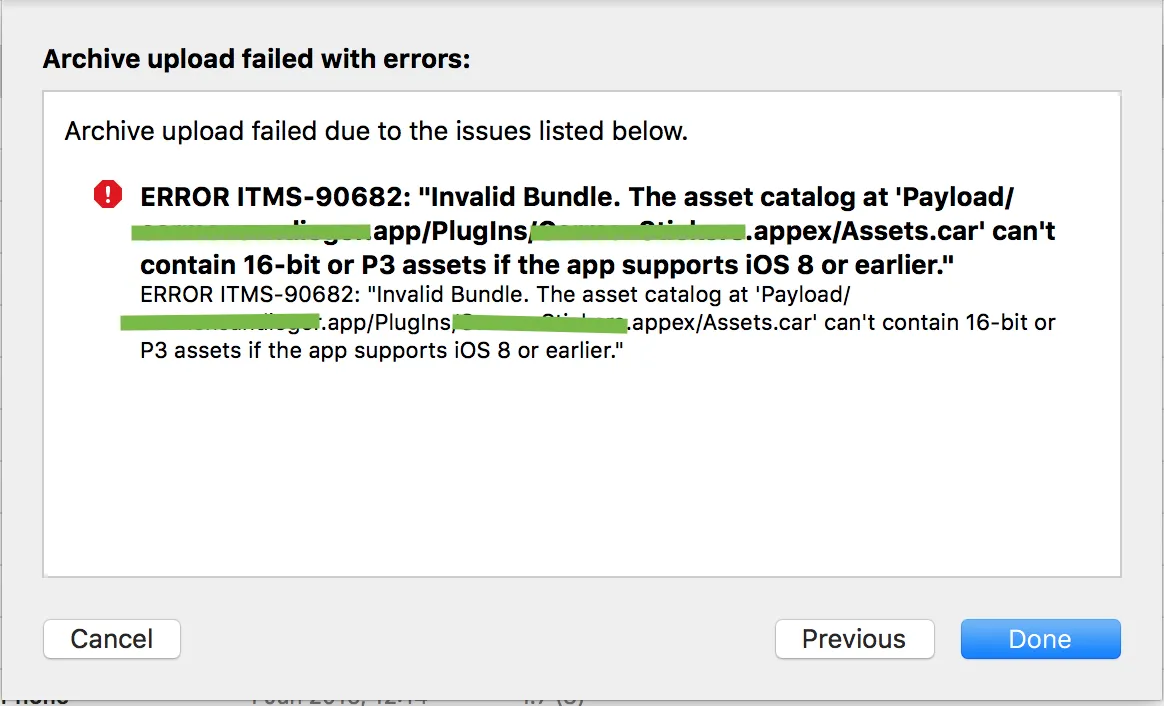
上传到iTunesConnect时,是否遇到了这个错误。上传进程到“正在验证与iTunes Store的资产”,然后我收到以下错误:
我正在使用xCode8,在现有iOS应用程序中嵌入自定义贴纸应用程序。 我已暂时删除贴纸资产并包含苹果示例消息图标以测试是否是我的贴纸资产导致问题,但是在验证时仍然收到相同的错误。 有任何想法吗?
上传到iTunesConnect时,是否遇到了这个错误。上传进程到“正在验证与iTunes Store的资产”,然后我收到以下错误:
我正在使用xCode8,在现有iOS应用程序中嵌入自定义贴纸应用程序。 我已暂时删除贴纸资产并包含苹果示例消息图标以测试是否是我的贴纸资产导致问题,但是在验证时仍然收到相同的错误。 有任何想法吗?
简而言之: 您的捆绑包中有一些图片的格式不受支持。 您可以调整这些图像的格式或增加目标最低iOS版本。请记住,后者只是一个临时解决方法,可能不是您想要做的,因为它会因为一个非常可解决的问题而减少您的潜在用户群。
第1部分将解释如何找出哪些图片是有问题的。
第2部分向您展示如何调整图片格式,以便iTunesConnect满意。如果您只有少量图像,则可以跳过第1部分并手动检查它们。
第1部分:确定有问题的图片:
苹果开发者论坛上有一个帖子讨论了这个问题: https://forums.developer.apple.com/thread/60919
被接受的解决方案如下:
如何解决“ERROR ITMS-90682: Invalid Bundle - The asset catalog at 'Payload/XXXXX/Assets.car' can't contain 16-bit or P3 assets if the app supports iOS 8 or earlier.”第二部分:调整图像的色彩配置以适应iTunesConnect
打开有问题文件的“信息”(CMD+I)。 检查您的色彩配置。
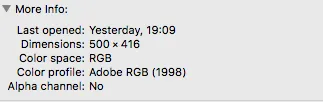
我不知道哪些配置文件是好的,哪些不好,但我的 "Adobe RGB (1998)" 被拒绝了。
所以我使用了 "Color Synch Utility"(随OSX附带)。 (右键单击图像,打开...)
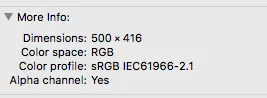
现在在底部,您可以选择分配不同的颜色配置文件:

现在,如果您再次检查图像,它应该看起来像这样:
现在替换以前的图像并重试。 这对我有用,希望对您有所帮助。
#!/bin/sh

files=`find . -name "*.png"`

for i in ${files[@]}; do
    SOURCE_FILE=${i}
    DESTINATION_FILE=$SOURCE_FILE
    sips \
    --matchTo '/System/Library/ColorSync/Profiles/sRGB Profile.icc' \
    "$SOURCE_FILE" \
    --out "$DESTINATION_FILE"
done

exit 0
"files=find . -name "*.jpg"" 和 "files=find . -name "*.jpeg"" 运行它,以确保所有图像文件都被正确设置。 - Blackcodebrew update
brew install imagemagick --with-little-cms --with-little-cms2
查找图像并将其转换为sRGB配置文件
cd path>to>Images.xcassets>folder
find . -name '*.png' -exec convert "{}" \
-profile "/System/Library/ColorSync/Profiles/AdobeRGB1998.icc" \
-profile "/System/Library/ColorSync/Profiles/sRGB Profile.icc" \
"{}" \;
尽管如此,随着iOS10即将上线,我们建议将您的部署目标移动到9.x。
brew update
brew install imagemagick --with-little-cms --with-little-cms2
1) Change the extension of .ipa to .zip.
2) Expand the .zip file. This will produce a Payload folder containing your .app bundle.
3) Open a terminal and change the working directory to the top level of your .app bundle cd path/to/Payload/your.app
4) find . -name "*.png" -print0 | xargs -0 identify | grep "16-bit" | awk '{print $1;}' | xargs mogrify -depth 8
this command will show you corrupted images. Replace these images with 8 depth images.
convert my_image.png -profile /path/to/AdobeRGB1998.icc -profile /path/to/sRGB_v4_ICC_preference_displayclass.icc my_image.png
brew update
brew install imagemagick --with-little-cms --with-little-cms2
2) 下载颜色配置文件:
3) 执行以下命令:
convert input_image_name.ext -profile /path/to/AdobeRGB1998.icc -profile /path/to/sRGB_v4_ICC_preference_displayclass.icc output_image_name.ext
因为需要更改为8位sRGB。
将所有PNG文件复制到一个文件夹中
例如,将文件夹命名为“image”并放在桌面上
然后打开终端并更改目录到您已移动照片的文件夹中
cd desktop/image
运行以下命令
sips -g all *.png >print.txt
您会发现一个名为Print.txt的文件被创建在该文件夹中(即image文件夹内)
打开它并搜索
bitsPerSample:
如果您发现旁边的数字与8不同,则说明您得到了错误的图像
在预览应用程序中打开此图像(或图像),然后将其导出为相同格式,并确保选择8位颜色深度(请注意,如果您选择多个图像,则看不到颜色深度选择,但它仍在工作)
将新图像复制并替换旧图像。
除了我之前发布的内容外,还要执行以下操作
这个步骤适用于所有照片 在预览应用程序中打开每张或所有照片 单击工具 > 调整大小 > 然后将dpi设置为72 然后单击工具 > 分配配置文件 > 然后选择通用RGB配置文件
就这样了
通过以下步骤解决了问题: