我有以下设置:
- 我使用AppCompat
- MainActivity持有一个fragment并具有工具栏,当向下滚动时会隐藏
Fragment中包含RecyclerView- 所有应适合屏幕的视图都在xml布局中具有相应的
android:fitsSystemWindows="true"
问题是,在这种情况下我无法使状态栏透明。我做的是以下操作:
- 创建活动并调用setContent
然后我尝试通过编程方式调整活动以获得半透明工具栏,如下所示:
@TargetApi(Build.VERSION_CODES.LOLLIPOP)
public void themeNavAndStatusBar(Activity activity)
{
    if (Build.VERSION.SDK_INT < Build.VERSION_CODES.LOLLIPOP)
        return;

    Window w = activity.getWindow();
    w.addFlags(WindowManager.LayoutParams.FLAG_DRAWS_SYSTEM_BAR_BACKGROUNDS);
    w.setFlags(
            WindowManager.LayoutParams.FLAG_TRANSLUCENT_NAVIGATION,
            WindowManager.LayoutParams.FLAG_TRANSLUCENT_NAVIGATION);
    w.setFlags(
            WindowManager.LayoutParams.FLAG_TRANSLUCENT_STATUS,
            WindowManager.LayoutParams.FLAG_TRANSLUCENT_STATUS);
    w.setNavigationBarColor(activity.getResources().getColor(android.R.color.transparent));

    w.setStatusBarColor(activity.getResources().getColor(android.R.color.transparent));
}
将活动中的占位符(
@+id/frame_container)替换为片段
在这种情况下,状态栏是实色的,并且视图不会被绘制在其下面...为什么?
我想要的
我想要一个工具栏,它可以滚动到屏幕上并完全隐藏,而此工具栏下面的内容应该适合屏幕并在透明的导航栏后面绘制。
布局
这是我的主要活动:
<android.support.design.widget.CoordinatorLayout
    xmlns:android="http://schemas.android.com/apk/res/android"
    xmlns:app="http://schemas.android.com/apk/res-auto"
    android:id="@+id/clMain"
    android:fitsSystemWindows="true"
    android:background="?attr/main_background_color"
    android:layout_width="match_parent"
    android:layout_height="match_parent">

    <android.support.design.widget.AppBarLayout
        android:id="@+id/appBarLayout"
        android:fitsSystemWindows="true"
        android:background="@null"
        app:elevation="0dp"
        app:contentInsetLeft="0dp"
        app:contentInsetStart="0dp"
        android:layout_width="match_parent"
        android:layout_height="wrap_content">

        <android.support.v7.widget.Toolbar
            android:id="@+id/toolbar"
            android:layout_width="match_parent"
            android:layout_height="?attr/actionBarSize"
            android:background="?attr/colorPrimary"
            android:elevation="4dp"
            android:theme="?actionBarThemeStyle"
            app:popupTheme="?actionBarPopupThemeStyle"
            app:layout_scrollFlags="scroll|enterAlways">

            <LinearLayout
                android:orientation="vertical"
                android:layout_width="wrap_content"
                android:layout_height="wrap_content">

                <LinearLayout
                    android:orientation="horizontal"
                    android:layout_width="wrap_content"
                    android:layout_height="wrap_content">

                    <ImageView
                        android:id="@+id/ivToolbarDataSource"
                        android:layout_gravity="center_vertical"
                        android:layout_marginRight="2dp"
                        android:layout_width="24dp"
                        android:layout_height="24dp" />

                    <TextView
                        android:id="@+id/tvToolbarTitle"
                        style="@style/TextAppearance.AppCompat.Widget.ActionBar.Title"
                        android:theme="?actionBarThemeStyle"
                        android:layout_gravity="center_vertical"
                        android:layout_width="wrap_content"
                        android:layout_height="wrap_content" />

                </LinearLayout>

                <TextView
                    android:id="@+id/tvToolbarSubTitle"
                    style="@style/TextAppearance.AppCompat.Widget.ActionBar.Subtitle"
                    android:theme="?actionBarThemeStyle"
                    android:layout_width="wrap_content"
                    android:layout_height="wrap_content" />

            </LinearLayout>


        </android.support.v7.widget.Toolbar>

        <!-- BUG: https://dev59.com/6l0a5IYBdhLWcg3wRGrp -->
        <View
            android:layout_width="fill_parent"
            android:layout_height="1dp"/>

    </android.support.design.widget.AppBarLayout>

    <FrameLayout
        android:id="@+id/frame_container"
        android:fitsSystemWindows="true"
        android:layout_width="match_parent"
        android:layout_height="match_parent"
        app:layout_behavior="@string/appbar_scrolling_view_behavior" />

    <android.support.design.widget.FloatingActionButton
        android:id="@+id/fab"
        android:layout_width="wrap_content"
        android:layout_height="wrap_content"
        android:layout_gravity="bottom|right"
        android:layout_margin="32dp"
        android:src="@drawable/ic_local_offer_white_24dp"
        app:backgroundTint="?attr/colorPrimary"
        app:borderWidth="0dp"
        app:fabSize="normal"
        app:rippleColor="?attr/colorPrimaryDark"
        app:layout_anchorGravity="bottom|right|end"
        app:layout_behavior="com.test.classes.ScrollAwareFABBehavior"/>

</android.support.design.widget.CoordinatorLayout>
这是我的片段,它将放置在主活动中:
<RelativeLayout
    xmlns:android="http://schemas.android.com/apk/res/android"
    xmlns:app="http://schemas.android.com/apk/res-auto"
    android:fitsSystemWindows="true"
    android:layout_width="match_parent"
    android:layout_height="match_parent">

    <android.support.v4.widget.SwipeRefreshLayout
        android:id="@+id/srlImages"
        android:fitsSystemWindows="true"
        android:layout_width="match_parent"
        android:layout_height="match_parent">

        <android.support.v7.widget.RecyclerView
            android:id="@+id/rvImages"
            android:fitsSystemWindows="true"
            android:layout_width="match_parent"
            android:layout_height="match_parent" />

    </android.support.v4.widget.SwipeRefreshLayout>

    <TextView
        android:id="@+id/tvEmpty"
        android:gravity="center"
        android:layout_centerInParent="true"
        android:layout_width="match_parent"
        android:layout_height="wrap_content" />

</RelativeLayout>
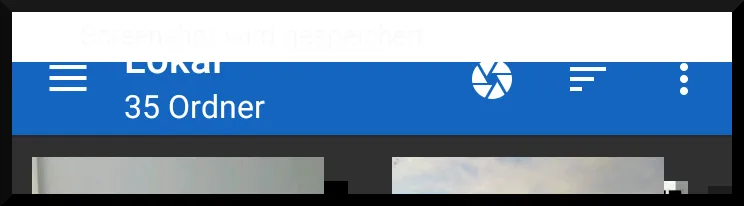
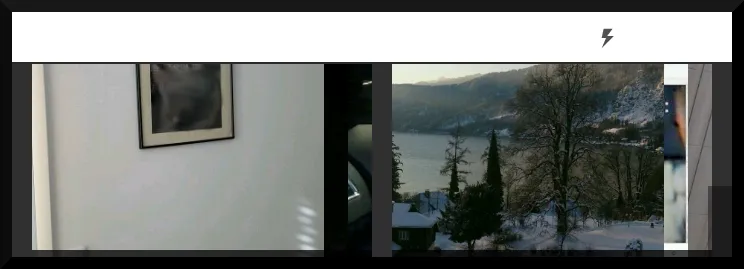
编辑 - 屏幕截图
我使用浅色/深色主题,并手动主题化所有内容(因为用户可以选择任何颜色作为主色/强调色),所以请不要在意工具栏是白色的(这是默认的主题背景颜色和主色调)。 我还添加了黑色边框,以便您看到活动结束的位置...
- 第一张截图:显示工具栏,没有滚动
- 第二张截图:我刚开始滚动 => 工具栏现在应该滚动消失
- 第三张截图:现在主要内容应该在导航栏下面滚动...
最终,我当然会使工具栏和导航栏半透明以获得更好的视觉效果...