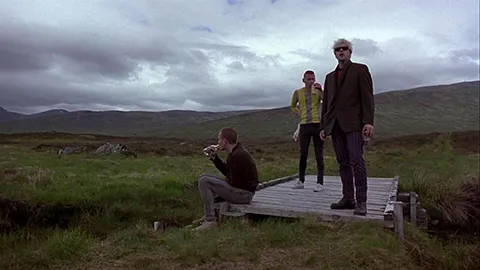
从一张图片开始,我想将其内容向上移动10个像素,而不改变大小,并将底部的子图像(宽度 x 10像素)填充为黑色。
例如,原始图像:
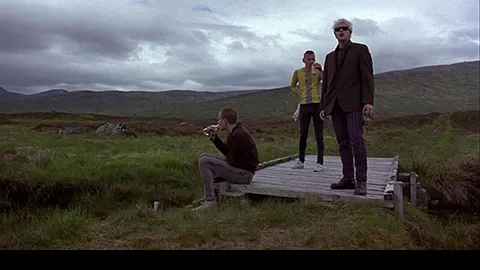
移位后:
是否有使用 OpenCV 执行此操作的函数?
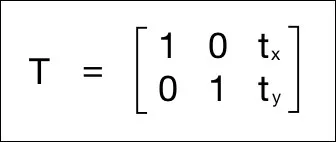
您可以简单地使用仿射变换矩阵平移(基本上是为了移动点)。cv::warpAffine() 函数与适当的转换矩阵将解决问题。
![TranslationMatrix [1,0,tx ; 0,1,ty]](https://istack.dev59.com/QmKtl.webp)
其中: tx 是图像 x 轴上的偏移量, ty 是图像 y 轴上的偏移量, 图像中每个像素都会这样移动。
您可以使用此函数返回平移矩阵。(可能对您来说是不必要的)但它将根据 offsetx 和 offsety 参数移动图像。
Mat translateImg(Mat &img, int offsetx, int offsety){
    Mat trans_mat = (Mat_<double>(2,3) << 1, 0, offsetx, 0, 1, offsety);
    warpAffine(img,img,trans_mat,img.size());
    return img;
}
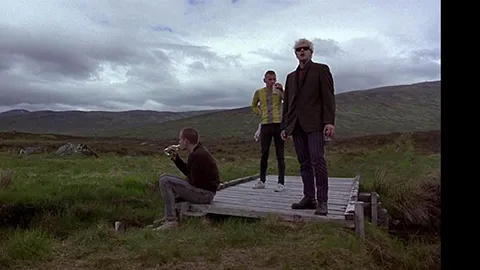
如果您想将图像向上移动10个像素,则调用:
translateImg(image,0,-10);
然后,您的图像将会按照您所期望的进行移动。
有没有OpenCV内置函数可以直接执行这个操作?
https://github.com/opencv/opencv/issues/4413 (之前是 http://web.archive.org/web/20170615214220/http://code.opencv.org/issues/2299)
或者您可以这样做
    cv::Mat out = cv::Mat::zeros(frame.size(), frame.type());
    frame(cv::Rect(0,10, frame.cols,frame.rows-10)).copyTo(out(cv::Rect(0,0,frame.cols,frame.rows-10)));
这个链接或许能帮助解决这个问题,谢谢
import cv2
import numpy as np
img = cv2.imread('images/input.jpg')
num_rows, num_cols = img.shape[:2]

translation_matrix = np.float32([ [1,0,70], [0,1,110] ])
img_translation = cv2.warpAffine(img, translation_matrix, (num_cols, num_rows))
cv2.imshow('Translation', img_translation)
cv2.waitKey()
tx和ty分别可以控制像素在x和y方向上的移位。
这里是我写的一个函数,基于Zaw Lin的答案,可以在任何方向上移动任意数量的像素行或列进行帧/图像偏移:
enum Direction{
    ShiftUp=1, ShiftRight, ShiftDown, ShiftLeft
   };

cv::Mat shiftFrame(cv::Mat frame, int pixels, Direction direction)
{
    //create a same sized temporary Mat with all the pixels flagged as invalid (-1)
    cv::Mat temp = cv::Mat::zeros(frame.size(), frame.type());

    switch (direction)
    {
    case(ShiftUp) :
        frame(cv::Rect(0, pixels, frame.cols, frame.rows - pixels)).copyTo(temp(cv::Rect(0, 0, temp.cols, temp.rows - pixels)));
        break;
    case(ShiftRight) :
        frame(cv::Rect(0, 0, frame.cols - pixels, frame.rows)).copyTo(temp(cv::Rect(pixels, 0, frame.cols - pixels, frame.rows)));
        break;
    case(ShiftDown) :
        frame(cv::Rect(0, 0, frame.cols, frame.rows - pixels)).copyTo(temp(cv::Rect(0, pixels, frame.cols, frame.rows - pixels)));
        break;
    case(ShiftLeft) :
        frame(cv::Rect(pixels, 0, frame.cols - pixels, frame.rows)).copyTo(temp(cv::Rect(0, 0, frame.cols - pixels, frame.rows)));
        break;
    default:
        std::cout << "Shift direction is not set properly" << std::endl;
    }

    return temp;
}
由于目前没有Python解决方案,如果您通过Google搜索使用Python来移动图像,则会进入此页面,这里提供了一个使用np.roll()的Python解决方案。
沿x轴移动
import cv2
import numpy as np

image = cv2.imread('1.jpg')
shift = 40

for i in range(image.shape[1] -1, image.shape[1] - shift, -1):
    image = np.roll(image, -1, axis=1)
    image[:, -1] = 0

cv2.imshow('image', image)
cv2.waitKey()
沿y轴移动
import cv2
import numpy as np

image = cv2.imread('1.jpg')
shift = 40

for i in range(image.shape[0] -1, image.shape[0] - shift, -1):
    image = np.roll(image, -1, axis=0)
    image[-1, :] = 0

cv2.imshow('image', image)
cv2.waitKey()
np.roll(image, (pixels_x, pixels_y), axis=(0,1)) 来进行对角线移动。 - SamuelIs there a function to perform directly this operation with OpenCV?
http://code.opencv.org/issues/2299
or you would do this
  cv::Mat out = cv::Mat::zeros(frame.size(), frame.type());
  frame(cv::Rect(0,10,
  frame.cols,frame.rows-10)).copyTo(out(cv::Rect(0,0,frame.cols,frame.rows-10)));
上面的代码只能用来向一个方向移动(向左和向上)。下面的代码是以上代码的扩展版本,可以用来在任何方向上移动。
int shiftCol = 10;
int shiftRow = 10;

Rect source = cv::Rect(max(0,-shiftCol),max(0,-shiftRow), frame.cols-abs(shiftCol),frame.rows-abs(shiftRow));

Rect target = cv::Rect(max(0,shiftCol),max(0,shiftRow),frame.cols-abs(shiftCol),frame.rows-abs(shiftRow));

frame(source).copyTo(out(target));
h, w = image.shape     # for gray image
shift = 100          # any legal number 0 < x < h

img[:h-shift, :] = img[shift:, :]
img[h-shift:, :] = 0
using namespace cv;
//and whatever header 'abs' requires...

Mat offsetImageWithPadding(const Mat& originalImage, int offsetX, int offsetY, Scalar backgroundColour){
        cv::Mat padded = Mat(originalImage.rows + 2 * abs(offsetY), originalImage.cols + 2 * abs(offsetX), CV_8UC3, backgroundColour);
        originalImage.copyTo(padded(Rect(abs(offsetX), abs(offsetY), originalImage.cols, originalImage.rows)));
        return Mat(padded,Rect(abs(offsetX) + offsetX, abs(offsetY) + offsetY, originalImage.cols, originalImage.rows));
}

//example use with black borders along the right hand side and top:
Mat offsetImage = offsetImageWithPadding(originalImage, -10, 6, Scalar(0,0,0));
这段代码来源于我的工作代码,但更改了一些变量。如果无法编译,则很可能只需要更改一些小细节 - 但你可以理解abs函数的用法...
一些可能对大家有用的Python代码。
h, w, c = image.shape
shift = 4 #set shift magnitude
img_shift_right = np.zeros(image.shape)
img_shift_down = np.zeros(image.shape)
img_shift_left = np.zeros(image.shape)
img_shift_up = np.zeros(image.shape)


img_shift_right[:,shift:w, :] = image[:,:w-shift, :]
img_shift_down[shift:h, :, :] = image[:h-shift, :, :]
img_shift_left[:,:w-shift, :] = image[:,shift:, :]
img_shift_up[:h-shift, :, :] = image[shift:, :, :]
我最初尝试了pajus_cz的答案,但实际上速度相当慢。而且,我无法承担制作临时副本的成本,所以我想出了这个解决方案:
void translateY(cv::Mat& image, int yOffset)
{
    int validHeight = std::max(image.rows - abs(yOffset), 0);
    int firstSourceRow = std::max(-yOffset, 0);
    int firstDestinationRow = std::max(yOffset, 0);

    memmove(image.ptr(firstDestinationRow),
            image.ptr(firstSourceRow),
            validHeight * image.step);
}
它比基于warpAffine的解决方案快上数个数量级。(但这在你的情况下可能完全无关紧要。)
Mat_<double>(2,3) << 1的作用吗? - locke14Mat_<double>(2,3) << 1,而是整个表达式:Mat_<double>(2,3) << 1, 0, offsetx, 0, 1, offsety将值插入矩阵中。因此,trans_mat中的值将在第一行是1,0,offsetx,第二行是0,1,offsety。如原帖中所示的矩阵M。 - pajus_cz