设置CollapsingToolbarLayout的起始高度

27

我希望在CollapsingToolbarLayout中的ImageView上可以滚动。那么怎样才能实现呢?还有,如何设置Image view的起始高度?

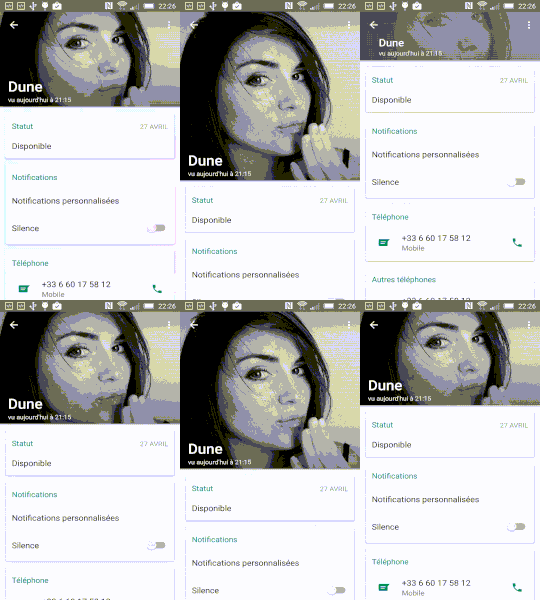
我的ImageView高度为280p,我想在活动开始时显示200p,然后向下滚动以查看图片的其余部分。我在WhatsApp应用程序中看到了类似的东西。

这里是一个链接,可以看到我想要的效果:

enter image description here

我的代码:

<?xml version="1.0" encoding="utf-8"?>
<android.support.design.widget.CoordinatorLayout
    xmlns:android="http://schemas.android.com/apk/res/android"
    xmlns:app="http://schemas.android.com/apk/res-auto"
    xmlns:tools="http://schemas.android.com/tools"
    android:layout_width="match_parent"
    android:layout_height="match_parent" 
    android:fitsSystemWindows="true"
    tools:context="com.example.yasser.version6.Profile">

<android.support.design.widget.AppBarLayout 
    android:id="@+id/app_bar"
    android:fitsSystemWindows="true"
    android:layout_height="@dimen/app_bar_height"
    android:layout_width="match_parent"
    android:theme="@style/MyMaterialTheme.AppBarOverlay">

    <android.support.design.widget.CollapsingToolbarLayout
        android:id="@+id/toolbar_layout"
        android:fitsSystemWindows="true" 
        android:layout_width="match_parent"
        android:layout_height="match_parent"         
        app:layout_scrollFlags="scroll|exitUntilCollapsed"
        app:contentScrim="?attr/colorPrimary">

        <ImageView
            android:layout_width="match_parent"
            android:layout_height="match_parent"
            android:scaleType="centerCrop"
            android:src="@drawable/tof" />

        <android.support.v7.widget.Toolbar 
            android:id="@+id/toolbar"
            android:layout_height="?attr/actionBarSize"
            android:layout_width="match_parent"
            app:layout_collapseMode="pin"
            app:popupTheme="@style/MyMaterialTheme.PopupOverlay" />

    </android.support.design.widget.CollapsingToolbarLayout>
</android.support.design.widget.AppBarLayout>

<include
    android:id="@+id/content"
    layout="@layout/content_profile" />


</android.support.design.widget.CoordinatorLayout>

内容概要代码:

<?xml version="1.0" encoding="utf-8"?>
<android.support.v4.widget.NestedScrollView
    xmlns:android="http://schemas.android.com/apk/res/android"
    xmlns:tools="http://schemas.android.com/tools"
    xmlns:app="http://schemas.android.com/apk/res-auto"
    app:layout_behavior="@string/appbar_scrolling_view_behavior"
    xmlns:card_view="http://schemas.android.com/apk/res-auto"
    tools:showIn="@layout/activity_profile"
    android:layout_width="match_parent"
    android:layout_height="match_parent"
    tools:context="com.example.yasser.version6.Profile">

</android.support.v4.widget.NestedScrollView>
1
你尝试在你的NestedScrollView上调用scrollTo(0, 200);了吗? - Blackbelt
嗨,伙计,你的问题解决了吗?我有和你一样的需求。如果解决了,请告诉我。 - sm_
3个回答

22

实际上,AppBarLayout有一种特殊的方法可以应用这样的偏移量:

final int setAppBarTopBottomOffset(CoordinatorLayout coordinatorLayout, AppBarLayout appBarLayout, int newOffset, int minOffset, int maxOffset)

很遗憾它具有包私有访问级别,但是我们可以通过这种中间链调用它:

private void setAppBarOffset(int offsetPx){
    CoordinatorLayout.LayoutParams params = (CoordinatorLayout.LayoutParams) mAppBarLayout.getLayoutParams();
    AppBarLayout.Behavior behavior = (AppBarLayout.Behavior) params.getBehavior();
    behavior.onNestedPreScroll(mCoordinatorLayour, mAppBarLayout, null, 0, offsetPx, new int[]{0, 0});
}

需要注意的一点是 - 此方法应在mAppBarLayout已准备好并测量完成后调用。因此,正确的方式是通过视图的post方法来调用它。

mCoordinatorLayour = (CoordinatorLayout) findViewById(R.id.root_coordinator);
mAppBarLayout = (AppBarLayout) findViewById(R.id.app_bar_layout);

mAppBarLayout.post(new Runnable() {
    @Override
    public void run() {
        int heightPx = findViewById(R.id.iv_header).getHeight();
        setAppBarOffset(heightPx/2);
    }
});

一个问题:减小AppBarLayout的高度不应该是负的offsetPx吗? - GPack
对我来说工作正常,但当 OffSet 改变时没有动画。 - MichaelYe
3
对于那些无法正常工作的人,请使用新的非弃用方法 behavior.onNestedPreScroll(mCoordinatorLayour, mAppBarLayout, null, 0, offsetPy, new int[]{0, 0}, 0); - Oliver Adam
@OliverAdam,这段代码对我没用。我有一个1000像素的位图,希望在页面加载时只显示100像素的图像。你有检查过这个场景下的代码吗? - Lokesh Desai

13

Cheesesquare可以实现您的请求。

这是在Cheesesquare中的一个布局。

<?xml version="1.0" encoding="utf-8"?>
<android.support.design.widget.CoordinatorLayout xmlns:android="http://schemas.android.com/apk/res/android"
    xmlns:app="http://schemas.android.com/apk/res-auto"
    android:id="@+id/main_content"
    android:layout_width="match_parent"
    android:layout_height="match_parent"
    android:fitsSystemWindows="true">

    <android.support.design.widget.AppBarLayout
        android:id="@+id/appbar"
        android:layout_width="match_parent"
        android:layout_height="@dimen/detail_backdrop_height"
        android:theme="@style/ThemeOverlay.AppCompat.Dark.ActionBar"
        android:fitsSystemWindows="true">

        <android.support.design.widget.CollapsingToolbarLayout
            android:id="@+id/collapsing_toolbar"
            android:layout_width="match_parent"
            android:layout_height="match_parent"
            app:layout_scrollFlags="scroll|exitUntilCollapsed"
            android:fitsSystemWindows="true"
            app:contentScrim="?attr/colorPrimary"
            app:expandedTitleMarginStart="48dp"
            app:expandedTitleMarginEnd="64dp">

            <ImageView
                android:id="@+id/backdrop"
                android:layout_width="match_parent"
                android:layout_height="match_parent"
                android:scaleType="centerCrop"
                android:fitsSystemWindows="true"
                app:layout_collapseMode="parallax" />

            <android.support.v7.widget.Toolbar
                android:id="@+id/toolbar"
                android:layout_width="match_parent"
                android:layout_height="?attr/actionBarSize"
                app:popupTheme="@style/ThemeOverlay.AppCompat.Light"
                app:layout_collapseMode="pin" />

        </android.support.design.widget.CollapsingToolbarLayout>

    </android.support.design.widget.AppBarLayout>

    <android.support.v4.widget.NestedScrollView
        android:layout_width="match_parent"
        android:layout_height="match_parent"
        app:layout_behavior="@string/appbar_scrolling_view_behavior">

        <LinearLayout
            android:layout_width="match_parent"
            android:layout_height="match_parent"
            android:orientation="vertical"
            android:paddingTop="24dp">

            <android.support.v7.widget.CardView
                android:layout_width="match_parent"
                android:layout_height="wrap_content"
                android:layout_margin="@dimen/card_margin">

                <LinearLayout
                    style="@style/Widget.CardContent"
                    android:layout_width="match_parent"
                    android:layout_height="wrap_content">

                    <TextView
                        android:layout_width="match_parent"
                        android:layout_height="wrap_content"
                        android:text="Info"
                        android:textAppearance="@style/TextAppearance.AppCompat.Title" />

                    <TextView
                        android:layout_width="match_parent"
                        android:layout_height="wrap_content"
                        android:text="@string/cheese_ipsum" />

                </LinearLayout>

            </android.support.v7.widget.CardView>

            <android.support.v7.widget.CardView
                android:layout_width="match_parent"
                android:layout_height="wrap_content"
                android:layout_marginBottom="@dimen/card_margin"
                android:layout_marginLeft="@dimen/card_margin"
                android:layout_marginRight="@dimen/card_margin">

                <LinearLayout
                    style="@style/Widget.CardContent"
                    android:layout_width="match_parent"
                    android:layout_height="wrap_content">

                    <TextView
                        android:layout_width="match_parent"
                        android:layout_height="wrap_content"
                        android:text="Friends"
                        android:textAppearance="@style/TextAppearance.AppCompat.Title" />

                    <TextView
                        android:layout_width="match_parent"
                        android:layout_height="wrap_content"
                        android:text="@string/cheese_ipsum" />

                </LinearLayout>

            </android.support.v7.widget.CardView>

            <android.support.v7.widget.CardView
                android:layout_width="match_parent"
                android:layout_height="wrap_content"
                android:layout_marginBottom="@dimen/card_margin"
                android:layout_marginLeft="@dimen/card_margin"
                android:layout_marginRight="@dimen/card_margin">

                <LinearLayout
                    style="@style/Widget.CardContent"
                    android:layout_width="match_parent"
                    android:layout_height="wrap_content">

                    <TextView
                        android:layout_width="match_parent"
                        android:layout_height="wrap_content"
                        android:text="Related"
                        android:textAppearance="@style/TextAppearance.AppCompat.Title" />

                    <TextView
                        android:layout_width="match_parent"
                        android:layout_height="wrap_content"
                        android:text="@string/cheese_ipsum" />

                </LinearLayout>

            </android.support.v7.widget.CardView>

        </LinearLayout>

    </android.support.v4.widget.NestedScrollView>

    <android.support.design.widget.FloatingActionButton
        android:layout_height="wrap_content"
        android:layout_width="wrap_content"
        app:layout_anchor="@id/appbar"
        app:layout_anchorGravity="bottom|right|end"
        android:src="@drawable/ic_discuss"
        android:layout_margin="@dimen/fab_margin"
        android:clickable="true"/>

</android.support.design.widget.CoordinatorLayout>

7
Cheesesquare示例应用程序没有实现OP请求的内容,但它实现了正常的CTL。 - Michael Fulton
1
不起作用!但是这个做了预期的事情。 - IgniteCoders

-2

只需添加:

android:fitsSystemWindows="true"
app:layout_collapseMode="parallax"

到折叠式工具栏布局中的ImageView。

您可以在此处找到更多信息。


这里有一个扩展答案的链接:http://android-developers.blogspot.com.au/2015/05/android-design-support-library.html - 滚动到底部或在页面上搜索“视差”。 - Tigger

网页内容由stack overflow 提供, 点击上面的
可以查看英文原文,
原文链接