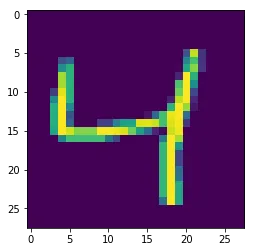
通过Python从.idx3-ubyte文件或GZIP中提取图像

61

我使用OpenCV中的facerecognizer创建了一个简单人脸识别函数,对于人的图像工作得很好。

现在我想用手写字符而不是人来进行测试。我遇到了MNIST数据集,但它们将图像存储在我以前从未见过的奇怪文件中。

我只需要从中提取几张图片:

train-images.idx3-ubyte

将它们保存在文件夹中,格式为.gif

或者我误解了MNIST的意思。如果是这样,请问我从哪里可以获取这样的数据集?

编辑

我还有gzip文件:

train-images-idx3-ubyte.gz

我正在尝试阅读内容,但show()不起作用,如果我使用read(),我会看到随机符号。

images = gzip.open("train-images-idx3-ubyte.gz", 'rb')
print images.read()

编辑

通过使用以下方法,成功地获得了一些有用的输出:

with gzip.open('train-images-idx3-ubyte.gz','r') as fin:
    for line in fin:
        print('got line', line)

不知怎么样,现在我必须将其转换为一张图片,输出:

enter image description here


python-mnist软件包在PyPI上有一些代码可以完成这项工作。 - Kh40tiK
1
.idx3-ubyte 的文件格式在 THE MNIST DATABASE 页面中有详细描述。 - Laurent LAPORTE
如果有人想知道在哪里可以找到所有这些数据集?这是链接-> http://yann.lecun.com/exdb/mnist/ - Rohit Singh
8个回答

80

下载训练/测试图像和标签:

  • train-images-idx3-ubyte.gz:训练集图像
  • train-labels-idx1-ubyte.gz:训练集标签
  • t10k-images-idx3-ubyte.gz:测试集图像
  • t10k-labels-idx1-ubyte.gz:测试集标签

并在工作目录(例如samples/)中解压缩它们。

从PyPi获取python-mnist软件包:

pip install python-mnist

导入mnist包并读取训练/测试图像:

from mnist import MNIST

mndata = MNIST('samples')

images, labels = mndata.load_training()
# or
images, labels = mndata.load_testing()

要在控制台上显示图像:

index = random.randrange(0, len(images))  # choose an index ;-)
print(mndata.display(images[index]))

你将获得类似于这样的内容:

............................
............................
............................
............................
............................
.................@@.........
..............@@@@@.........
............@@@@............
..........@@................
..........@.................
...........@................
...........@................
...........@...@............
...........@@@@@.@..........
...........@@@...@@.........
...........@@.....@.........
..................@.........
..................@@........
..................@@........
..................@.........
.................@@.........
...........@.....@..........
...........@....@@..........
............@@@@............
.............@..............
............................
............................
............................

说明:

  • images列表中的每个image都是Python list类型的无符号字节。
  • labels是Python array类型的无符号字节。

33
请注意,在提取文件时,需要将点符号重命名为“-”(否则会出现文件丢失错误),例如t10k-images.idx3-ubyte必须重命名为t10k-images-idx3-ubyte - Abdelouahab

59

(仅使用matplotlib、gzip和numpy)
提取图像数据:

import gzip
f = gzip.open('train-images-idx3-ubyte.gz','r')

image_size = 28
num_images = 5

import numpy as np
f.read(16)
buf = f.read(image_size * image_size * num_images)
data = np.frombuffer(buf, dtype=np.uint8).astype(np.float32)
data = data.reshape(num_images, image_size, image_size, 1)

打印图片:

import matplotlib.pyplot as plt
image = np.asarray(data[2]).squeeze()
plt.imshow(image)
plt.show()

输入图像描述

打印前50个标签:

f = gzip.open('train-labels-idx1-ubyte.gz','r')
f.read(8)
for i in range(0,50):   
    buf = f.read(1)
    labels = np.frombuffer(buf, dtype=np.uint8).astype(np.int64)
    print(labels)

7
f.read(16)和f.read(8)是否跳过了非图像信息? - DuttaA
现在已经重写,更易于理解。是的,前两个字节(f.read(8))始终为0。在此处了解有关IDX(MNIST)格式的更多信息:http://yann.lecun.com/exdb/mnist/ - Punnerud
但是你写了100个标签,现在改成50个了? - DuttaA
谢谢,已修复。感觉在屏幕上显示大量数据时,当它只是垂直的时候并没有增加额外的价值。当它是水平+垂直堆叠时,它有其目的。 - Punnerud
嗨,如果我想展示来自train-labels-idx1-ubyte(已经去掉了.gz)的图像,我该怎么做? - mostafiz67
2
@mostafiz67 你好,你可以使用f = open('train-labels-idx1-ubyte', 'rb')。这样你就可以使用Python的打开函数以二进制模式打开文件了。 - gonzarodriguezt

20

你可以在PyPI上找到idx2numpy包,它非常简单易用并可以将数据直接转换为numpy数组。 以下是要做的事情:

下载数据

官方网站下载MNIST数据集。
如果你使用的是Linux,则可以使用wget在命令行中获取它。只需运行:

wget http://yann.lecun.com/exdb/mnist/train-images-idx3-ubyte.gz
wget http://yann.lecun.com/exdb/mnist/train-labels-idx1-ubyte.gz
wget http://yann.lecun.com/exdb/mnist/t10k-images-idx3-ubyte.gz
wget http://yann.lecun.com/exdb/mnist/t10k-labels-idx1-ubyte.gz

解压数据

解压或解压缩数据。在Linux上,您可以使用gzip

最终,您应该拥有以下文件:

data/train-images-idx3-ubyte
data/train-labels-idx1-ubyte
data/t10k-images-idx3-ubyte
data/t10k-labels-idx1-ubyte

前缀data/只是因为我将它们提取到名为data的文件夹中。你的问题看起来已经做得很好了,所以继续阅读。

使用idx2numpy

这是一个简单的Python代码,可以将解压缩的文件读取为numpy数组。

import idx2numpy
import numpy as np
file = 'data/train-images-idx3-ubyte'
arr = idx2numpy.convert_from_file(file)
# arr is now a np.ndarray type of object of shape 60000, 28, 28

现在,您可以像显示其他图像一样使用它与OpenCV,使用类似以下代码:

cv.imshow("Image", arr[4])

要安装idx2numpy,您可以使用PyPI(pip包管理器)。只需运行以下命令:

pip install idx2numpy

1
有没有办法获取分离的图像而不是混合的图像? - Vicrobot
1
不错的端到端教程。这个工具不仅适用于Digits mnist,还适用于Fashion mnist(在此处找到--https://github.com/zalandoresearch/fashion-mnist)或任何其他idx格式的文件。 - NYCeyes

16

安装 idx2numpy

pip install idx2numpy

下载数据

官方网站下载MNIST数据集。

解压数据

最终,您应该拥有以下文件:

train-images-idx3-ubyte
train-labels-idx1-ubyte
t10k-images-idx3-ubyte
t10k-labels-idx1-ubyte

使用idx2numpy

import numpy as np
import idx2numpy
import matplotlib.pyplot as plt

imagefile = 'train-images.idx3-ubyte'
imagearray = idx2numpy.convert_from_file(imagefile)

plt.imshow(imagearray[4], cmap=plt.cm.binary)

mnist图片


非常好。我尝试了大多数答案,只有这个完美地运行。 - Amir Pourmand

15
import gzip
import numpy as np


def training_images():
    with gzip.open('data/train-images-idx3-ubyte.gz', 'r') as f:
        # first 4 bytes is a magic number
        magic_number = int.from_bytes(f.read(4), 'big')
        # second 4 bytes is the number of images
        image_count = int.from_bytes(f.read(4), 'big')
        # third 4 bytes is the row count
        row_count = int.from_bytes(f.read(4), 'big')
        # fourth 4 bytes is the column count
        column_count = int.from_bytes(f.read(4), 'big')
        # rest is the image pixel data, each pixel is stored as an unsigned byte
        # pixel values are 0 to 255
        image_data = f.read()
        images = np.frombuffer(image_data, dtype=np.uint8)\
            .reshape((image_count, row_count, column_count))
        return images


def training_labels():
    with gzip.open('data/train-labels-idx1-ubyte.gz', 'r') as f:
        # first 4 bytes is a magic number
        magic_number = int.from_bytes(f.read(4), 'big')
        # second 4 bytes is the number of labels
        label_count = int.from_bytes(f.read(4), 'big')
        # rest is the label data, each label is stored as unsigned byte
        # label values are 0 to 9
        label_data = f.read()
        labels = np.frombuffer(label_data, dtype=np.uint8)
        return labels

'from_bytes()'函数中的'big'是什么意思? - Zimeng Zhao
'big' 表示大端模式,它定义了字节顺序。在大端模式中,单词的最高有效字节存储在较小的内存地址中。 - UdaraWanasinghe
我能把np.uint8改成np.float32吗?当我这样做时,图像的数量从60000变成了15000。 - X.G

1

这里为您提供一个函数!(它以二进制格式加载,即0或1)。

def load_mnist(train_data=True, test_data=False):
    """
    Get mnist data from the official website and
    load them in binary format.

    Parameters
    ----------
    train_data : bool
        Loads
        'train-images-idx3-ubyte.gz'
        'train-labels-idx1-ubyte.gz'
    test_data : bool
        Loads
        't10k-images-idx3-ubyte.gz'
        't10k-labels-idx1-ubyte.gz' 

    Return
    ------
    tuple
    tuple[0] are images (train & test)
    tuple[1] are labels (train & test)

    """
    RESOURCES = [
        'train-images-idx3-ubyte.gz',
        'train-labels-idx1-ubyte.gz',
        't10k-images-idx3-ubyte.gz',
        't10k-labels-idx1-ubyte.gz']

    if (os.path.isdir('data') == 0):
        os.mkdir('data')
    if (os.path.isdir('data/mnist') == 0):
        os.mkdir('data/mnist')
    for name in RESOURCES:
        if (os.path.isfile('data/mnist/'+name) == 0):
            url = 'http://yann.lecun.com/exdb/mnist/'+name
            r = requests.get(url, allow_redirects=True)
            open('data/mnist/'+name, 'wb').write(r.content)

    return get_images(train_data, test_data), get_labels(train_data, test_data)


def get_images(train_data=True, test_data=False):

    to_return = []

    if train_data:
        with gzip.open('data/mnist/train-images-idx3-ubyte.gz', 'r') as f:
            # first 4 bytes is a magic number
            magic_number = int.from_bytes(f.read(4), 'big')
            # second 4 bytes is the number of images
            image_count = int.from_bytes(f.read(4), 'big')
            # third 4 bytes is the row count
            row_count = int.from_bytes(f.read(4), 'big')
            # fourth 4 bytes is the column count
            column_count = int.from_bytes(f.read(4), 'big')
            # rest is the image pixel data, each pixel is stored as an unsigned byte
            # pixel values are 0 to 255
            image_data = f.read()
            train_images = np.frombuffer(image_data, dtype=np.uint8)\
                .reshape((image_count, row_count, column_count))
            to_return.append(np.where(train_images > 127, 1, 0))

    if test_data:
        with gzip.open('data/mnist/t10k-images-idx3-ubyte.gz', 'r') as f:
            # first 4 bytes is a magic number
            magic_number = int.from_bytes(f.read(4), 'big')
            # second 4 bytes is the number of images
            image_count = int.from_bytes(f.read(4), 'big')
            # third 4 bytes is the row count
            row_count = int.from_bytes(f.read(4), 'big')
            # fourth 4 bytes is the column count
            column_count = int.from_bytes(f.read(4), 'big')
            # rest is the image pixel data, each pixel is stored as an unsigned byte
            # pixel values are 0 to 255
            image_data = f.read()
            test_images = np.frombuffer(image_data, dtype=np.uint8)\
                .reshape((image_count, row_count, column_count))
            to_return.append(np.where(test_images > 127, 1, 0))

    return to_return


def get_labels(train_data=True, test_data=False):

    to_return = []

    if train_data:
        with gzip.open('data/mnist/train-labels-idx1-ubyte.gz', 'r') as f:
            # first 4 bytes is a magic number
            magic_number = int.from_bytes(f.read(4), 'big')
            # second 4 bytes is the number of labels
            label_count = int.from_bytes(f.read(4), 'big')
            # rest is the label data, each label is stored as unsigned byte
            # label values are 0 to 9
            label_data = f.read()
            train_labels = np.frombuffer(label_data, dtype=np.uint8)
            to_return.append(train_labels)
    if test_data:
        with gzip.open('data/mnist/t10k-labels-idx1-ubyte.gz', 'r') as f:
            # first 4 bytes is a magic number
            magic_number = int.from_bytes(f.read(4), 'big')
            # second 4 bytes is the number of labels
            label_count = int.from_bytes(f.read(4), 'big')
            # rest is the label data, each label is stored as unsigned byte
            # label values are 0 to 9
            label_data = f.read()
            test_labels = np.frombuffer(label_data, dtype=np.uint8)
            to_return.append(test_labels)

    return to_return

0

批量转换为PNG文件

https://github.com/myleott/mnist_png/blob/400fe88faba05ae79bbc2107071144e6f1ea2720/convert_mnist_to_png.py 包含一个很好的PNG提取示例,使用GPL 2.0许可证。使用像Pillow这样的库应该很容易适应其他输出格式。

他们还有一个预先提取的存档:https://github.com/myleott/mnist_png/blob/master/mnist_png.tar.gz?raw=true

用法:

wget \
 http://yann.lecun.com/exdb/mnist/train-images-idx3-ubyte.gz \
 http://yann.lecun.com/exdb/mnist/train-labels-idx1-ubyte.gz \
 http://yann.lecun.com/exdb/mnist/t10k-images-idx3-ubyte.gz \
 http://yann.lecun.com/exdb/mnist/t10k-labels-idx1-ubyte.gz
gunzip --keep *-ubyte.gz
python3 -m pip install pypng==0.20220715.0
./convert_mnist_to_png.py . out

现在out/包含了如下文件:

out/training/0/1.png

out/training/0/21.png

out/training/1/3.png

out/training/1/6.png

out/testing/0/10.png

out/testing/0/13.png

convert_mnist_to_png.py

#!/usr/bin/env python

import os
import struct
import sys

from array import array
from os import path

import png

# source: http://abel.ee.ucla.edu/cvxopt/_downloads/mnist.py
def read(dataset = "training", path = "."):
    if dataset is "training":
        fname_img = os.path.join(path, 'train-images-idx3-ubyte')
        fname_lbl = os.path.join(path, 'train-labels-idx1-ubyte')
    elif dataset is "testing":
        fname_img = os.path.join(path, 't10k-images-idx3-ubyte')
        fname_lbl = os.path.join(path, 't10k-labels-idx1-ubyte')
    else:
        raise ValueError("dataset must be 'testing' or 'training'")

    flbl = open(fname_lbl, 'rb')
    magic_nr, size = struct.unpack(">II", flbl.read(8))
    lbl = array("b", flbl.read())
    flbl.close()

    fimg = open(fname_img, 'rb')
    magic_nr, size, rows, cols = struct.unpack(">IIII", fimg.read(16))
    img = array("B", fimg.read())
    fimg.close()

    return lbl, img, size, rows, cols

def write_dataset(labels, data, size, rows, cols, output_dir):
    # create output directories
    output_dirs = [
        path.join(output_dir, str(i))
        for i in range(10)
    ]
    for dir in output_dirs:
        if not path.exists(dir):
            os.makedirs(dir)

    # write data
    for (i, label) in enumerate(labels):
        output_filename = path.join(output_dirs[label], str(i) + ".png")
        print("writing " + output_filename)
        with open(output_filename, "wb") as h:
            w = png.Writer(cols, rows, greyscale=True)
            data_i = [
                data[ (i*rows*cols + j*cols) : (i*rows*cols + (j+1)*cols) ]
                for j in range(rows)
            ]
            w.write(h, data_i)

if __name__ == "__main__":
    if len(sys.argv) != 3:
        print("usage: {0} <input_path> <output_path>".format(sys.argv[0]))
        sys.exit()

    input_path = sys.argv[1]
    output_path = sys.argv[2]

    for dataset in ["training", "testing"]:
        labels, data, size, rows, cols = read(dataset, input_path)
        write_dataset(labels, data, size, rows, cols,
                      path.join(output_path, dataset))

使用以下方法检查生成的PNG文件:

identify out/testing/0/10.png

给出:

out/testing/0/10.png PNG 28x28 28x28+0+0 8-bit Gray 256c 272B 0.000u 0:00.000

因此它们看起来是灰度和8位,因此应该忠实地表示原始数据。

在Ubuntu 22.10上进行了测试。


-4

我遇到了同样的问题。

每当我将文件解压缩成可执行文件时,扩展名并没有被删除,所以我得到了:

train-images-idx3-ubyte.gz

每当我去掉了: .gz 之后,我得到了:
train-images-idx3-ubyte

这解决了我的问题。


网页内容由stack overflow 提供, 点击上面的
可以查看英文原文,
原文链接