如何在Swagger UI中发送带有Authorization头的请求?

22

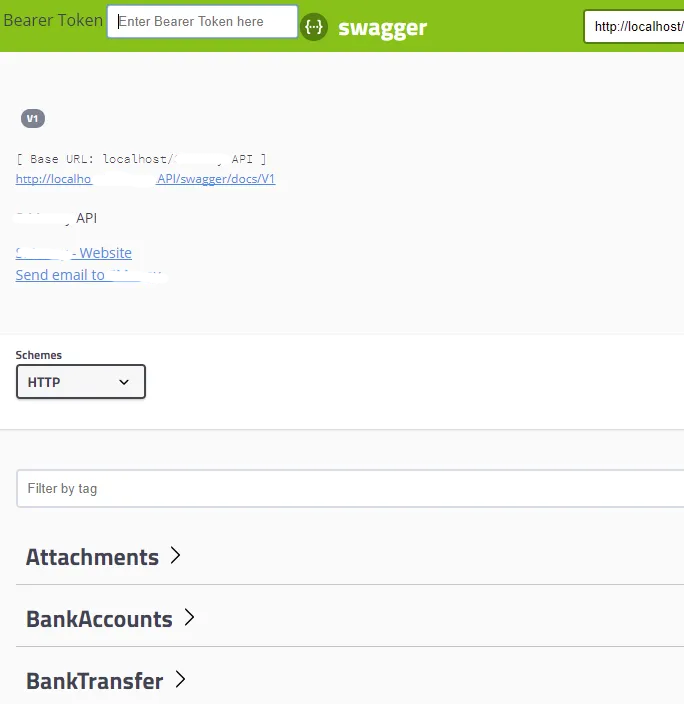
我有一个ASP.NET Web Api 2应用程序。我添加了Swashbuckle(.NET的Swagger)。它可以显示我的端点,但是为了发送请求,我需要附加Authorization标头到请求中。如果我理解正确,我需要修改index.html文件才能实现这个目的(https://github.com/swagger-api/swagger-ui#how-to-use-it)。因此,我克隆了Swashbuckle项目以便修改index.html并添加一些标头。

是在Swashbuckle中发送请求时必须修改index.html文件吗?


@AlbertoPellizzon - 我应该在哪里添加那段代码?是哪个文件? - Marta
在swaggerUi初始化之后,尝试搜索它的初始化位置,类似于以下代码: var swaggerUi = new SwaggerUi({}); - Alberto Pellizzon
我在我的代码中没有类似的东西。我有: GlobalConfiguration.Configuration .EnableSwagger(c => { c.SingleApiVersion("v1", "MyApplication"); }) .EnableSwaggerUi(c => {})); 在SwaggerConfig.cs文件中。 - Marta
我认为你正在使用原始JS库的包装器CS,这个东西应该最终生成JavaScript,所以找出JS在哪里。 - Alberto Pellizzon
2
好的,看起来我需要修改包含一些JavaScript的index.html文件。当我完全解决问题时,我会回答这个问题。 - Marta
显示剩余3条评论
4个回答

11

为了在Swagger UI中使用Authorization头向请求发送数据,我需要:

  1. 假设我的程序集名字是:My.Assembly,并且其中包含一个名为Swagger的文件夹,在该文件夹下添加了自定义的index.html页面,我需要在SwaggerConfig.cs文件中添加以下代码:

  2.  c.CustomAsset("index", thisAssembly, "My.Assembly.Swagger.index.html");
    
    注意,index.html文件加载javascript和css文件。为了使这些文件能够加载,我不得不在文件路径中将所有的点改为破折号。我不知道为什么必须这样做,但这解决了加载文件的问题...
    在index.html文件中,我修改了addApiKeyAuthorization()函数,使其看起来像这样:
    function addApiKeyAuthorization() {
            var key = encodeURIComponent($('#input_apiKey')[0].value);
            if (key && key.trim() != "") {
                var value = "auth-scheme api_key=123456,order_id=56789";
                var authKeyHeader = new SwaggerClient.ApiKeyAuthorization("Authorization", value, "header");
                window.swaggerUi.api.clientAuthorizations.add("Authorization", authKeyHeader);
            }
        }
    
    1. 我还取消了这段代码的注释:

    Note我将“query”更改为“header”。

    var apiKey = "this field represents header but can be anything as long as its not empty";
    $('#input_apiKey').val(apiKey);
    

这将在第二个文本字段中显示文本,但似乎它的内容并不重要,只要不为空即可。

对我来说这很有效,并使我能够加载自定义的index.html文件。现在我正在考虑让Swagger UI用户操作头参数的值...


1
它对我也不起作用,没有错误。 你在哪里调用了addApiKeyAuthorization? - Campinho

4

我在一个js文件中添加了以下代码,并将其作为嵌入式资源添加到我的Web API项目中。当您构建和运行Swagger时,api_key文本框将被替换为授权密钥文本框,在其中您可以粘贴您的AuthKey,并且在每个请求中,Swagger将把它添加到请求头中。

(function () {

    $(function () {
        var basicAuthUI =
         '<div class="input"><input placeholder="Authorization Token" id="input_token" name="token" type="text"></div>';
            $(basicAuthUI).insertBefore('#api_selector div.input:last-child');
            $("#input_apiKey").hide();
            $('#input_token').change(addAuthorization);
    });

    function addAuthorization() {
        var token = $('#input_token').val();

        if (token && token.trim() !== "" ) {
            window.swaggerUi.api.clientAuthorizations.add("api_key", new window.SwaggerClient.ApiKeyAuthorization("Authorization", "Bearer " + token, "header"));
            console.log("authorization added: Bearer = " + token);
        }
    }

})();

4

我认为通过修改index.html发送授权标头不是一个好的方式。你只能添加一些设置来实现这个目的。
这是我的解决方案:
1. 在Starup.csConfigureServices方法中添加设置。

    public void ConfigureServices(IServiceCollection services)
    {
        services.AddSwaggerGen(config => {
            config.SwaggerDoc("v1", new OpenApiInfo() { Title = "WebAPI", Version = "v1" });
            config.AddSecurityDefinition("Bearer", new OpenApiSecurityScheme
            {
                Name = "Authorization",
                In = ParameterLocation.Header,
                Type = SecuritySchemeType.ApiKey,
                Scheme = "Bearer"
            });
            config.AddSecurityRequirement(new OpenApiSecurityRequirement
            {
                {
                    new OpenApiSecurityScheme
                    {
                        Reference = new OpenApiReference
                        {
                            Type = ReferenceType.SecurityScheme,
                            Id = "Bearer"
                        }
                    },
                    Array.Empty<string>()
                }
            });
        });
    }

2.在Startup.cs文件的Configure方法中添加设置。

    public void Configure(IApplicationBuilder app, IWebHostEnvironment env)
    {
        app.UseSwagger();
        app.UseSwaggerUI(c => c.SwaggerEndpoint("/swagger/v1/swagger.json", "API Document"));
    }

添加设置后,运行该项目,您将在swagger页面找到一个授权按钮,并可以使用它来设置授权标头。

1

对于Bearer令牌,我是这样做的:我只使用Swashbuckle来生成swagger.json文件,并使用Swagger.Net显示最新的SwaggerUI版本(3.xx)并对其进行自定义:

因此,在我的项目引用中,我已添加了以下内容(通过NuGet):

references

swaggerui

在index.html中:
<input id="bearer-code-input" type="text" placeholder="Enter Bearer Token here" style="width: auto" value="yourtoken" />

然后在SwaggerUIBundle构造函数中:

const ui = SwaggerUIBundle({
...,
requestInterceptor: function (req) {
req.headers = {
'Authorization': 'Bearer ' + document.getElementById('bearer-code-
input').value
, 'Accept': 'application/json',
'Content-Type': 'application/json'
};
return req;
},
... })

结果展示: result

我也定制了许多其他功能(JSON模型绑定器,查询字符串解析,自定义SwaggerGenerator来覆盖默认的ConflictingActionsResolver行为以处理多个路由路径,但这不在本主题的范围内)。


网页内容由stack overflow 提供, 点击上面的
可以查看英文原文,
原文链接