在GDI中设置像素的高效方法是什么?

6

我创建了一个基本程序,在Windows控制台中使用SetPixel()方法渲染精灵,它可以正常工作,但是有很大的开销。

我已经对此进行了一些优化,这有所帮助,但速度仍然太慢。

目前我的程序使用两个COLORREF缓冲区,将更新的缓冲区绘制到屏幕上,交换它们并重新开始。然而,只有当像素发生变化时,才会重新绘制像素。这大大提高了性能,但仍然很慢。缓冲区交换尚未使用指针完成,但真正的开销在于SetPixel(),因此,我正在寻找一种比SetPixel()更快的使用GDI创建像素级图形的替代方法。

(忽略anim_frame和img_data向量的第一维,它们只是为了以后添加动画对象而存在)

void graphics_context::update_screen()
{
update_buffer();

for (int x = 0; x < this->width; x++)
{
    for (int y = 0; y < this->height; y++)
    {
        if (this->buffer.at(x).at(y) != this->buffer_past.at(x).at(y))
        {
            for (int i = 0; i < this->scale_factor; i++)
            {
                for (int j = 0; j < this->scale_factor; j++)
                {
                    int posX = i + (this->scale_factor  * x) + this->width_offset;
                    int posY = j + (this->scale_factor  * y) + this->height_offset;

                    SetPixel(this->target_dc, posX, posY, this->buffer.at(x).at(y));
                }
            }
        }
    }
}

buffer_past = buffer;
}

以下是update_buffer()方法:

void graphics_context::update_buffer()
{
for (int x = 0; x < this->width; x++)
{
    for (int y = 0; y < this->height; y++)
    {
        buffer.at(x).at(y) = RGB(0, 0, 0);
    }
}

//this->layers.at(1)->sprite; <- pointer to member gfx_obj pointer

for (int i = 0; i < this->layers.size(); i++)
{
    gfx_object tmp_gfx = *this->layers.at(i)->sprite;

    for (int x = 0; x < tmp_gfx.img_data.at(0).size(); x++)
    {
        for (int y = 0; y < tmp_gfx.img_data.at(tmp_gfx.anim_frame).at(0).size(); y++)
        {
            if(tmp_gfx.img_data.at(tmp_gfx.anim_frame).at(x).at(y) != RGB(0,255,0))
            buffer.at(x + this->layers.at(i)->locX).at(y + this->layers.at(i)->locY) = tmp_gfx.img_data.at(tmp_gfx.anim_frame).at(x).at(y);
        }
    }
}
}
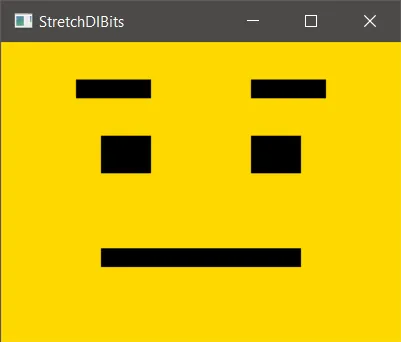
1
SetPixel 因为每次调用都必须发现正在写入的图像的属性,所以速度非常慢。使用 LockBits 直接操作位图字节要快得多,就像 这个问题 中所示,但这也更加复杂,因为位图格式可能不同。 - 500 - Internal Server Error
如果 target_dc 是窗口设备上下文,则会进行许多 GDI 调用,这会非常慢。如果 target_dc 是内存设备上下文,则 SetPixel 的速度较快。使用 SetPixelV 这个函数,它不返回已存在的颜色,并且速度更快。但无论哪种方式都是错误的。最后您需要使用 BitBlt 来绘制图像。您也可以使用 BitBlt 来绘制精灵。 - Barmak Shemirani
.at 也不是很快,但这可能是次要的。 - MSalters
@BarmakShemirani 那我得切换到使用位图来获得相对高效的绘制?而 target_dc 是一个窗口设备上下文。 - Kivi
@MSalters,[] 运算符更快吗?还是我应该通过一些指针魔法直接访问内存? - Kivi
@kivi:是的,operator[]是正确的方法。指针操作可能会更慢,因为优化器需要回退。 - MSalters
2个回答

8
理想情况下,您希望每帧只使用 BitBlt 一次并在屏幕上绘制。
否则,您需要为每帧进行多次绘制调用,而且绘制速度慢且容易出现闪烁。例如:
case WM_PAINT: 
{
    PAINTSTRUCT ps;
    auto hdc = BeginPaint(hwnd, &ps);

    for (...)
        SetPixelV(hdc, ...) //<- slow with possible flicker

    EndPaint(hwnd, &ps);
    return 0;
}

主要问题不在于SetPixel,而是我们为每个帧向图形卡发送了数千个绘图请求。

我们可以通过使用“内存设备上下文”的缓冲区来解决这个问题:

HDC hdesktop = GetDC(0);
memdc = CreateCompatibleDC(hdesktop);
hbitmap = CreateCompatibleBitmap(hdesktop, w, h);
SelectObject(memdc, hbitmap);

现在,您可以在memdc上进行所有绘图操作。由于这些绘图不发送到显卡,因此速度很快。完成在memdc上的绘制后,您需要使用BitBltmemdc复制到实际的hdc目标窗口设备上下文中:
//draw on memdc instead of drawing on hdc:
...

//draw memdc on to hdc:
BitBlt(hdc, 0, 0, w, h, memdc, 0, 0, SRCCOPY);

实际上,你很少需要使用 SetPixel。通常,你会将位图加载到背景和精灵中,然后在 memdc 上绘制所有内容,并使用 BitBlthdc
在 Windows Vista 及以上版本中,你可以使用 BeginBufferedPaint 例程,这可能会更加方便。例如:
#ifndef UNICODE
#define UNICODE
#endif
#include <Windows.h>

class memory_dc
{
    HDC hdc;
    HBITMAP hbitmap;
    HBITMAP holdbitmap;
public:
    int w, h;

    memory_dc()
    {
        hdc = NULL;
        hbitmap = NULL;
    }

    ~memory_dc()
    {
        cleanup();
    }

    void cleanup()
    {
        if(hdc)
        {
            SelectObject(hdc, holdbitmap);
            DeleteObject(hbitmap);
            DeleteDC(hdc);
        }
    }

    void resize(int width, int height)
    {
        cleanup();
        w = width;
        h = height;
        HDC hdesktop = GetDC(0);
        hdc = CreateCompatibleDC(hdesktop);
        hbitmap = CreateCompatibleBitmap(hdesktop, w, h);
        holdbitmap = (HBITMAP)SelectObject(hdc, hbitmap);
        ReleaseDC(0, hdc);
    }

    //handy operator to return HDC
    operator HDC() { return hdc; }
};

LRESULT CALLBACK WndProc(HWND hwnd, UINT msg, WPARAM wparam, LPARAM lparam)
{
    static memory_dc buffer;
    static memory_dc sprite;
    static memory_dc background;

    switch(msg)
    {
    case WM_CREATE:
    {
        RECT rc;
        GetClientRect(hwnd, &rc);

        buffer.resize(rc.right, rc.bottom);
        background.resize(rc.right, rc.bottom);
        sprite.resize(20, 20);

        //draw the background
        rc = RECT{ 0, 0, sprite.w, sprite.h };
        FillRect(sprite, &rc, (HBRUSH)GetStockObject(GRAY_BRUSH));

        //draw the sprite
        rc = RECT{ 0, 0, background.w, background.h };
        FillRect(background, &rc, (HBRUSH)GetStockObject(WHITE_BRUSH));

        return 0;
    }

    case WM_PAINT: 
    {
        PAINTSTRUCT ps;
        auto hdc = BeginPaint(hwnd, &ps);

        //draw the background on to buffer
        BitBlt(buffer, 0, 0, background.w, background.w, background, 0, 0, SRCCOPY);

        //draw the sprite on top, at some location
        //or use TransparentBlt...
        POINT pt;
        GetCursorPos(&pt);
        ScreenToClient(hwnd, &pt);
        BitBlt(buffer, pt.x, pt.y, sprite.w, sprite.h, sprite, 0, 0, SRCCOPY);

        //draw the buffer on to HDC
        BitBlt(hdc, 0, 0, buffer.w, buffer.w, buffer, 0, 0, SRCCOPY);

        EndPaint(hwnd, &ps);
        return 0;
    }

    case WM_MOUSEMOVE:
        InvalidateRect(hwnd, NULL, FALSE);
        return 0;

    case WM_DESTROY:
        PostQuitMessage(0);
        return 0;
    }

    return DefWindowProc(hwnd, msg, wparam, lparam);
}

int WINAPI wWinMain(HINSTANCE hInstance, HINSTANCE, LPTSTR, int)
{
    WNDCLASSEX wcex = { sizeof(WNDCLASSEX) };
    wcex.lpfnWndProc = WndProc;
    wcex.hInstance = hInstance;
    wcex.hCursor = LoadCursor(NULL, IDC_ARROW);
    wcex.hbrBackground = (HBRUSH)(COLOR_WINDOW + 1);
    wcex.lpszClassName = L"classname";
    RegisterClassEx(&wcex);

    CreateWindow(wcex.lpszClassName, L"Test", WS_VISIBLE | WS_OVERLAPPEDWINDOW, 
        0, 0, 600, 400, 0, 0, hInstance, 0);

    MSG msg;
    while(GetMessage(&msg, NULL, 0, 0))
    {
        TranslateMessage(&msg);
        DispatchMessage(&msg);
    }

    return (int)msg.wParam;
}

注意,这对于简单的绘图已经足够了。但是GDI函数无法处理矩阵等复杂操作,它们的透明度支持有限,因此您可能需要使用不同的技术,例如Direct2D,它与GPU的集成更好。

这个很顺利,我从中得到了一些合理的结果,现在我知道我的代码还有很多不必要的开销需要修复。 - Kivi
太好了。我更新了memory_dc类,使其具有GDI对象的自动清理功能。 - Barmak Shemirani

1

如果您对像素拥有完全控制权,请使用SetDIBitsToDeviceStretchDIBits。您甚至不需要创建内存设备上下文。

这是一个16x16位图,使用StretchDIBits手动定义并显示:

StretchDIBits

#include <windows.h>
#include <cstdint>
const int CLIENT_WIDTH = 320;
const int CLIENT_HEIGHT = 240;
const int IMAGE_WIDTH = 16;
const int IMAGE_HEIGHT = 16;
const uint32_t bg = 0xffd800;
const uint32_t imageData [16*16] = {
bg, bg, bg, bg, bg, bg, bg, bg, bg, bg, bg, bg, bg, bg, bg, bg,
bg, bg, bg,  0,  0,  0, bg, bg, bg, bg,  0,  0,  0, bg, bg, bg,
bg, bg, bg, bg, bg, bg, bg, bg, bg, bg, bg, bg, bg, bg, bg, bg,
bg, bg, bg, bg,  0,  0, bg, bg, bg, bg,  0,  0, bg, bg, bg, bg,
bg, bg, bg, bg, bg, bg, bg, bg, bg, bg, bg, bg, bg, bg, bg, bg,
bg, bg, bg, bg,  0,  0,  0,  0,  0,  0,  0,  0, bg, bg, bg, bg,
bg, bg, bg, bg, bg, bg, bg, bg, bg, bg, bg, bg, bg, bg, bg, bg,
};

void drawImage(HDC hdc)
{
  BITMAPINFOHEADER bmih = {0};
  bmih.biSize     = sizeof(BITMAPINFOHEADER);
  bmih.biWidth    = IMAGE_WIDTH;
  bmih.biHeight   = -IMAGE_HEIGHT;
  bmih.biPlanes   = 1;
  bmih.biBitCount = 32;
  bmih.biCompression  = BI_RGB ;
  bmih.biSizeImage    = 0;
  bmih.biXPelsPerMeter    =   10;
  bmih.biYPelsPerMeter    =   10;

  BITMAPINFO dbmi = {0};
  dbmi.bmiHeader = bmih;

  // Draw pixels without stretching
//  SetDIBitsToDevice(hdc, 0, 0, IMAGE_WIDTH, IMAGE_HEIGHT,
//                    0, 0, 0, IMAGE_HEIGHT, imageData, &dbmi, 0 );

  StretchDIBits(hdc, 0, 0, CLIENT_WIDTH, CLIENT_HEIGHT,
                0, 0, IMAGE_WIDTH, IMAGE_HEIGHT,
                imageData, &dbmi, 0, SRCCOPY);
}

LRESULT CALLBACK WndProc(HWND hwnd, UINT Message, WPARAM wParam, LPARAM lParam) {
  switch(Message) {
    case WM_PAINT: {
      PAINTSTRUCT ps ;
      HDC hdc = BeginPaint(hwnd, &ps);
      drawImage(hdc);
      EndPaint(hwnd, &ps) ;
      break;
    }
    case WM_DESTROY: { PostQuitMessage(0); break; }
    default: return DefWindowProc(hwnd, Message, wParam, lParam);
  }
  return 0;
}

int WINAPI WinMain(HINSTANCE hInstance, HINSTANCE hPrevInstance,
                   LPSTR lpCmdLine, int nCmdShow) {
  WNDCLASSEX wc = {0};
  HWND hwnd;
  MSG msg;
  wc.cbSize    = sizeof(WNDCLASSEX);
  wc.lpfnWndProc = WndProc;
  wc.hInstance = hInstance;
  wc.lpszClassName = "GDIPixelsClass";
  wc.hbrBackground = (HBRUSH)GetStockObject(BLACK_BRUSH);
  RegisterClassEx(&wc);
  hwnd = CreateWindowEx(WS_EX_CLIENTEDGE,wc.lpszClassName,"StretchDIBits",
                        WS_VISIBLE|WS_OVERLAPPEDWINDOW,
                        CW_USEDEFAULT, CW_USEDEFAULT, 480, 320,
                        NULL,NULL,hInstance,NULL);
  DWORD dwStyle = (DWORD)GetWindowLongPtr( hwnd, GWL_STYLE ) ;
  DWORD dwExStyle = (DWORD)GetWindowLongPtr( hwnd, GWL_EXSTYLE ) ;
  HMENU menu = GetMenu( hwnd ) ;
  RECT rc = { 0, 0, CLIENT_WIDTH, CLIENT_HEIGHT } ;
  AdjustWindowRectEx( &rc, dwStyle, menu ? TRUE : FALSE, dwExStyle );
  SetWindowPos( hwnd, NULL, 0, 0, rc.right - rc.left, rc.bottom - rc.top,
                SWP_NOZORDER | SWP_NOMOVE ) ;
  while(GetMessage(&msg, NULL, 0, 0) > 0) {
    TranslateMessage(&msg);
    DispatchMessage(&msg);
  }
  return msg.wParam;
}

网页内容由stack overflow 提供, 点击上面的
可以查看英文原文,
原文链接