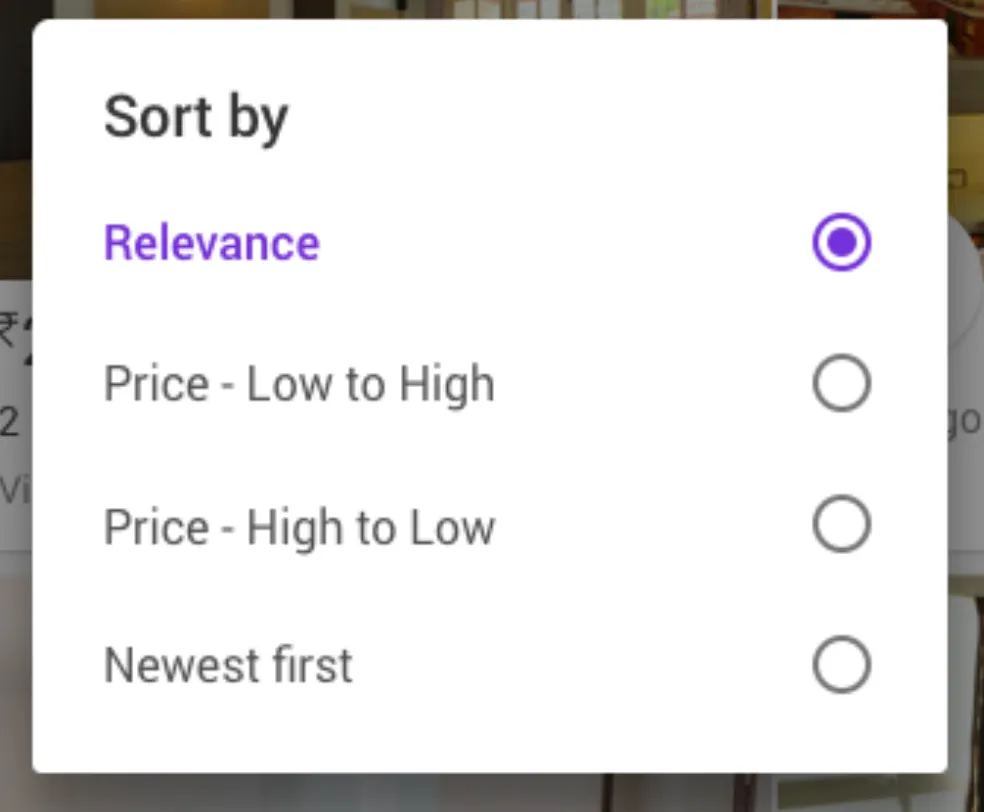
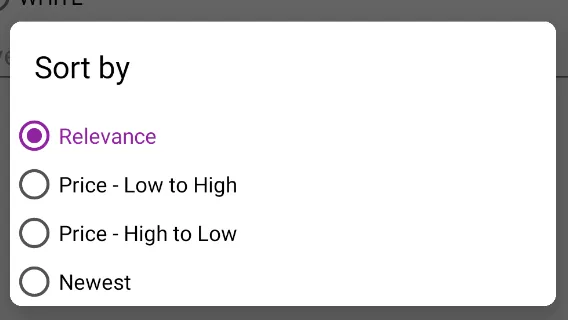
样式单选按钮和文本在AlertDialog内部

13

我想在AlertDialog中展示一个带有自定义样式的单选框列表,类似于this

因此,我创建了一个自定义主题,并将其作为参数提供给AlertDialog.Builder的构造函数。

下面是显示对话框的代码:

private void showSortDialog() {
final CharSequence[] options = new String[] {"Relevance", "Newest"};
    AlertDialog.Builder builder = new AlertDialog.Builder(getActivityReference(),
                                                          R.style.RadioDialogTheme);
    builder.setTitle("Sort by");
    builder.setSingleChoiceItems(options, -1, new DialogInterface.OnClickListener() {
    . . . . 
    builder.create().show();
}

这是样式:

<style name="RadioDialogTheme" parent="Theme.AppCompat.Light.Dialog.Alert">
    <item name="android:textColorAlertDialogListItem">@drawable/radiobutton_textcolor_selector
    </item>
    <item name="android:listChoiceIndicatorSingle">@drawable/apptheme_btn_radio_holo_light
    </item>
</style>

我能够找到一些属性,将其添加到我的样式中以更改单选按钮 / 文本的颜色,但是我无法自定义文本外观(我想更改大小,提供填充等)。

我确定有一些属性可以用来样式化文本,但我找不到它。请问有人能帮我吗?谢谢。

3个回答

3
我猜你需要的几乎就是以下内容:

我想这几乎是你所需要的:

fun showSortDialog(context: Activity) {
    val options = arrayOf(
        "Relevance",
        "Price - Low to High",
        "Price - High to Low",
        "Newest"
    )
    val builder = AlertDialog.Builder(context, R.style.MultiChoiceAlertDialog)
    val view = context.layoutInflater.inflate(R.layout.dialog_custom, null, false)
    val radioGroup = view.findViewById<RadioGroup>(R.id.radiogroup)

    val purpleColor = ContextCompat.getColor(context, R.color.purple)
    val radioStyle = ContextThemeWrapper(radioGroup.context, R.style.MyRadioButton)
    for (option in options) {
        val radioButton = RadioButton(radioStyle)
        radioButton.setText(option)
        radioGroup.addView(radioButton)
    }
    radioGroup.setOnCheckedChangeListener { group, checkedId ->
        for (child in radioGroup.children) {
            child as RadioButton
            if (child.id == checkedId) {
                child.setTextColor(purpleColor)
            } else {
                child.setTextColor(Color.BLACK)
            }
        }
    }
    builder.setView(view)
    builder.show()
}

样式:

 <style name="YourAlertDialog.Button" parent="Widget.MaterialComponents.Button.TextButton">
    <item name="android:textColor">@color/colorPrimary</item>
    <item name="android:textSize">20sp</item>
    <item name="android:textAllCaps">false</item>
    <item name="android:gravity">left</item>
    <item name="android:letterSpacing">0</item>
</style>
<style name="MultiChoiceAlertDialog" parent="Theme.MaterialComponents.Light.Dialog.Alert">
    <item name="buttonBarPositiveButtonStyle">@style/YourAlertDialog.Button</item>
    <item name="buttonBarNegativeButtonStyle">@style/YourAlertDialog.Button</item>
    <item name="buttonBarNeutralButtonStyle">@style/YourAlertDialog.Button</item>
    <item name="android:background">#fff</item>
    <item name="android:textColorPrimary">#000</item>
    <item name="android:textColor">@drawable/selector_custom</item>
    <item name="android:colorActivatedHighlight">#0f0</item>
    <item name="android:colorControlActivated">#00f</item>
    <item name="colorControlNormal">@color/gray</item>
    <item name="colorControlActivated">@color/purple</item>
    <item name="dialogCornerRadius">8dp</item>
</style>

<style name="MyRadioButton" parent="Theme.AppCompat.Light">
    <item name="colorControlNormal">@color/gray</item>
    <item name="colorControlActivated">@color/purple</item>
</style>

以及自定义布局(dialog_custom.xml):

<?xml version="1.0" encoding="utf-8"?>
<LinearLayout xmlns:android="http://schemas.android.com/apk/res/android"
android:layout_width="wrap_content"
android:layout_height="match_parent"
android:orientation="vertical">
<androidx.appcompat.widget.AppCompatTextView
    android:layout_width="wrap_content"
    android:layout_height="wrap_content"
    android:layout_margin="16dp"
    android:text="Sort by"
    android:textColor="#000"
    android:textSize="20sp" />
<RadioGroup
    android:id="@+id/radiogroup"
    android:layout_width="match_parent"
    android:layout_height="wrap_content">
</RadioGroup>

screenshot


1
首先,制作对话框布局如下:
<androidx.appcompat.widget.AppCompatTextView
                android:id="@+id/tv_title"
                android:layout_width="match_parent"
                android:layout_height="@dimen/_40sdp"
                android:layout_gravity="center|start"
                android:layout_marginStart="@dimen/_25sdp"
                android:layout_marginTop="@dimen/_20sdp"
                android:layout_marginEnd="@dimen/_25sdp"
                android:layout_marginBottom="@dimen/_10sdp"
                android:fontFamily="@font/lato_bold"
                android:gravity="center|start"
                android:text="@string/text_select_speciality"
                android:textColor="@color/color_dark_grey"
                android:textSize="@dimen/_20ssp" />

            <androidx.recyclerview.widget.RecyclerView
                android:id="@+id/rv_speciality_list"
                android:layout_width="match_parent"
                android:layout_height="wrap_content"
                android:layout_marginBottom="@dimen/_15sdp"
                tools:listitem="@layout/item_speciality" />

然后像这样为Recyclerview创建一个项目,我的情况下使用了Checkbox,但你也可以使用Radiobutton:

<androidx.appcompat.widget.AppCompatCheckBox
        android:id="@+id/rb_title"
        android:layout_width="match_parent"
        android:layout_height="@dimen/_40sdp"
        android:layout_marginStart="@dimen/_25sdp"
        android:layout_marginEnd="@dimen/_25sdp"
        android:button="@drawable/radio_button_selector"
        android:gravity="center|start"
        android:paddingStart="@dimen/_20sdp"
        android:paddingEnd="@dimen/_20sdp"
        android:text="@string/text_speciality"
        android:textColor="@color/color_dark_grey"
        android:textSize="@dimen/_14ssp" />

然后按照以下方式初始化对话框和 RecyclerView:
private void showDialog() {
        dialog = new Dialog(LastActivity.this, R.style.DialogSlideAnim);
        dialog.requestWindowFeature(Window.FEATURE_NO_TITLE);
        dialog.setCancelable(false);
        dialog.setContentView(R.layout.dialog);
        Objects.requireNonNull(dialog.getWindow()).setLayout(WindowManager.LayoutParams.MATCH_PARENT, WindowManager.LayoutParams.WRAP_CONTENT);

        if (dialog.getWindow() != null)
            dialog.getWindow().setBackgroundDrawable(new ColorDrawable(Color.TRANSPARENT));

        AppCompatTextView tv_title = dialog.findViewById(R.id.tv_title);
        tv_title.setText(getString(R.string.text_select));

        FrameLayout fl_close = dialog.findViewById(R.id.fl_close);
        fl_close.setOnClickListener(new View.OnClickListener() {
            @Override
            public void onClick(View view) {
                dialog.dismiss();
            }
        });

        LinearLayoutCompat btn_ok = dialog.findViewById(R.id.btn_ok);
        btn_ok.setOnClickListener(new View.OnClickListener() {
            @Override
            public void onClick(View view) {
                dialog.dismiss();
            }
        });
        RecyclerView rv_list = dialog.findViewById(R.id.rv_list);
        if (Adapter == null) {
            Adapter = new Adapter(LastActivity.this);
        }
        Adapter.doRefresh(specialityList);
        if (rv_list.getAdapter() == null) {
            rv_list.setHasFixedSize(true);
            LinearLayoutManager layoutManager = new LinearLayoutManager(DoctorRegisterLastActivity.this);
            rv_list.setLayoutManager(layoutManager);
            rv_list.setAdapter(specialityAdapter);
        }
        dialog.show();
    }

请考虑解释您的代码如何帮助解决 OP 的问题,而不仅仅是从其他地方复制和粘贴代码。 - Edric

-2
属性textSize对我有效:
<item name="android:textSize">18sp</item>

网页内容由stack overflow 提供, 点击上面的
可以查看英文原文,
原文链接