前提条件
一些预备代码:
%matplotlib inline
%load_ext Cython
import numpy as np
import cv2
from matplotlib import pyplot as plt
import skimage as sk
import skimage.morphology as skm
import itertools
def ShowImage(title,img,ctype):
plt.figure(figsize=(20, 20))
if ctype=='bgr':
b,g,r = cv2.split(img)
rgb_img = cv2.merge([r,g,b])
plt.imshow(rgb_img)
elif ctype=='hsv':
rgb = cv2.cvtColor(img,cv2.COLOR_HSV2RGB)
plt.imshow(rgb)
elif ctype=='gray':
plt.imshow(img,cmap='gray')
elif ctype=='rgb':
plt.imshow(img)
else:
raise Exception("Unknown colour type")
plt.axis('off')
plt.title(title)
plt.show()
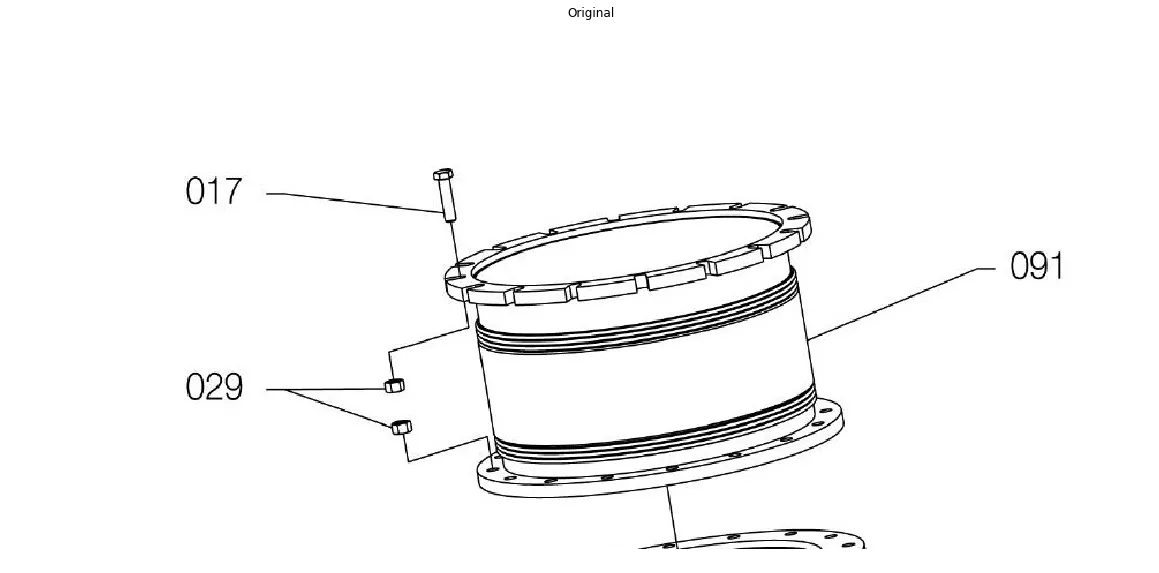
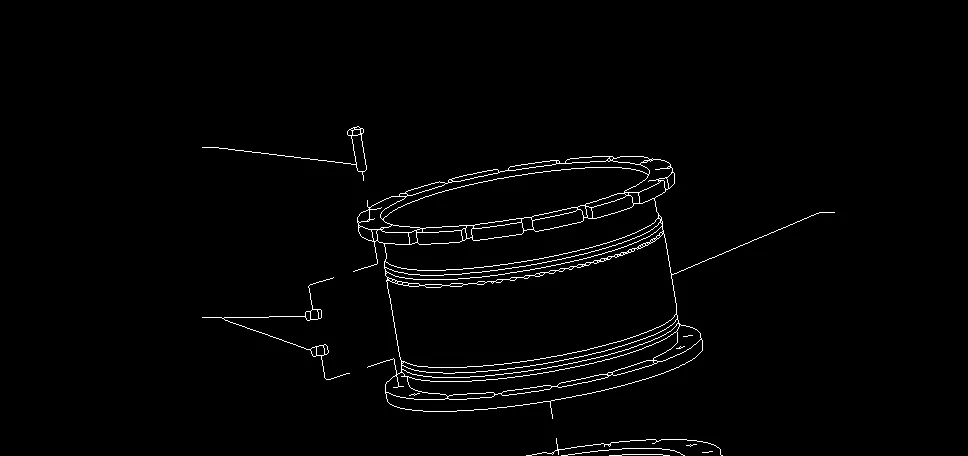
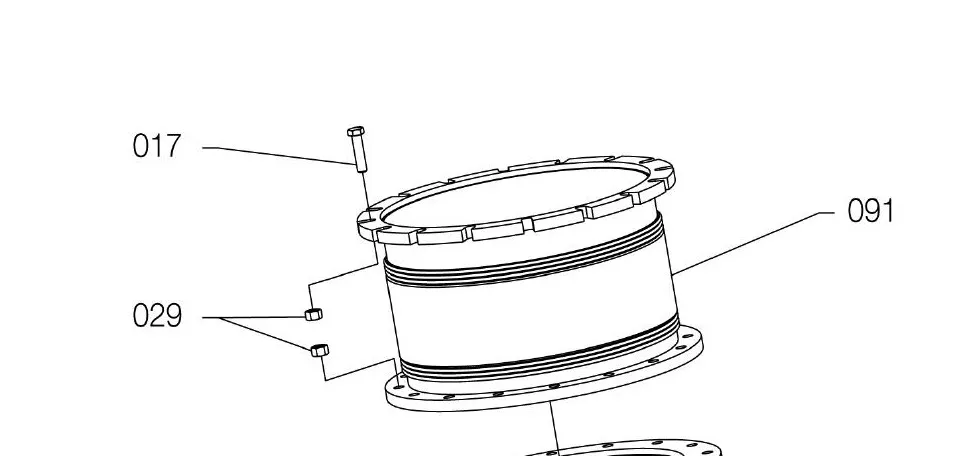
作为参考,这是您的原始图像:
#Read in image
img         = cv2.imread('part.jpg')
ShowImage('Original',img,'bgr')
识别数字
为了简化事情,我们需要将像素分类为开或关。我们可以使用阈值处理来实现。由于我们的图像包含两种明显的像素类别(黑色和白色),因此我们可以使用大津法。我们将反转颜色方案,因为我们正在使用的库认为黑色像素很无聊,而白色像素很有趣。
gray = cv2.cvtColor(img,cv2.COLOR_BGR2GRAY)
ret, thresh = cv2.threshold(gray,0,255,cv2.THRESH_BINARY_INV+cv2.THRESH_OTSU)
ShowImage('Applying Otsu',thresh,'gray')
np.unique(thresh)

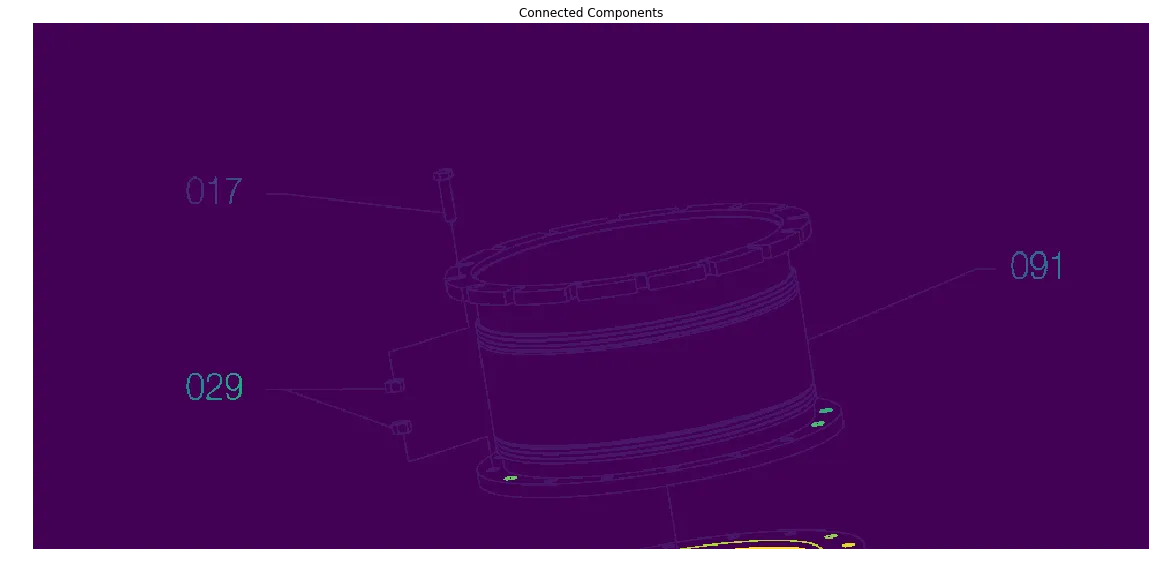
我们的策略是定位数字,然后沿着它们附近的线条到达部件,并对这些部件进行标记。由于所有阿拉伯数字都由连续的像素形成,因此我们可以从查找连接的组件开始。
ret, components = cv2.connectedComponents(thresh)
ShowImage('Connected Components', components, 'rgb')
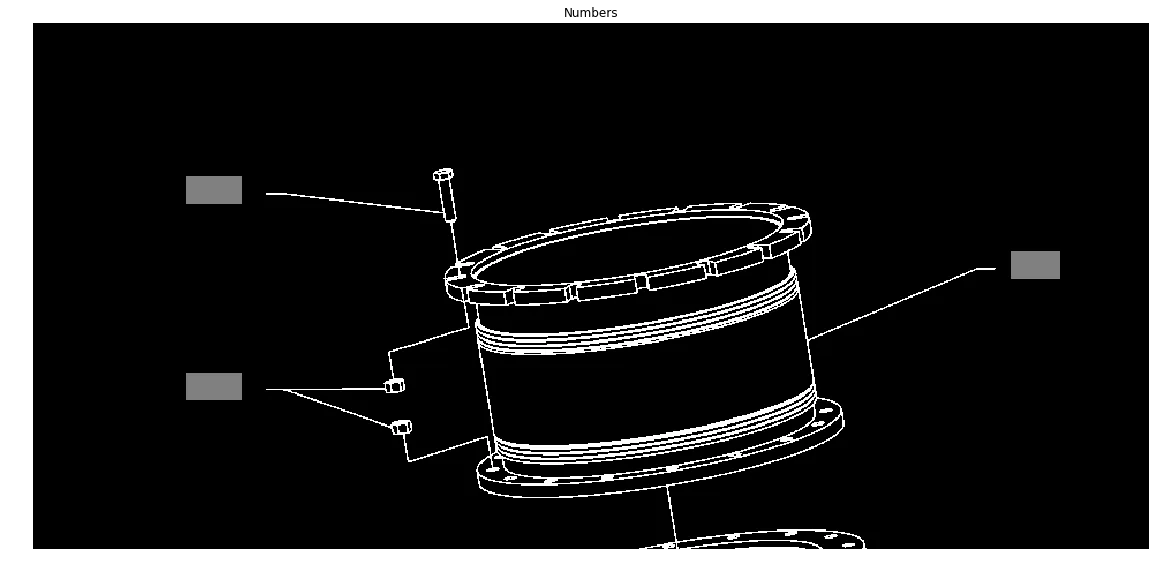
我们可以通过筛选维度来过滤连接的组件以找到数字。请注意,这不是一个非常健壮的方法。更好的选择是使用字符识别,但这留给读者作为练习 :-)
class Box:
def __init__(self,x0,x1,y0,y1):
self.x0, self.x1, self.y0, self.y1 = x0,x1,y0,y1
def overlaps(self,box2,tol):
if self.x0 is None or box2.x0 is None:
return False
return not (self.x1+tol<=box2.x0 or self.x0-tol>=box2.x1 or self.y1+tol<=box2.y0 or self.y0-tol>=box2.y1)
def merge(self,box2):
self.x0 = min(self.x0,box2.x0)
self.x1 = max(self.x1,box2.x1)
self.y0 = min(self.y0,box2.y0)
self.y1 = max(self.y1,box2.y1)
box2.x0 = None
def dist(self,x,y):
ax = (self.x0+self.x1)/2
ay = (self.y0+self.y1)/2
return np.sqrt((ax-x)**2+(ay-y)**2)
def good(self):
return not (self.x0 is None)
def ExtractComponent(original_image, component_matrix, component_number):
"""Extracts a component from a ConnectedComponents matrix"""
is_component = component_matrix==component_number
coords = np.argwhere(is_component)
y0, x0 = coords.min(axis=0)
y1, x1 = coords.max(axis=0) + 1
return x0,x1,y0,y1,original_image[y0:y1, x0:x1]
numbers_img = thresh.copy()
numbers = []
for component in range(components.max()):
tx0,tx1,ty0,ty1,this_component = ExtractComponent(thresh, components, component)
cheight, cwidth = this_component.shape
if (abs(cwidth-14)<3 or abs(cwidth-7)<3) and abs(cheight-24)<3:
numbers_img[ty0:ty1,tx0:tx1] = 128
numbers.append(Box(tx0,tx1,ty0,ty1))
ShowImage('Numbers', numbers_img, 'gray')

我们现在将数字通过稍微扩大它们的边界框并寻找重叠部分来连接成连续的块。
merged=True
while merged:
merged=False
for a,b in itertools.combinations(numbers,2):
if a.overlaps(b,10):
a.merge(b)
merged=True
numbers = [x for x in numbers if x.good()]
numbers_img = thresh.copy()
for n in numbers:
numbers_img[n.y0:n.y1,n.x0:n.x1] = 128
thresh[n.y0:n.y1,n.x0:n.x1] = 0
ShowImage('Numbers', numbers_img, 'gray')
好的,现在我们已经确定了这些数字!稍后我们将使用它们来识别部件。
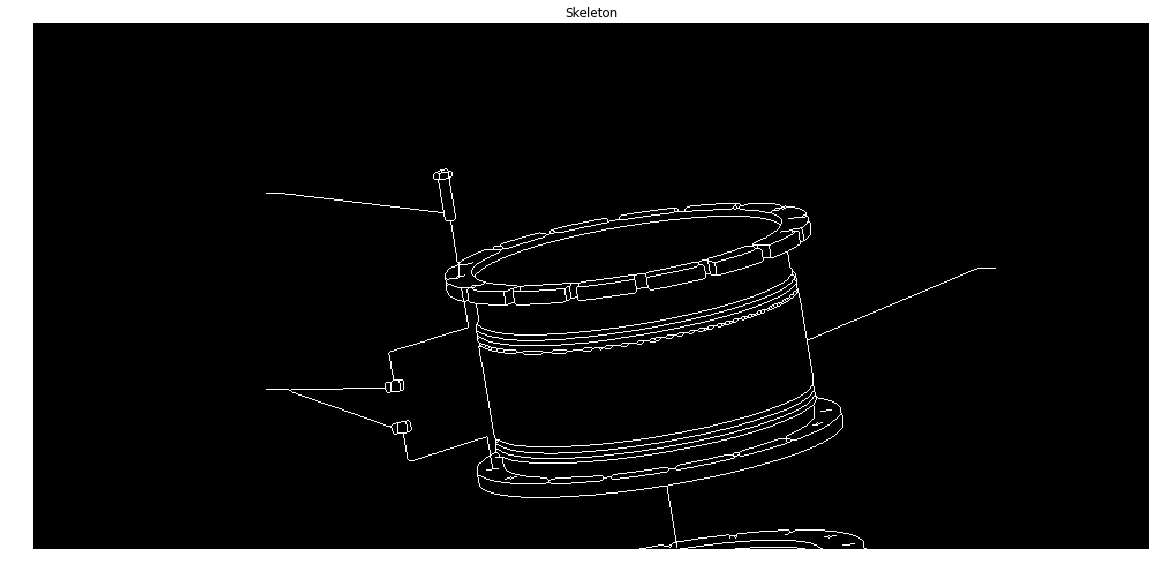
识别箭头
接下来,我们需要找出数字所指向的部分。为此,我们想要检测线条。霍夫变换很适合这个任务。为了减少误报的数量,我们对数据进行骨架化处理,将其转换成最多只有一个像素宽度的表示形式。
skel = sk.img_as_ubyte(skm.skeletonize(thresh>0))
ShowImage('Skeleton', skel, 'gray')
现在我们进行Hough变换。我们正在寻找一个可以识别从数字到零件的所有线条的变换。正确地完成这一步可能需要调整参数。
lines = cv2.HoughLinesP(
skel,
1,
np.pi / 180,
30,
None,
80,
10
)
lines = [x[0] for x in lines]
line_img = thresh.copy()
line_img = cv2.cvtColor(line_img, cv2.COLOR_GRAY2BGR)
for l in lines:
color = tuple(map(int, np.random.randint(low=0, high=255, size=3)))
cv2.line(line_img, (l[0], l[1]), (l[2], l[3]), color, 3, cv2.LINE_AA)
ShowImage('Lines', line_img, 'bgr')

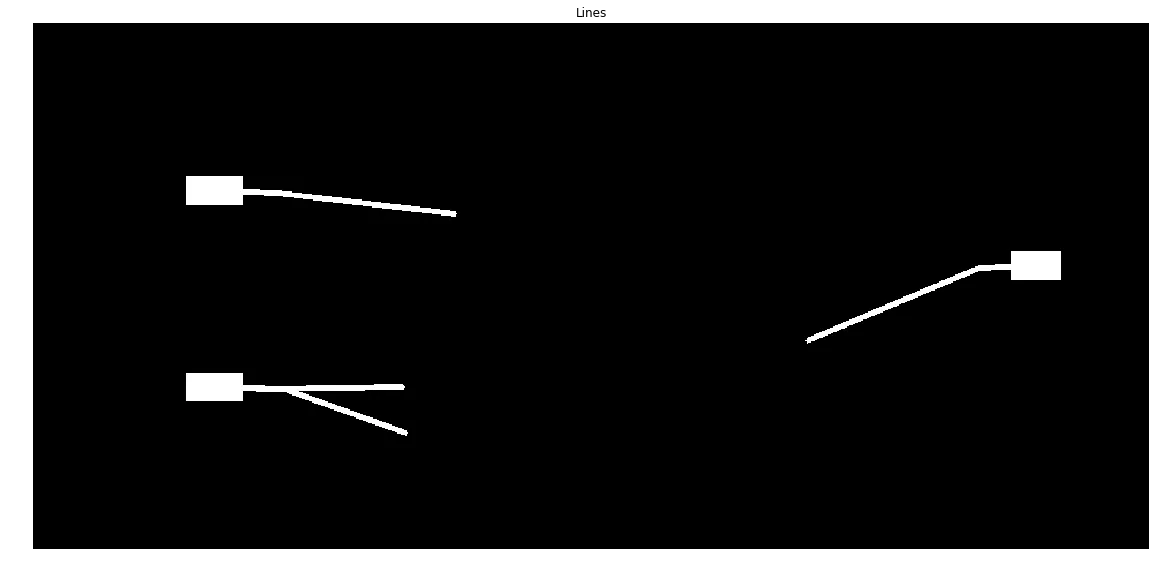
我们现在要找到最接近每个数字的直线或直线,并仅保留这些。我们实际上是过滤掉所有不是箭头的线条。为此,我们将每条线的端点与每个数字框的中心点进行比较。
comp_labels = np.zeros(img.shape[0:2], dtype=np.uint8)
for n_idx,n in enumerate(numbers):
distvals = []
for i,l in enumerate(lines):
dists = [n.dist(l[0],l[1]),n.dist(l[2],l[3])]
distvals.append( (i,np.argmin(dists),np.min(dists)) )
distvals = sorted(distvals, key=lambda x: x[2])
distvals = [x for x in distvals if x[2]<1.5*distvals[0][2]]
cv2.rectangle(comp_labels, (n.x0,n.y0), (n.x1,n.y1), 1, cv2.FILLED)
for dv in distvals:
l = lines[dv[0]]
lp = (l[0],l[1]) if dv[1]==0 else (l[2],l[3])
cv2.line(comp_labels, (l[0], l[1]), (l[2], l[3]), 1, 3, cv2.LINE_AA)
cv2.line(comp_labels, (lp[0], lp[1]), ((n.x0+n.x1)//2, (n.y0+n.y1)//2), 1, 3, cv2.LINE_AA)
ShowImage('Lines', comp_labels, 'gray')
查找零件
这部分很难!我们现在想要将图像中的零件进行分割。如果有一种方法可以断开连接子部件的线条,那么这将会很容易。不幸的是,连接子部件的线与构成零件的许多线条具有相同的宽度。
为了解决这个问题,我们可以使用大量的逻辑。这将是痛苦且容易出错的。
或者,我们可以假设您有一个专家来协助。这位专家的唯一工作就是切断连接子部件的线条。这对他们来说应该既容易又快速。对于人类来说,标记所有东西可能会很慢且令人沮丧,但对于计算机来说却很快。将事物分离对于人类来说很容易,但对于计算机来说很困难。因此,我们让两者各司其职。
在这种情况下,您可能可以在几分钟内培训某人来完成这项工作,因此真正的“专家”并不是必需的。只需要一个稍有能力的人类即可。
如果您要追求这一点,您需要编写专家协助工具。为此,保存骨架图像,让您的专家修改它们,然后再读取骨架化图像。就像这样。
skelhuman = cv2.imread('/z/skel.png')
skelhuman = cv2.cvtColor(skelhuman,cv2.COLOR_BGR2GRAY)
ret, skelhuman = cv2.threshold(skelhuman,0,255,cv2.THRESH_OTSU)
ShowImage('SkelHuman', skelhuman, 'gray')
现在我们已经把零件分开了,我们将尽可能消除箭头。我们已经提取了这些内容,因此如果需要,我们可以随时添加它们回来。
为了消除箭头,我们将找到所有终止于其他位置而不是另一条线的线条。也就是说,我们将定位只有一个相邻像素的像素。然后,我们将删除该像素并查看其邻居。通过迭代执行此操作可以消除箭头。由于我不知道其他术语,所以我将其称为“融合变换”。由于这将需要操作单个像素,在Python中速度会非常慢,因此我们将使用Cython编写转换。
%%cython -a --cplus
import cython
from libcpp.queue cimport queue
import numpy as np
cimport numpy as np
@cython.boundscheck(False)
@cython.wraparound(False)
@cython.nonecheck(False)
@cython.cdivision(True)
cpdef void FuseTransform(unsigned char [:, :] image):
cdef int c, x, y, nx, ny, width, height, neighbours
cdef queue[int] q
height = image.shape[0]
width = image.shape[1]
cdef int dx[8]
cdef int dy[8]
dx[:] = [-1,-1,0,1,1,1,0,-1]
dy[:] = [0,-1,-1,-1,0,1,1,1]
for y in range(1, height-1):
for x in range(1, width-1):
if image[y,x]==0:
continue
neighbours = 0
for n in range(0,8):
nx = x+dx[n]
ny = y+dy[n]
if image[ny,nx]>0:
neighbours += 1
if neighbours==1:
q.push(y*width+x)
while not q.empty():
c = q.front()
q.pop()
y = c//width
x = c%width
image[y,x] = 0
neighbour = -1
for n in range(0,8):
nx = x+dx[n]
ny = y+dy[n]
if nx<0 or ny<0 or nx==width or ny==height:
continue
if image[ny,nx]>0:
if neighbour!=-1:
neighbour=-1
break
else:
neighbour = ny*width+nx
if neighbour!=-1:
q.push(neighbour)
回到标准的Python:
skh_dilated=skelhuman.copy()
FuseTransform(skh_dilated)
ShowImage('Fuse Transform', skh_dilated, 'gray')

现在我们已经消除了连接部件的所有箭头和线条,我们要大幅度扩张剩下的像素。
kernel = np.ones((3,3),np.uint8)
dilated  = cv2.dilate(skh_dilated, kernel, iterations=6)
ShowImage('Dilation', dilated, 'gray')

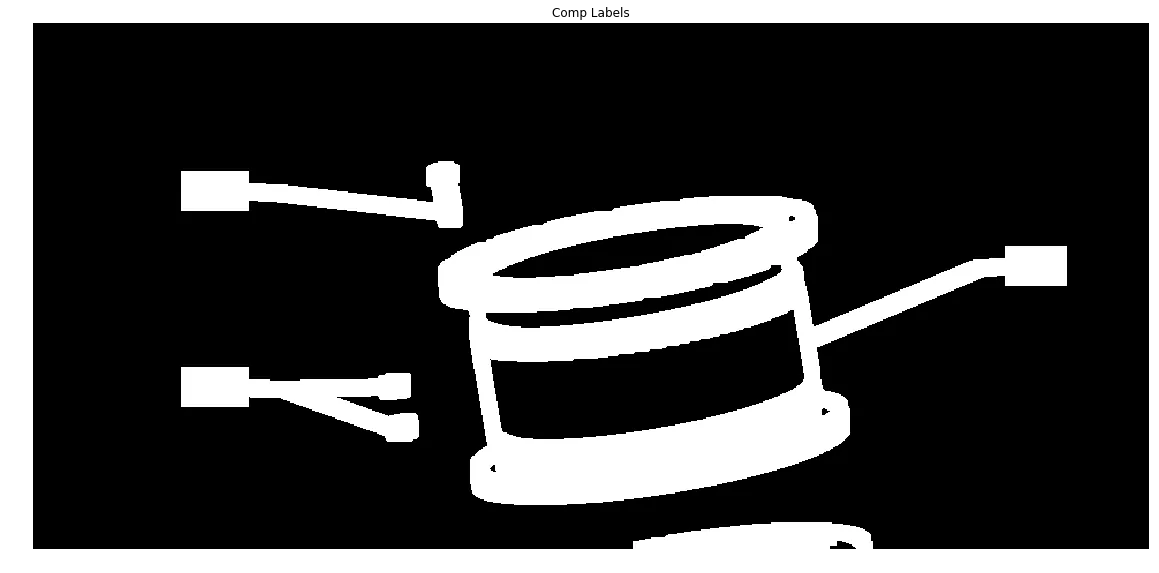
把所有东西放在一起
并且覆盖我们之前分割出来的标签和箭头...
comp_labels_dilated  = cv2.dilate(comp_labels, kernel, iterations=5)
labels_combined = np.uint8(np.logical_or(comp_labels_dilated,dilated))
ShowImage('Comp Labels', labels_combined, 'gray')
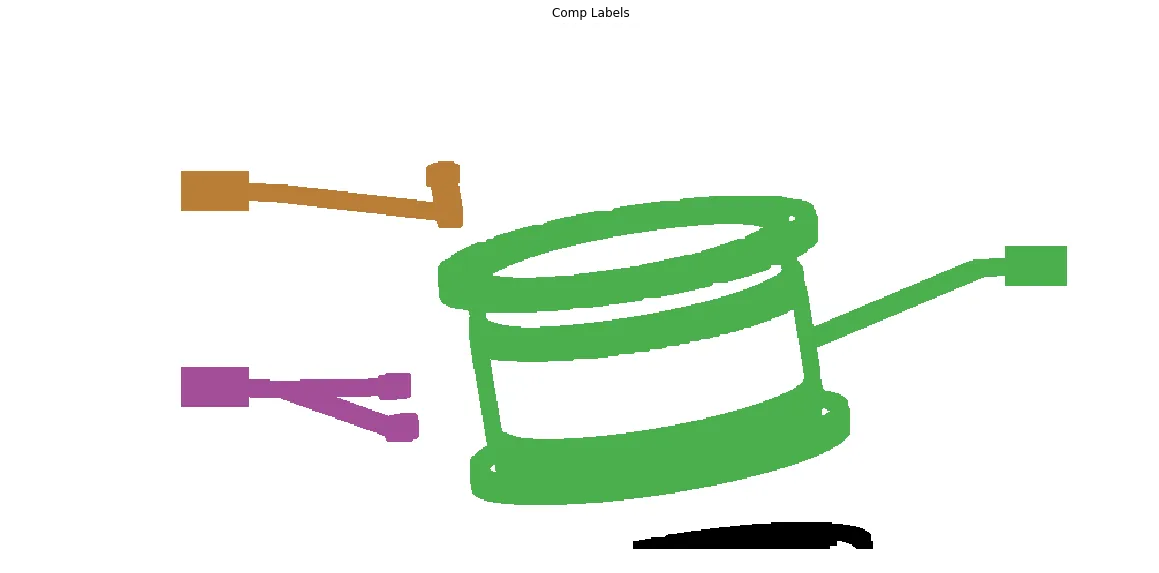
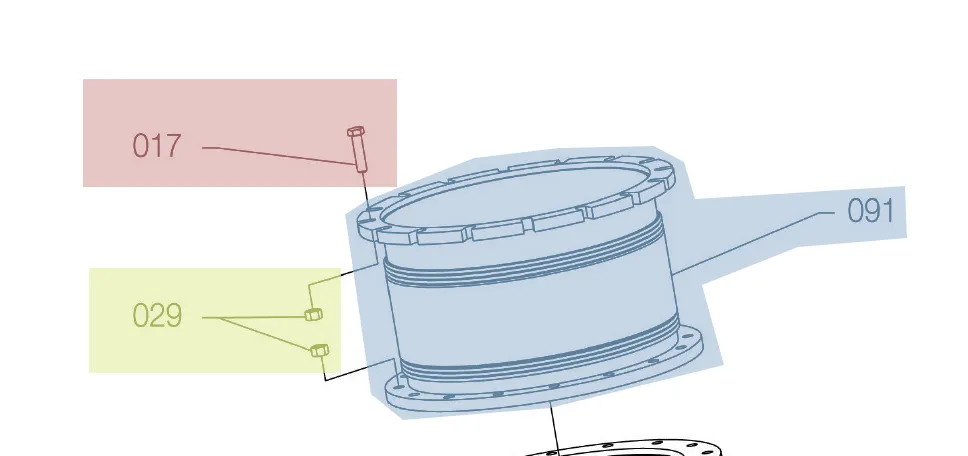
最后,我们使用
Color Brewer中漂亮的颜色对合并的数字框、组件箭头和零件进行着色。然后将其覆盖在原始图像上,以获得所需的高亮效果。
ret, labels = cv2.connectedComponents(labels_combined)
colormask = np.zeros(img.shape, dtype=np.uint8)
colors = [(228,26,28),(55,126,184),(77,175,74),(152,78,163),(255,127,0),(255,255,51),(166,86,40),(247,129,191),(153,153,153)]
for l in range(labels.max()):
if l==0:
colormask[labels==0] = (255,255,255)
else:
colormask[labels==l] = colors[l]
ShowImage('Comp Labels', colormask, 'bgr')
blended = cv2.addWeighted(img,0.7,colormask,0.3,0)
ShowImage('Blended', blended, 'bgr')
最终图像
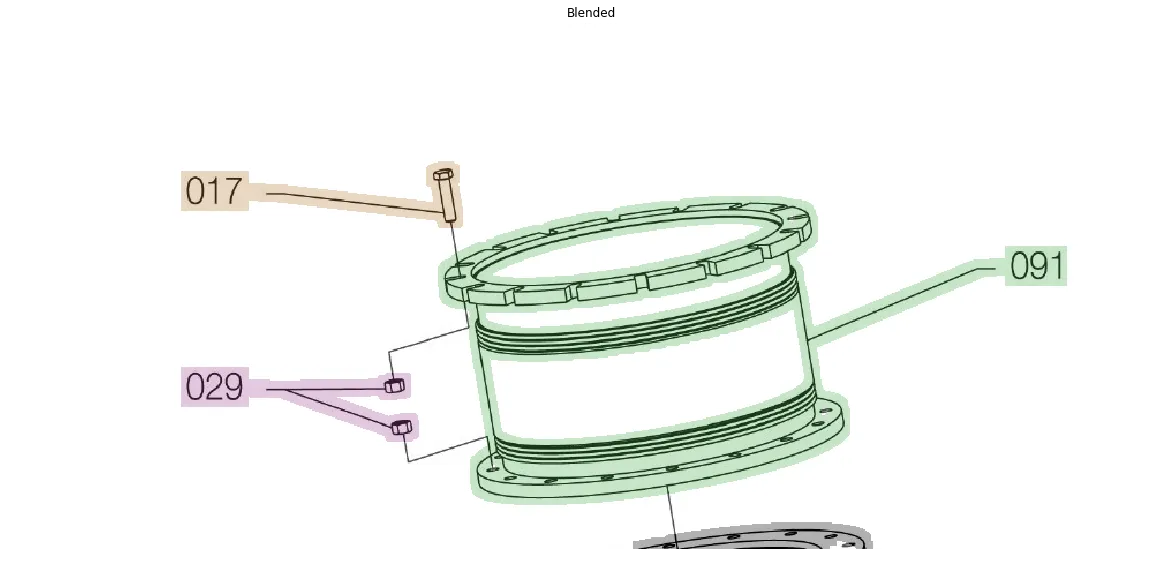
因此,简要概括一下,我们识别了数字、箭头和零件。在某些情况下,我们能够自动分离它们。在其他情况下,我们使用专家来处理。当我们需要单独操作像素时,我们使用Cython来提高速度。
当然,这种方法的危险在于,其他图像可能会打破我在这里所做的(许多)假设。但是,当你尝试使用单个图像来呈现问题时,这就是你承担的风险。
 我正在尝试将阴影区域单独分割出来。
 我目前能够将零件和编号分别分割出来作为不同的聚类。
 使用skimage中的