使用SwiftUI实现按钮闪烁动画

9
如何在SwiftUI中制作边框颜色变化动画。 这是使用UIKit的代码。
extension UIButton{
    func blink(setColor: UIColor, repeatCount: Float, duration: Double) {
        self.layer.borderWidth = 1.0
        let animation: CABasicAnimation = CABasicAnimation(keyPath: "borderColor")
        animation.fromValue = UIColor.clear.cgColor
        animation.toValue = setColor.cgColor
        animation.duration = duration
        animation.autoreverses = true
        animation.repeatCount = repeatCount
        self.layer.borderColor = UIColor.clear.cgColor
        self.layer.add(animation, forKey: "")
    }
}
5个回答

7

我在实现SwiftUI项目中遇到了一个类似的重复文本问题。然而,答案看起来对我来说过于高级而无法实现。经过一番搜索和研究,我成功地让我的文本重复闪烁。对于后来看到此帖子的人,你可以尝试使用withAnimation{}.animation()来解决这个问题。

Swift 5

@State private var myRed = 0.2
@State private var myGreen = 0.2
@State private var myBlue = 0.2

var body:some View{
    
Button(action:{
 //
}){
 Text("blahblahblah")
}
.border(Color(red: myRed,green: myGreen,blue: myBlue))
.onAppear{
    withAnimation{
       myRed = 0.5
       myGreen = 0.5
       myBlue = 0
    }
}
.animation(Animation.easeInOut(duration:2).repeatForever(autoreverses:true))
}

5
这很容易。首先创建一个 ViewModifier,以便我们可以在任何地方轻松使用它。
import SwiftUI

struct BlinkViewModifier: ViewModifier {
    
    let duration: Double
    @State private var blinking: Bool = false
    
    func body(content: Content) -> some View {
        content
            .opacity(blinking ? 0 : 1)
            .animation(.easeOut(duration: duration).repeatForever())
            .onAppear {
                withAnimation {
                    blinking = true
                }
            }
    }
}

extension View {
    func blinking(duration: Double = 0.75) -> some View {
        modifier(BlinkViewModifier(duration: duration))
    }
}

然后像这样使用:

// with duration 

Text("Hello, World!")
    .foregroundColor(.white)
    .padding()
    .background(Color.blue)
    .blinking(duration: 0.75) // here duration is optional. This is blinking time

// or (default is 0.75)

Text("Hello, World!")
    .foregroundColor(.white)
    .padding()
    .background(Color.blue)
    .blinking() 


这在正常情况下运行得非常好,但我的情况是我必须执行:Text(..)+ Text(..)+ Text(..),而它不起作用,因为blinking()返回“some View”。 - Jack
将它们包裹在 VStack 中,就像 VStack { Text(..) + Text(..) }.blinking() 一样。 - Shahriar Nasim Nafi

3

更新:Xcode 13.4 / iOS 15.5

一个提议的解决方案在稍加调整后仍然可用。

更新的代码和演示在这里

原文:

希望以下方法对您有所帮助。它基于ViewModifier,可以通过binding进行控制。动画的速度以及动画的种类都可以根据需要轻松更改。

注意:虽然观察到了一些缺点:由于API没有提供Animation的didFinish回调,因此使用了一些技巧来解决它;还观察到了一些奇怪的Animation.repeatCount处理,但这看起来像是SwiftUI的问题。

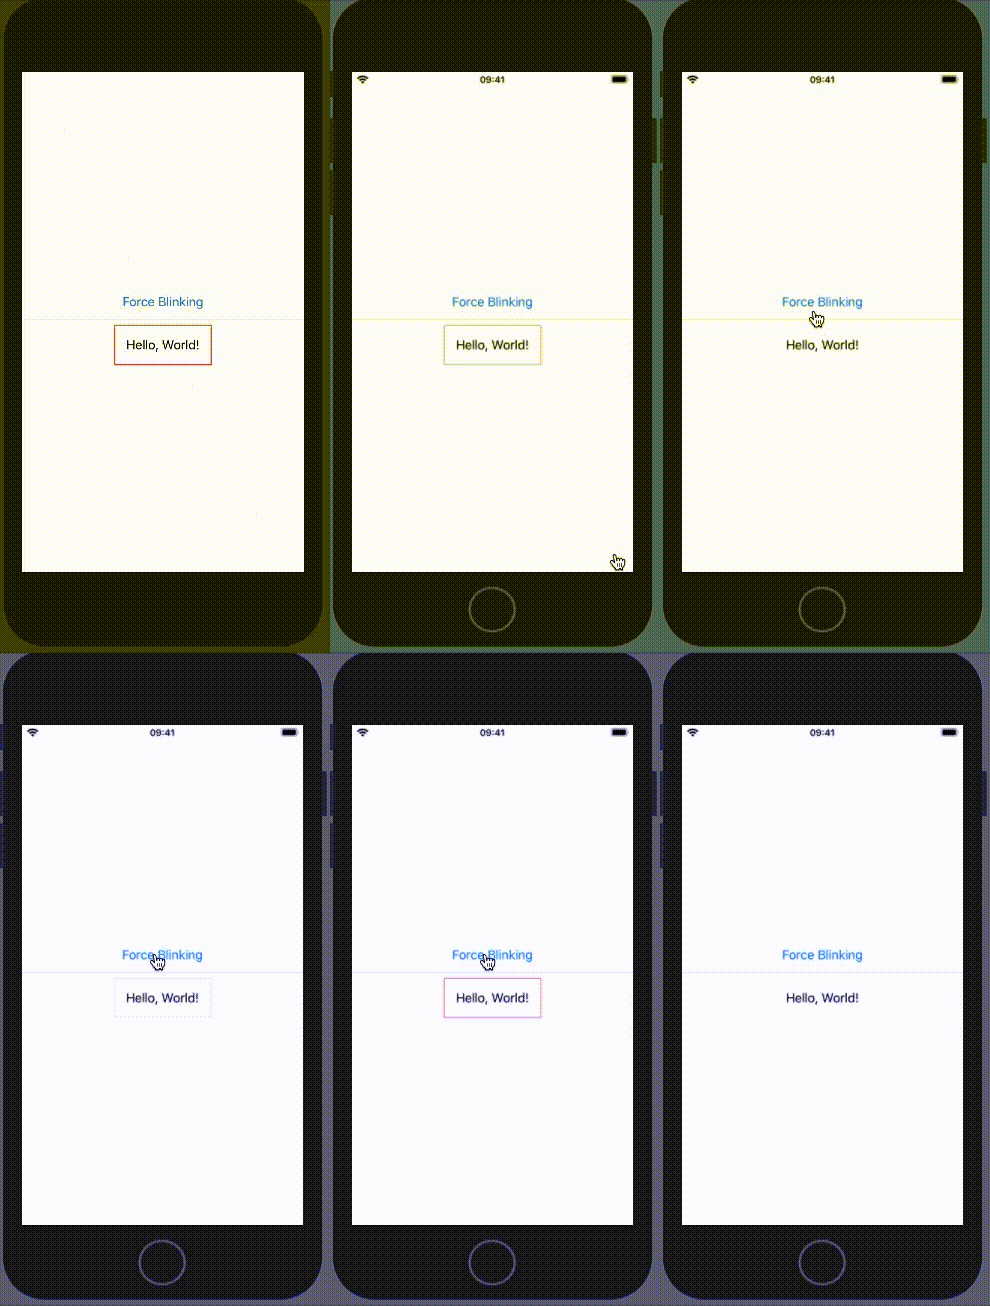
无论如何,这里有一个演示(屏幕闪烁表示启动预览):a)在onAppear中激活闪烁 b)通过某些操作强制激活,此例中为按钮。

border blinking

struct BlinkingBorderModifier: ViewModifier {
    let state: Binding<Bool>
    let color: Color
    let repeatCount: Int
    let duration: Double

    // internal wrapper is needed because there is no didFinish of Animation now
    private var blinking: Binding<Bool> {
        Binding<Bool>(get: {
            DispatchQueue.main.asyncAfter(deadline: .now() + self.duration) {
                self.state.wrappedValue = false
            }
            return self.state.wrappedValue }, set: {
            self.state.wrappedValue = $0
        })
    }
    
    func body(content: Content) -> some View
    {
        content
            .border(self.blinking.wrappedValue ? self.color : Color.clear, width: 1.0)
            .animation( // Kind of animation can be changed per needs
                Animation.linear(duration:self.duration).repeatCount(self.repeatCount)
            )
    }
}

extension View {
    func blinkBorder(on state: Binding<Bool>, color: Color,
                     repeatCount: Int = 1, duration: Double = 0.5) -> some View {
        self.modifier(BlinkingBorderModifier(state: state, color: color,
                                             repeatCount: repeatCount, duration: duration))
    }
}

struct TestBlinkingBorder: View {
    @State  var blink = false
    var body: some View {
        VStack {
            Button(action: { self.blink = true }) {
                Text("Force Blinking")
            }
            Divider()
            Text("Hello, World!").padding()
                .blinkBorder(on: $blink, color: Color.red, repeatCount: 5, duration: 0.5)
        }
        .onAppear {
            self.blink = true
        }
    }
}

2

在这个主题上进行了大量研究后,我找到了两种解决方法。每种方法都有其优缺点。

动画方式

对于你的问题有一个直接的答案。它不够优雅,因为它依赖于您以冗余的方式输入时间。

像这样向Animation添加一个reverse函数:

extension Animation {
    func reverse(on: Binding<Bool>, delay: Double) -> Self {
        DispatchQueue.main.asyncAfter(deadline: .now() + delay) {
            on.wrappedValue = false /// Switch off after `delay` time
        }
        return self
    }
}

使用此扩展,您可以创建一个文本,在按下按钮后缩放并再次缩小,如下所示:
struct BlinkingText: View {
    @State private var isBlinking: Bool = false

    var body: some View {
        VStack {
            Button {
                isBlinking = true
            } label: {
                Text("Let it blink")
            }
            .padding()

            Text("Blink!")
                .font(.largeTitle)
                .foregroundColor(.red)
                .scaleEffect(isBlinking ? 2.0 : 1.0)
                .animation(Animation.easeInOut(duration: 0.5).reverse(on: $isBlinking, delay: 0.5))
        }
    }
}

这还不够完美,所以我进行了更多的研究。

转换方式

实际上,SwiftUI 提供了两种平滑地从一个外观(视觉表示,...你可以称之为任何名称)转换到另一个外观的方法。

  1. 动画是专门设计用来从一个视图转换到同一视图的另一个外观。(相同=相同的结构,不同的实例)
  2. 转换是用来通过淡出旧视图并淡入另一个视图来从一个视图转换到另一个视图的。

因此,这里有另一个使用转换的代码片段。hacky 部分是 if-else,它确保一个视图消失并出现另一个视图。

struct LetItBlink: View {
    @State var count: Int

    var body: some View {
        VStack {
            Button {
                count += 1
            } label: {
                Text("Let it blink: \(count)")
            }
            .padding()

            if count % 2 == 0 {
                BlinkingText(text: "Blink Blink 1!")
            } else {
                BlinkingText(text: "Blink Blink 2!")
            }
        }
        .animation(.default)
    }
}

private struct BlinkingText: View {
    let text: String

    var body: some View {
        Text(text)
            .foregroundColor(.red)
            .font(.largeTitle)
            .padding()
            .transition(AnyTransition.scale(scale: 1.5).combined(with: .opacity))
    }
}

通过组合转换,您可以创建漂亮且有趣的“动画”。

我的个人意见是什么?

  • 两者都不完美优雅,看起来有些“hacky”,要么是由于延迟管理,要么是由于if-else。为SwiftUI添加链接动画的可能性将有所帮助。
  • 过渡效果看起来更加可定制化,但这取决于实际需求。
  • 两者都是必要的。添加默认动画是我做的第一件事情之一,因为它们使应用程序看起来和感觉顺畅。

0
这是我在SwiftUI 2中为闪烁按钮编写的一些代码,它可能会对某些人有所帮助。它是一个切换按钮,可以在按钮周围闪烁一个胶囊形状的覆盖层。它能够正常工作,但就个人而言,我不喜欢调用自身的blink()函数。
    struct BlinkingButton:View{
    @Binding var val:Bool
    var label:String
    @State private var blinkState:Bool = false
    
    var body: some View{
        Button(label){
            val.toggle()
            if val{
                blink()
            }
        }
        .padding(EdgeInsets(top: 8, leading: 16, bottom: 8, trailing: 16))
        .foregroundColor(.white)
        .background(val ? Color.blue:Color.gray)
        .clipShape(Capsule())
        .padding(.all,8)
        .overlay(Capsule().stroke( blinkState && val ? Color.red:Color.clear,lineWidth: 3))

    }
     func blink(){
        blinkState.toggle()
        DispatchQueue.main.asyncAfter(deadline: .now() + 0.5){
            if val{
                blink()
            }
        }
    }
   
}

在使用时,它看起来像这样:

    struct ContentView: View {
    @State private var togVal:Bool = false
    var body: some View {
        VStack{
            Text("\(togVal ? "ON":"OFF")")
            BlinkingButton(val: $togVal, label: "tap me")
        }
    }
}

网页内容由stack overflow 提供, 点击上面的
可以查看英文原文,
原文链接