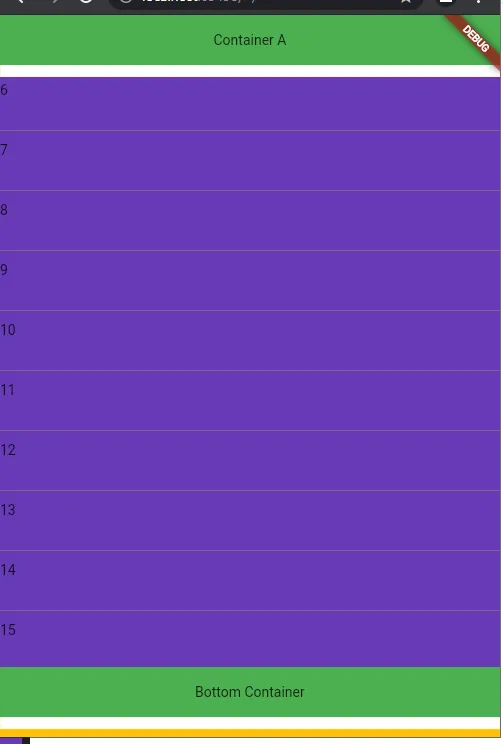
我的基础小部件是Column。第一个元素是一个Container,它有一个BoxShadow。第二个元素是一个ListView,根据上下文构建了几个Card。如果滚动为0,则显示阴影。然而,当开始滚动时,Card会覆盖在阴影之上(z-index更高),并将其隐藏。
未滚动
已滚动

阴影应始终保持在Cards之上。如何实现这一点?
我的基础小部件是Column。第一个元素是一个Container,它有一个BoxShadow。第二个元素是一个ListView,根据上下文构建了几个Card。如果滚动为0,则显示阴影。然而,当开始滚动时,Card会覆盖在阴影之上(z-index更高),并将其隐藏。
未滚动
已滚动
阴影应始终保持在Cards之上。如何实现这一点?
margin。SizedBox。Padding包装我们的列表,并提供top:。shadow: white,background:amber。
演示代码:
import 'package:flutter/material.dart';

class ColumnWithContainerShadow extends StatelessWidget {
  const ColumnWithContainerShadow({Key? key}) : super(key: key);

  @override
  Widget build(BuildContext context) {
    return Scaffold(
      backgroundColor: Colors.amber,
      body: Column(
        children: [
          Container(
            height: 50,
            width: double.infinity,
            ////* we dont need margin if we have padding on ListView
            // margin: EdgeInsets.only(bottom: 12),
            decoration: BoxDecoration(
              color: Colors.green,
              boxShadow: [
                BoxShadow(
                  offset: Offset(0, 12),
                  color: Colors.white,
                )
              ],
            ),
            child: Center(child: Text("Container A")),
          ),
          Expanded(
            child: Padding(
              padding: const EdgeInsets.only(top: 12),
              child: ListView(
                children: [
                  ...List.generate(
                    333,
                    (index) => Container(
                      /// enable this margine and remove other spaces to see 1st child shadow.(shadow depend on children position)
                      // margin: EdgeInsets.only(top: 12),
                      height: 60,
                      color: Colors.deepPurple,
                      child: Text("$index"),
                    ),
                  )
                ],
              ),
            ),
          ),
          Container(
            height: 50,
            width: double.infinity,
            alignment: Alignment.center,
            decoration: BoxDecoration(
              color: Colors.green,
              boxShadow: [
                BoxShadow(
                  offset: Offset(0, 12),
                  color: Colors.white,
                )
              ],
            ),
            child: Text("Bottom Container"),
          ),
          // Comment to close shadow
          SizedBox(
            height: 20,
          )
        ],
      ),
    );
  }
}
编辑
如果您不希望容器阴影在滚动时消失,请删除ScrollNotification和NotificationListener。
有一个适用于此的小部件
您可以使用ScrollNotification与NotificationListener。尝试this;
编程愉快!
class TestPage extends StatefulWidget {
  const TestPage({Key key}) : super(key: key);

  @override
  _TestPageState createState() => _TestPageState();
}

class _TestPageState extends State<TestPage> {
  double blurRadius = 10.0;
  double spreadRadius = 1.0;

  @override
  void initState() {
    super.initState();
  }

  @override
  Widget build(BuildContext context) {
    return Scaffold(
      appBar: AppBar(
        backgroundColor: Colors.blueGrey,
        title: Text('Title'),
      ),
      body: Container(
        width: Get.width,
        height: Get.height,
        child: Stack(
          children: [
            Padding(
              padding: const EdgeInsets.symmetric(horizontal: 16.0).copyWith(
                top: 62.0,
              ),
              child: NotificationListener<ScrollNotification>(
                // ignore: missing_return
                onNotification: (scrollNotification) {
                  if (scrollNotification is ScrollStartNotification) {
                    setState(() {
                      blurRadius = 0.0;
                      spreadRadius = 0.0;
                    });
                  } else if (scrollNotification is ScrollEndNotification) {
                    setState(() {
                      blurRadius = 10.0;
                      spreadRadius = 1.0;
                    });
                  }
                },
                child: ListView.builder(
                  // controller: _controller,
                  itemCount: 10,
                  itemBuilder: (context, index) {
                    return Card(
                      child: Container(
                          width: Get.width * .8,
                          height: 100.0,
                          child: Center(
                            child: Text('child @ index : $index'),
                          )),
                    );
                  },
                ),
              ),
            ),
            Positioned(
              top: 0,
              left: 0,
              right: 0,
              child: Container(
                width: Get.width,
                height: 60.0,
                margin: EdgeInsets.only(),
                decoration: BoxDecoration(
                  color: Colors.white,
                  borderRadius: BorderRadius.only(
                    bottomLeft: Radius.circular(20.0),
                    bottomRight: Radius.circular(20.0),
                  ),
                  boxShadow: [
                    BoxShadow(
                      color: Colors.grey,
                      blurRadius: blurRadius,
                      spreadRadius: spreadRadius,
                    ),
                  ],
                ),
                child: Center(
                  child: Text('TOP CONTAINER'),
                ),
              ),
            ),
          ],
        ),
      ),
    );
  }
}
Material 组件中并提供一个高度。