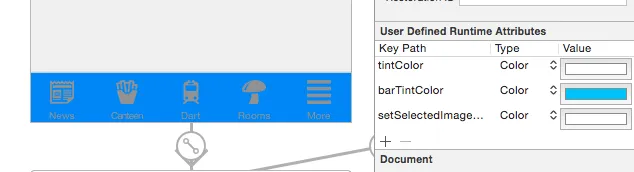
![enter image description here](https://istack.dev59.com/coil4.webp)
![enter image description here](https://istack.dev59.com/IiErj.webp)
但是,“tintColor”仅影响图像,而不影响文本。
此外,当选择某个项目时(如上图中的新闻),该项目颜色变为蓝色!我该如何防止这种情况发生?我希望它保持白色。
为什么在选择项目时文本会变成白色,而在未选择时则不会呢?
基本上,我希望项目颜色和文本颜色始终为白色。
我该如何实现这一点?感谢任何帮助。
是否需要Swift代码来处理每个条目?
编辑:
![enter image description here](https://istack.dev59.com/Jt89w.webp)
来自UITabBarItem类文档:
默认情况下,未选中和选中的实际图像是从源图像中的alpha值自动创建的。为了防止系统着色,请提供带有UIImageRenderingModeAlwaysOriginal属性的图像。
关键不在于是否使用UIImageRenderingModeAlwaysOriginal,而在于何时使用它。
为了防止未选定项目变灰色,您只需要防止系统对未选定图像进行着色。以下是如何实现:
var firstViewController:UIViewController = UIViewController()
// The following statement is what you need
var customTabBarItem:UITabBarItem = UITabBarItem(title: nil, image: UIImage(named: "YOUR_IMAGE_NAME")?.imageWithRenderingMode(UIImageRenderingMode.AlwaysOriginal), selectedImage: UIImage(named: "YOUR_IMAGE_NAME"))
firstViewController.tabBarItem = customTabBarItem
正如您所看到的,我要求iOS仅在未选定状态下应用图像的原始颜色(白色、黄色、红色等),并将图像保留为选定状态。
此外,您可能需要为选项卡栏添加一个着色颜色以应用不同于默认iOS蓝色的颜色于选定状态。根据您上面的截图,您正在为选定状态应用白色:
self.tabBar.tintColor = UIColor.whiteColor()
编辑:
firstViewController.tabBarItem = customTabBarItem
放在哪里? - Greg PeckoryTabBarClass: ??, ??
,我似乎无法将其与我的选项卡栏连接起来。我必须将其连接到选项卡栏还是选项卡栏控制器? - Greg PeckorySwift 3
我通过创建一个自定义的选项卡控制器并在viewDidLoad
方法中添加了以下代码来实现。
if let count = self.tabBar.items?.count {
for i in 0...(count-1) {
let imageNameForSelectedState = arrayOfImageNameForSelectedState[i]
let imageNameForUnselectedState = arrayOfImageNameForUnselectedState[i]
self.tabBar.items?[i].selectedImage = UIImage(named: imageNameForSelectedState)?.withRenderingMode(.alwaysOriginal)
self.tabBar.items?[i].image = UIImage(named: imageNameForUnselectedState)?.withRenderingMode(.alwaysOriginal)
}
}
let selectedColor = UIColor(red: 246.0/255.0, green: 155.0/255.0, blue: 13.0/255.0, alpha: 1.0)
let unselectedColor = UIColor(red: 16.0/255.0, green: 224.0/255.0, blue: 223.0/255.0, alpha: 1.0)
UITabBarItem.appearance().setTitleTextAttributes([NSForegroundColorAttributeName: unselectedColor], for: .normal)
UITabBarItem.appearance().setTitleTextAttributes([NSForegroundColorAttributeName: selectedColor], for: .selected)
它对我起作用了!
对于图片:
custom.tabBarItem = UITabBarItem(title: "Home", image: UIImage(named: "tab_icon_normal"), selectedImage: UIImage(named: "tab_icon_selected"))
翻译内容:
UITabBarItem.appearance().setTitleTextAttributes([NSAttributedString.Key.foregroundColor: UIColor.gray], for: .normal)
UITabBarItem.appearance().setTitleTextAttributes([NSAttributedString.Key.foregroundColor: UIColor.red], for: .selected)
对我起作用的解决方案:
这将防止 Tab 栏组件设置其默认图像色调。
文本 - 在此处,我创建了一个简单的 UITabBarController 子类,并在它的 viewDidLoad 方法中自定义了默认和选定的文本颜色,如下所示:
class HomeTabBarController: UITabBarController {
override func viewDidLoad() {
super.viewDidLoad()
let appearance = UITabBarItem.appearance(whenContainedInInstancesOf: [HomeTabBarController.self])
appearance.setTitleTextAttributes([NSAttributedStringKey.foregroundColor: .black], for: .normal)
appearance.setTitleTextAttributes([NSAttributedStringKey.foregroundColor: .red], for: .selected)
}
}
只需在IB中的身份检查器中将此类设置为标签栏控制器的自定义类即可。
就这样,完成了。
iOS 13 更新:
+ iOS 15 / Xcode 13 更新:
将以下内容添加到iOS 13和iOS 15的设置中:
更新23/09/2022:针对在使用Xcode 13构建时iOS 15上出现标签栏丢失的奇怪行为进行更新。
if #available(iOS 13, *) {
let appearance = UITabBarAppearance()
appearance.stackedLayoutAppearance.selected.titleTextAttributes = [NSAttributedString.Key.foregroundColor: .red]
tabBar.standardAppearance = appearance
// Update for iOS 15, Xcode 13
if #available(iOS 15.0, *) {
tabBar.scrollEdgeAppearance = appearance
}
}
Swift 4: 在您的UITabBarController中,请使用以下代码进行更改
tabBar.unselectedItemTintColor = .black
self.tabBar.unselectedItemTintColor = [UIColor colorNamed:@"ColorName"];
Objective-C self.tabBar.unselectedItemTintColor = [UIColor colorNamed:@"ColorName"];
- undefinedSwift 3
这对我有效(指设置 tabBarItems 图片颜色):
UITabBar.appearance().tintColor = ThemeColor.Blue
if let items = tabBarController.tabBar.items {
let tabBarImages = getTabBarImages() // tabBarImages: [UIImage]
for i in 0..<items.count {
let tabBarItem = items[i]
let tabBarImage = tabBarImages[i]
tabBarItem.image = tabBarImage.withRenderingMode(.alwaysOriginal)
tabBarItem.selectedImage = tabBarImage
}
}
我注意到,如果你使用渲染模式 = .alwaysOriginal来设置图像,UITabBar.tintColor不会产生任何效果。
我知道这里有很多答案,但我找不到一个简单有效的复制/粘贴答案适用于Swift 4.2/Swift 5.1
tabBarController?.tabBar.tintColor = UIColor.red
tabBarController?.tabBar.unselectedItemTintColor = UIColor.green
或者使用UITabBar.appearances()
代替tabBarController?.tabBar
,像这样:
UITabBar.appearance().tintColor = UIColor.red
UITabBar.appearance().unselectedItemTintColor = UIColor.green
首先,确保您已将BOOLEAN键“View controller-based status bar appearance”添加到Info.plist中,并将值设置为“NO”。
Appdelegate.swift
在“launchOptions:[UIApplicationLaunchOptionsKey:Any]?) - > Bool {”之后的某个位置插入代码:
UITabBar.appearance().barTintColor = UIColor(red: 0.145, green: 0.592, blue: 0.804, alpha: 1.00)
或使用其中一个默认的UI颜色:
UITabBar.appearance().barTintColor = UIColor.white)
所选项目
UITabBarItem.appearance().setTitleTextAttributes([NSForegroundColorAttributeName: UIColor.white], for: .selected)
未激活的项目
UITabBarItem.appearance().setTitleTextAttributes([NSForegroundColorAttributeName: UIColor.black], for: .normal)
如果您不从头开始制作图标,则在Photoshop中交替使用黑色和白色版本相对容易。
Adobe Photoshop(几乎任何版本都可以)
确保您的图标图像具有透明背景,并且图标本身是纯黑色(或接近纯黑色)。
打开图像文件,将其另存为不同的文件名(例如exampleFilename-Inverted.png)
在“图像”菜单的“调整”子菜单中:
点击“反转”
现在您拥有原始图标的负片。
在XCode中,您需要在故事板中的选项卡栏属性下设置一个图像作为“选中图像”,并在“Bar Item”图像下指定“非活动”版本。完成啦!
UITabBar.appearance().tintColor = UIColor.black
- Chaudhry Talha尝试将它添加到AppDelegate.swift中(在application方法内):
UITabBar.appearance().tintColor = UIColor(red: 0/255.0, green: 0/255.0, blue: 0/255.0, alpha: 1.0)
// For WHITE color:
UITabBar.appearance().tintColor = UIColor(red: 255/255.0, green: 255/255.0, blue: 255/255.0, alpha: 1.0)
例子:
func application(application: UIApplication, didFinishLaunchingWithOptions launchOptions: [NSObject: AnyObject]?) -> Bool {
// Tab bar icon selected color
UITabBar.appearance().tintColor = UIColor(red: 0/255.0, green: 0/255.0, blue: 0/255.0, alpha: 1.0)
// For WHITE color: UITabBar.appearance().tintColor = UIColor(red: 255/255.0, green: 255/255.0, blue: 255/255.0, alpha: 1.0)
return true
}
示例:
我的英语太烂了!抱歉!:-)
override func viewWillAppear(_ animated: Bool) {
super.viewWillAppear(animated)
let appearance = UITabBarAppearance()
appearance.backgroundColor = .white
setTabBarItemColors(appearance.stackedLayoutAppearance)
setTabBarItemColors(appearance.inlineLayoutAppearance)
setTabBarItemColors(appearance.compactInlineLayoutAppearance)
setTabBarItemBadgeAppearance(appearance.stackedLayoutAppearance)
setTabBarItemBadgeAppearance(appearance.inlineLayoutAppearance)
setTabBarItemBadgeAppearance(appearance.compactInlineLayoutAppearance)
tabBar.standardAppearance = appearance
}
@available(iOS 13.0, *)
private func setTabBarItemColors(_ itemAppearance: UITabBarItemAppearance) {
itemAppearance.normal.iconColor = .lightGray
itemAppearance.normal.titleTextAttributes = [NSAttributedString.Key.foregroundColor: UIColor.gray]
itemAppearance.selected.iconColor = .white
itemAppearance.selected.titleTextAttributes = [NSAttributedString.Key.foregroundColor: UIColor.orange]
}
@available(iOS 13.0, *)
private func setTabBarItemBadgeAppearance(_ itemAppearance: UITabBarItemAppearance) {
//Adjust the badge position as well as set its color
itemAppearance.normal.badgeBackgroundColor = .orange
itemAppearance.normal.badgeTextAttributes = [NSAttributedString.Key.foregroundColor: UIColor.white]
itemAppearance.normal.badgePositionAdjustment = UIOffset(horizontal: 1, vertical: -1)
}