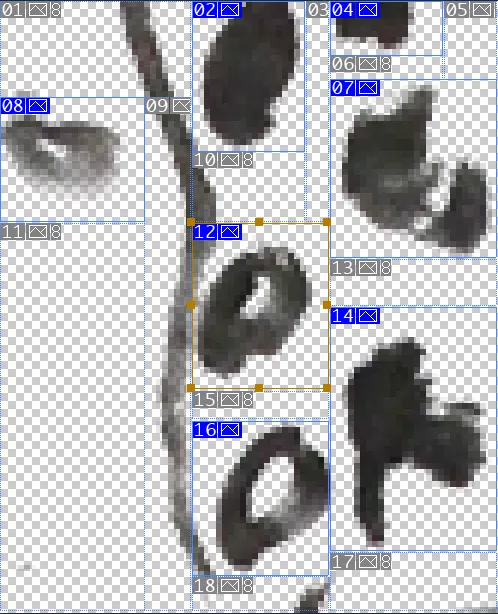
我正在尝试将类似这样的东西转换为一堆较小的图像裁剪或“切片”,其中每个切片可能会与另一个重叠,但应包含每个非透明像素的岛屿。长连续的笔画不必转换,但大部分“斑点”应该被转换。

magick image.png  -alpha off -colorspace gray -negate -threshold 10%  \
   -define connected-components:verbose=true                          \
   -define connected-components:area-threshold=100                    \
   -connected-components 8 -auto-level output.png
Objects (id: bounding-box centroid area mean-color):
1: 498x614+0+0 236.9,317.2 219166 srgb(0,0,0)
2: 112x583+112+0 177.0,268.6 16094 srgb(255,255,255)
27: 128x210+350+342 403.8,436.5 14195 srgb(255,255,255)
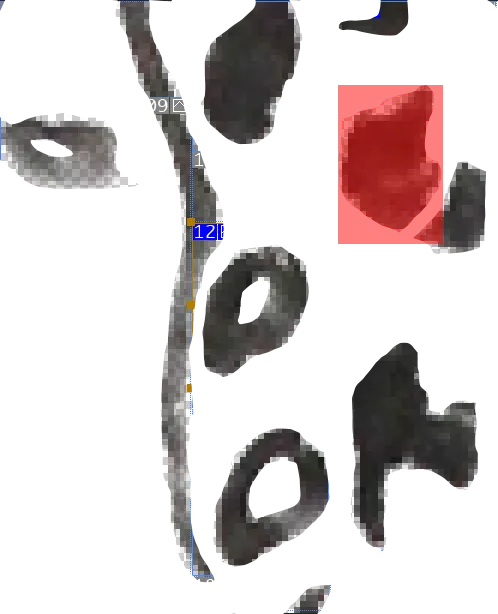
7: 104x148+338+85 390.0,160.4 10451 srgb(255,255,255) <--- this one
3: 103x145+200+0 250.9,70.9 10317 srgb(255,255,255)
25: 107x132+202+245 252.7,307.8 9227 srgb(255,255,255)
36: 117x139+213+428 268.3,497.2 9103 srgb(255,255,255)
12: 139x77+0+112 62.1,152.4 7162 srgb(255,255,255)
16: 73x93+414+161 459.0,213.4 4104 srgb(255,255,255)
37: 51x61+249+457 274.6,488.1 2224 srgb(0,0,0)
4: 71x36+338+0 382.0,19.6 1507 srgb(255,255,255)
26: 32x47+238+277 253.1,300.2 875 srgb(0,0,0)
43: 50x30+283+584 310.7,600.0 833 srgb(255,255,255)
13: 41x17+31+140 51.0,148.1 410 srgb(0,0,0)
9: 11x11+174+100 178.7,105.3 104 srgb(255,255,255)
7: 104x148+338+85 390.0,160.4 10451 srgb(255,255,255)
magick image.png -fill "rgba(255,0,0,0.5)" -draw "rectangle 338,85 442,243" result.png
-alpha off),并将转换为灰度的 RGB 通道用作要检测的项目。根据您的图像创建方式,您可能最好丢弃 RGB 通道,只使用 alpha 或其反转(-alpha extract -negate)。不确定 ImageMagick 能否做到这一点。
有一个类似于 Gimp 的脚本:ofn-extract-objects。
它使用的技术相当简单:选择背景并将选择转换为“路径”(即矢量)。每个连续边界在选择中都会有一个“笔画”,这意味着如果您有带孔的对象,则会有嵌套的笔画,但这并不难检测和过滤。一旦您拥有笔画,您就可以使用锚点和切线的坐标来确定它们的边界框。
如果您不想使用 Gimp,可以使用 potrace 并以类似的方式处理输出的 SVG。