我正在进行一个图像处理项目,利用HLSL着色器添加Photoshop风格的滤镜,如投影、斜面等。现在我正在寻找一种实现HLSL外部发光效果的方法。
目前,我正在尝试以下想法:
1)缩放当前纹理以创建发光(参数:glowSize,设置轮廓的大小)
2)水平模糊
3)垂直模糊,将模糊的颜色改变为发光颜色,并在顶部添加原始纹理
我正在使用以下多通道HLSL着色器来渲染发光效果:
目前,我正在尝试以下想法:
1)缩放当前纹理以创建发光(参数:glowSize,设置轮廓的大小)
2)水平模糊
3)垂直模糊,将模糊的颜色改变为发光颜色,并在顶部添加原始纹理
我正在使用以下多通道HLSL着色器来渲染发光效果:
float4 PS_Scale(VS_OUTPUT IN) : COLOR0
{
    float2 tex = IN.texture0;
    float2 scaleCenter = float2(0.5f, 0.5f);
    float2 scaleTex = (tex - scaleCenter) * glowSize + scaleCenter;
    return tex2D(foreground, scaleTex);
}

float4 PS_GlowH(VS_OUTPUT IN) : COLOR0
{
    float2 Tex = IN.texture0;

    float4 sum = float4(0.0, 0.0, 0.0, 0.0);
    sum += tex2D(secondForeground, float2(Tex.x - 4.0*blur, Tex.y))*0.05;
    sum += tex2D(secondForeground, float2(Tex.x - 3.0*blur, Tex.y))*0.09;
    sum += tex2D(secondForeground, float2(Tex.x - 2.0*blur, Tex.y))*0.12;
    sum += tex2D(secondForeground, float2(Tex.x - blur, Tex.y))*0.15;
    sum += tex2D(secondForeground, float2(Tex.x, Tex.y))*0.16;
    sum += tex2D(secondForeground, float2(Tex.x + blur, Tex.y))*0.15;
    sum += tex2D(secondForeground, float2(Tex.x + 2.0*blur, Tex.y))*0.12;
    sum += tex2D(secondForeground, float2(Tex.x + 3.0*blur, Tex.y))*0.09;
    sum += tex2D(secondForeground, float2(Tex.x + 4.0*blur, Tex.y))*0.05;

    return sum;
}

float4 PS_GlowV(VS_OUTPUT IN) : COLOR0
{
    float2 Tex = IN.texture0;

    float4 sum = float4(0.0, 0.0, 0.0, 0.0);
    sum += tex2D(secondForeground, float2(Tex.x, Tex.y - 4.0*blur))*0.05;
    sum += tex2D(secondForeground, float2(Tex.x, Tex.y - 3.0*blur))*0.09;
    sum += tex2D(secondForeground, float2(Tex.x, Tex.y - 2.0*blur))*0.12;
    sum += tex2D(secondForeground, float2(Tex.x, Tex.y - blur))*0.15;
    sum += tex2D(secondForeground, float2(Tex.x, Tex.y))*0.16;
    sum += tex2D(secondForeground, float2(Tex.x, Tex.y + blur))*0.15;
    sum += tex2D(secondForeground, float2(Tex.x, Tex.y + 2.0*blur))*0.12;
    sum += tex2D(secondForeground, float2(Tex.x, Tex.y + 3.0*blur))*0.09;
    sum += tex2D(secondForeground, float2(Tex.x, Tex.y + 4.0*blur))*0.05;

    float4 result = sum * opacity;
    result.rgb = float3(glowColor.r, glowColor.g, glowColor.b) / 255.0f;

    float4 src = tex2D(foreground, IN.texture0.xy);
    return result * (1-src.a) + src;
}
当使用简单的形状,如椭圆时,此代码的输出看起来很好,但是在应用于文本时不起作用:
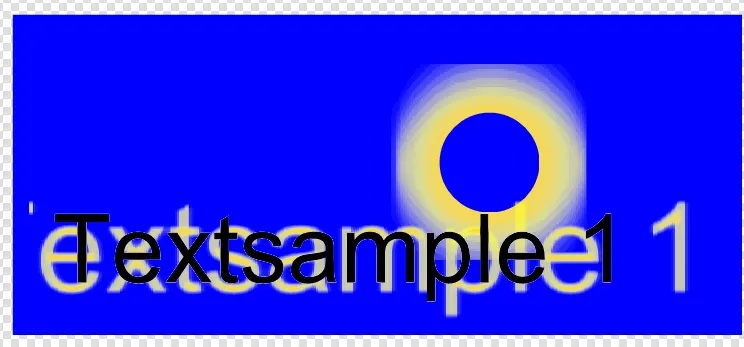
很明显存在缩放问题。我不知道如何缩放原始纹理以将其用作轮廓。这是否可能?还有其他实现HLSL中外发光或轮廓滤镜的想法吗?
提前致谢。