我想在
UITextField中只保留底部的边框,但是我不知道如何将其保留在底部。请问您能给予建议吗?UITextField中只保留底部的边框,但是我不知道如何将其保留在底部。请问您能给予建议吗?我正在创建自定义的textField,以便将其作为可重用组件用于SwiftUI。
SwiftUI
struct CustomTextField: View {
    var placeHolder: String
    @Binding var value: String

    var lineColor: Color
    var width: CGFloat

    var body: some View {
        VStack {
            TextField(self.placeHolder, text: $value)
            .padding()
            .font(.title)

            Rectangle().frame(height: self.width)
                .padding(.horizontal, 20).foregroundColor(self.lineColor)
        }
    }
}
用法:
@Binding var userName: String
@Binding var password: String

var body: some View {
    VStack(alignment: .center) {
        CustomTextField(placeHolder: "Username", value: $userName, lineColor: .white, width: 2)
        CustomTextField(placeHolder: "Password", value: $password, lineColor: .white, width: 2)
    }
}
Swift 5.0
这里我正在使用可视化格式语言(VFL),这将允许在任何UIControl中添加一行。
您可以创建一个UIView扩展类,例如UIView+Extention.swift
import UIKit

enum LinePosition {
    case top
    case bottom
}

extension UIView {
    func addLine(position: LinePosition, color: UIColor, width: Double) {
        let lineView = UIView()
        lineView.backgroundColor = color
        lineView.translatesAutoresizingMaskIntoConstraints = false // This is important!
        self.addSubview(lineView)

        let metrics = ["width" : NSNumber(value: width)]
        let views = ["lineView" : lineView]
        self.addConstraints(NSLayoutConstraint.constraints(withVisualFormat: "H:|[lineView]|", options:NSLayoutConstraint.FormatOptions(rawValue: 0), metrics:metrics, views:views))

        switch position {
        case .top:
            self.addConstraints(NSLayoutConstraint.constraints(withVisualFormat: "V:|[lineView(width)]", options:NSLayoutConstraint.FormatOptions(rawValue: 0), metrics:metrics, views:views))
            break
        case .bottom:
            self.addConstraints(NSLayoutConstraint.constraints(withVisualFormat: "V:[lineView(width)]|", options:NSLayoutConstraint.FormatOptions(rawValue: 0), metrics:metrics, views:views))
            break
        }
    }
}
用法:
textField.addLine(position: .LINE_POSITION_BOTTOM, color: .darkGray, width: 0.5)
Objective C:
你可以将这个帮助方法添加到你的全局帮助类中(我使用了全局类方法),或者在同一个视图控制器中使用实例方法。
typedef enum : NSUInteger {
    LINE_POSITION_TOP,
    LINE_POSITION_BOTTOM
} LINE_POSITION;


- (void) addLine:(UIView *)view atPosition:(LINE_POSITION)position withColor:(UIColor *)color lineWitdh:(CGFloat)width {
    // Add line
    UIView *lineView = [[UIView alloc] init];
    [lineView setBackgroundColor:color];
    [lineView setTranslatesAutoresizingMaskIntoConstraints:NO];
    [view addSubview:lineView];

    NSDictionary *metrics = @{@"width" : [NSNumber numberWithFloat:width]};
    NSDictionary *views = @{@"lineView" : lineView};
    [view addConstraints:[NSLayoutConstraint constraintsWithVisualFormat:@"H:|[lineView]|" options: 0 metrics:metrics views:views]];

    switch (position) {
        case LINE_POSITION_TOP:
            [view addConstraints:[NSLayoutConstraint constraintsWithVisualFormat:@"V:|-0-[lineView(width)]" options: 0 metrics:metrics views:views]];
            break;

        case LINE_POSITION_BOTTOM:
            [view addConstraints:[NSLayoutConstraint constraintsWithVisualFormat:@"V:[lineView(width)]|" options: 0 metrics:metrics views:views]];
            break;
        default: break;
    }
}
用法:
[self addLine:self.textField atPosition:LINE_POSITION_TOP withColor:[UIColor darkGrayColor] lineWitdh:0.5];
Xamarin 代码:
 var border = new CALayer();
 nfloat width = 2;
 border.BorderColor = UIColor.Black.CGColor;
 border.Frame = new CoreGraphics.CGRect(0, textField.Frame.Size.Height - width, textField.Frame.Size.Width, textField.Frame.Size.Height);
 border.BorderWidth = width;
 textField.Layer.AddSublayer(border);
 textField.Layer.MasksToBounds = true;
如果你想要在不先了解框架、不使用子类化和不使用自动布局的情况下进行操作:
Swift 5 / Swift 4.x / Swift 3.x
extension UITextField {
  func setBottomBorder() {
    self.borderStyle = .none
    self.layer.backgroundColor = UIColor.white.cgColor

    self.layer.masksToBounds = false
    self.layer.shadowColor = UIColor.gray.cgColor
    self.layer.shadowOffset = CGSize(width: 0.0, height: 1.0)
    self.layer.shadowOpacity = 1.0
    self.layer.shadowRadius = 0.0
  }
}
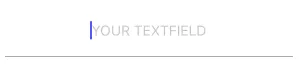
无需确保框架正确,即可从任何地方调用yourTextField.setBottomBorder()。
结果如下所示:
Swift UI
struct MyTextField: View {
  var myPlaceHolder: String
  @Binding var text: String

  var underColor: Color
  var height: CGFloat

  var body: some View {
    VStack {
        TextField(self.myPlaceHolder, text: $text)
        .padding()
        .font(.title)

        Rectangle().frame(height: self.height)
            .padding(.horizontal, 24).foregroundColor(self.underColor)
    }
  }
}
UITextField的子类:
class TextField : UITextField {

    override var tintColor: UIColor! {

        didSet {
            setNeedsDisplay()
        }
    }

    override func draw(_ rect: CGRect) {

        let startingPoint   = CGPoint(x: rect.minX, y: rect.maxY)
        let endingPoint     = CGPoint(x: rect.maxX, y: rect.maxY)

        let path = UIBezierPath()

        path.move(to: startingPoint)
        path.addLine(to: endingPoint)
        path.lineWidth = 2.0

        tintColor.setStroke()

        path.stroke()
    }
}
didBeginEditing 和 didEndEditing 中设置 tintColor。 - user1046037这些方案都没有真正满足我的期望。我想要继承TextField,因为我不想每次都手动设置边框。我还想更改边框颜色,例如在出现错误时。所以这是我的解决方案,使用锚点:
class CustomTextField: UITextField {

    var bottomBorder = UIView()

    override func awakeFromNib() {

            // Setup Bottom-Border

            self.translatesAutoresizingMaskIntoConstraints = false

            bottomBorder = UIView.init(frame: CGRect(x: 0, y: 0, width: 0, height: 0))
            bottomBorder.backgroundColor = UIColor(rgb: 0xE2DCD1) // Set Border-Color
            bottomBorder.translatesAutoresizingMaskIntoConstraints = false

            addSubview(bottomBorder)

            bottomBorder.bottomAnchor.constraint(equalTo: bottomAnchor).isActive = true
            bottomBorder.leftAnchor.constraint(equalTo: leftAnchor).isActive = true
            bottomBorder.rightAnchor.constraint(equalTo: rightAnchor).isActive = true
            bottomBorder.heightAnchor.constraint(equalToConstant: 1).isActive = true // Set Border-Strength

    }
}
---- 可选 ----
要更改颜色,请像这样向CustomTextField类添加内容:
@IBInspectable var hasError: Bool = false {
    didSet {

        if (hasError) {

            bottomBorder.backgroundColor = UIColor.red

        } else {

            bottomBorder.backgroundColor = UIColor(rgb: 0xE2DCD1)

        }

    }
}
创建CustomTextField实例后,调用此方法以触发错误。
textField.hasError = !textField.hasError

希望能对某人有所帮助 ;)
 extension UITextField {
  func setBottomBorder(color:String) {
    self.borderStyle = UITextBorderStyle.None
    let border = CALayer()
    let width = CGFloat(1.0)
    border.borderColor = UIColor(hexString: color)!.cgColor
    border.frame = CGRect(x: 0, y: self.frame.size.height - width,   width:  self.frame.size.width, height: self.frame.size.height)
    border.borderWidth = width
    self.layer.addSublayer(border)
    self.layer.masksToBounds = true
   }
}
然后只需要这样做:
yourTextField.setBottomBorder(color: "#3EFE46")
viewDidLoad()中使用它,框架会不正确。所以我们有2个选择:viewDidLayoutSubviews()或viewDidAppear()。但是viewDidLayoutSubviews()会被多次调用,而从viewDidAppear()调用会导致用户体验不佳。 - iAkshayviewDidLayoutSubviews()也无法正常工作。您将获得多个边框。 - Kunal Kumar您可以在类外创建此扩展,并使用任何想要的borderWidth替换宽度。
Swift 4
extension UITextField
{
    func setBottomBorder(withColor color: UIColor)
    {
        self.borderStyle = UITextBorderStyle.none
        self.backgroundColor = UIColor.clear
        let width: CGFloat = 1.0

        let borderLine = UIView(frame: CGRect(x: 0, y: self.frame.height - width, width: self.frame.width, height: width))
        borderLine.backgroundColor = color
        self.addSubview(borderLine)
    }
}
Original
extension UITextField
{
    func setBottomBorder(borderColor: UIColor)
    {
        self.borderStyle = UITextBorderStyle.None
        self.backgroundColor = UIColor.clearColor()
        let width = 1.0

        let borderLine = UIView(frame: CGRectMake(0, self.frame.height - width, self.frame.width, width))
        borderLine.backgroundColor = borderColor
        self.addSubview(borderLine)
    }
}
然后将此添加到您的viewDidLoad中,将yourTextField替换为您的UITextField变量,并使用任何您想要的边框颜色。
yourTextField.setBottomBorder(UIColor.blackColor())

Objective C
        [txt.layer setBackgroundColor: [[UIColor whiteColor] CGColor]];
        [txt.layer setBorderColor: [[UIColor grayColor] CGColor]];
        [txt.layer setBorderWidth: 0.0];
        [txt.layer setCornerRadius:12.0f];
        [txt.layer setMasksToBounds:NO];
        [txt.layer setShadowRadius:2.0f];
        txt.layer.shadowColor = [[UIColor blackColor] CGColor];
        txt.layer.shadowOffset = CGSizeMake(1.0f, 1.0f);
        txt.layer.shadowOpacity = 1.0f;
        txt.layer.shadowRadius = 1.0f;
Swift
        txt.layer.backgroundColor = UIColor.white.cgColor
        txt.layer.borderColor = UIColor.gray.cgColor
        txt.layer.borderWidth = 0.0
        txt.layer.cornerRadius = 5
        txt.layer.masksToBounds = false
        txt.layer.shadowRadius = 2.0
        txt.layer.shadowColor = UIColor.black.cgColor
        txt.layer.shadowOffset = CGSize.init(width: 1.0, height: 1.0)
        txt.layer.shadowOpacity = 1.0
        txt.layer.shadowRadius = 1.0
    extension UITextField {

    @IBInspectable var placeHolderColor: UIColor? {
        get {
            return self.placeHolderColor
        }
        set {
            self.attributedPlaceholder = NSAttributedString(string:self.placeholder != nil ? self.placeholder! : "", attributes:[NSForegroundColorAttributeName: newValue!])
        }
    }


    @IBInspectable var bottomBorderColor: UIColor? {
        get {
            return self.bottomBorderColor
        }
        set {
            self.borderStyle = UITextBorderStyle.None;
            let border = CALayer()
            let width = CGFloat(0.5)
            border.borderColor = newValue?.CGColor
            border.frame = CGRect(x: 0, y: self.frame.size.height - width,   width:  self.frame.size.width, height: self.frame.size.height)

            border.borderWidth = width
            self.layer.addSublayer(border)
            self.layer.masksToBounds = true

        }
    }
}
在Swift 3中,您可以创建一个扩展并在您的视图类后面添加。
extension UITextField
{
    func setBottomBorder(borderColor: UIColor)
    {

        self.borderStyle = UITextBorderStyle.none
        self.backgroundColor = UIColor.clear
        let width = 1.0

        let borderLine = UIView()
        borderLine.frame = CGRect(x: 0, y: Double(self.frame.height) - width, width: Double(self.frame.width), height: width)

        borderLine.backgroundColor = borderColor
        self.addSubview(borderLine)
    }
}
这里是带有 @IBInspectable 的 Swift3 代码
创建一个新的 Cocoa Touch Class Swift 文件
import UIKit


extension UIView {

@IBInspectable var cornerRadius: CGFloat {
    get {
        return layer.cornerRadius
    }
    set {
        layer.cornerRadius = newValue
        layer.masksToBounds = newValue > 0
    }
}

@IBInspectable var borderWidth: CGFloat {
    get {
        return layer.borderWidth
    }
    set {
        layer.borderWidth = newValue
    }
}

@IBInspectable var borderColor: UIColor? {
    get {
        return UIColor(cgColor: layer.borderColor!)
    }
    set {
        layer.borderColor = newValue?.cgColor
    }
}

@IBInspectable var leftBorderWidth: CGFloat {
    get {
        return 0.0   // Just to satisfy property
    }
    set {
        let line = UIView(frame: CGRect(x: 0.0, y: 0.0, width: newValue, height: bounds.height))
        line.translatesAutoresizingMaskIntoConstraints = false
        line.backgroundColor = UIColor(cgColor: layer.borderColor!)
       line.tag = 110
        self.addSubview(line)

        let views = ["line": line]
        let metrics = ["lineWidth": newValue]
        addConstraints(NSLayoutConstraint.constraints(withVisualFormat: "|[line(==lineWidth)]", options: [], metrics: metrics, views: views))
        addConstraints(NSLayoutConstraint.constraints(withVisualFormat: "V:|[line]|", options: [], metrics: nil, views: views))
    }
}

@IBInspectable var topBorderWidth: CGFloat {
    get {
        return 0.0   // Just to satisfy property
    }
    set {
        let line = UIView(frame: CGRect(x: 0.0, y: 0.0, width: bounds.width, height: newValue))
        line.translatesAutoresizingMaskIntoConstraints = false
        line.backgroundColor = borderColor
       line.tag = 110
        self.addSubview(line)

        let views = ["line": line]
        let metrics = ["lineWidth": newValue]
        addConstraints(NSLayoutConstraint.constraints(withVisualFormat: "|[line]|", options: [], metrics: nil, views: views))
        addConstraints(NSLayoutConstraint.constraints(withVisualFormat: "V:|[line(==lineWidth)]", options: [], metrics: metrics, views: views))
    }
}

@IBInspectable var rightBorderWidth: CGFloat {
    get {
        return 0.0   // Just to satisfy property
    }
    set {
        let line = UIView(frame: CGRect(x: bounds.width, y: 0.0, width: newValue, height: bounds.height))
        line.translatesAutoresizingMaskIntoConstraints = false
        line.backgroundColor = borderColor
       line.tag = 110
        self.addSubview(line)

        let views = ["line": line]
        let metrics = ["lineWidth": newValue]
        addConstraints(NSLayoutConstraint.constraints(withVisualFormat: "[line(==lineWidth)]|", options: [], metrics: metrics, views: views))
        addConstraints(NSLayoutConstraint.constraints(withVisualFormat: "V:|[line]|", options: [], metrics: nil, views: views))
    }
}
@IBInspectable var bottomBorderWidth: CGFloat {
    get {
        return 0.0   // Just to satisfy property
    }
    set {
        let line = UIView(frame: CGRect(x: 0.0, y: bounds.height, width: bounds.width, height: newValue))
        line.translatesAutoresizingMaskIntoConstraints = false
        line.backgroundColor = borderColor
      line.tag = 110
        self.addSubview(line)

        let views = ["line": line]
        let metrics = ["lineWidth": newValue]
        addConstraints(NSLayoutConstraint.constraints(withVisualFormat: "|[line]|", options: [], metrics: nil, views: views))
        addConstraints(NSLayoutConstraint.constraints(withVisualFormat: "V:[line(==lineWidth)]|", options: [], metrics: metrics, views: views))
    }
}
 func removeborder() {
      for view in self.subviews {
           if view.tag == 110  {
                view.removeFromSuperview()
           }

      }
 }
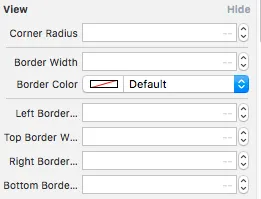
将文件替换为以下代码,您将在Storyboard属性检查器中获得选项,如下所示:
享受吧 :)
viewDidLoad()中尝试? - saurabh