如何在TextField(SwiftUI)中添加底部线

32

我使用 Rectangle() 为 TextField 添加底部边框(SwiftUI)

但我想使用 protocol TextFieldStyle 来创建一个类似于 RoundedBorderTextFieldStyle 的底部线条样式

如何在不使用 Rectangle 的情况下为 TextField 创建自定义样式?

https://developer.apple.com/documentation/swiftui/staticmember

enter image description here

struct ContentView : View {
    @State private var username = "Text Hellow"
    var body: some View {
        VStack() {
            TextField($username)
                .foregroundColor(Color.yellow)
            Rectangle()
                .frame(height: 1.0, alignment: .bottom)
                .relativeWidth(1)
                .foregroundColor(Color.red)

        }
        .padding()
    }

    func editChanged() {

    }
}

#if DEBUG
struct ContentView_Previews : PreviewProvider {
    static var previews: some View {
        ContentView()
    }
}
#endif
7个回答

44

分隔线

一种视觉元素,可用于分隔其他内容。

您可以设置colorheight

Divider()
 .frame(height: 1)
 .padding(.horizontal, 30)
 .background(Color.red)

输入图像描述

struct LoginField: View {

    @State private var email: String = ""
    @State private var password: String = ""

    var body: some View {
        VStack {
            TextField("Email", text: $email)
                .padding(.horizontal, 30).padding(.top, 20)
            Divider()
                .padding(.horizontal, 30)
            TextField("Password", text: $password)
                .padding(.horizontal, 30).padding(.top, 20)
            Divider()
                .padding(.horizontal, 30)
            Spacer()
        }
    }
}

请注意,您可以通过使用.padding(.horizontal)(不指定明确的长度)来获得平台建议的间距。 - Ky -

33

使用.overlay

TextField("mail@example.com", text: $email)
        .overlay(VStack{Divider().offset(x: 0, y: 15)})

在这里输入图片描述

VStack 的使用是为了确保 Divider 始终水平。


5
太棒了。最佳答案。 - Duck
3
为什么不直接使用.overlay(Divider(), alignment: .bottom)呢? - rsanath
如果我想要不同颜色的分隔线怎么办? - Neeraj Joshi
@NeerajJoshi 你试过使用前景色修饰符吗? - iGhost
@iGhost,是的,我尝试过了,它不起作用。 - Neeraj Joshi

11

在SwiftUI中,通过遵循TextFieldStyle协议而不是使用Rectangle来实现自定义TextField样式

struct BottomLineTextFieldStyle: TextFieldStyle {
    func _body(configuration: TextField<Self._Label>) -> some View {
        VStack() {
            configuration
            Rectangle()
                .frame(height: 0.5, alignment: .bottom)
                .foregroundColor(Color.secondary)
        }
    }
}

使用方法:

TextField("Name", text: $presenter.name).textFieldStyle(BottomLineTextFieldStyle())

9
为了定义自定义样式,您可以使用以下代码。矩形最终会被使用,但是在自定义样式内部,而不是在视图代码中。这符合您的要求吗?
注意:在Beta 3上进行过测试。
要使用您的自定义初始化器:
struct ContentView : View {
    @State private var username = ""

    var body: some View {
        VStack {

            TextField("Enter text", text: $username)
                .textFieldStyle(.myOwnStyle)

        }.frame(width:300)
    }
}

您的自定义初始化器实现:

public struct MyOwnTextFieldStyle: TextFieldStyle {
    public func _body(configuration: TextField<Self.Label>) -> some View {

        VStack() {
            configuration
                .border(Color.blue, width: 2)
                .foregroundColor(Color.yellow)
            Rectangle()
                .frame(height: 1.0, alignment: .bottom)
                .relativeWidth(1)
                .foregroundColor(Color.red)

        }
    }
}

extension StaticMember where Base : TextFieldStyle {
    public static var myOwnStyle: MyOwnTextFieldStyle.Member {
        StaticMember<MyOwnTextFieldStyle>(MyOwnTextFieldStyle())
    }
}

是的,这就是我要找的。谢谢。 - Shawn Baek
3
beta 6中不再支持StaticMember,有什么替代方法吗? - Bagusflyer

9
无论如何,Kontiki 的解决方案在Beta 6上都无法使用。因此我创建了一个新视图,其中包含一个文本框和一个底部绘制的线条。你只需复制以下代码,并通过编写
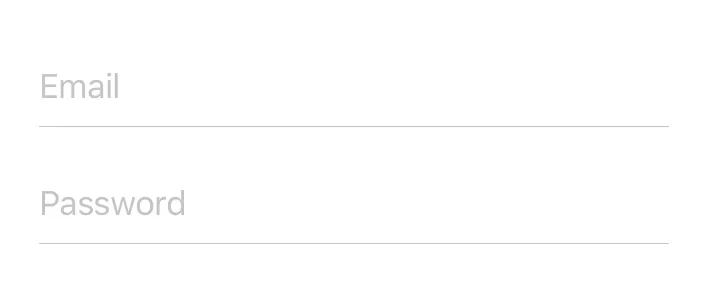
TextFieldWithBottomLine(placeholder: "My placeholder")来使用它。在视图中使用的样子如下所示:

TextView with bottom line 的用法

首先我创建了一条水平线:

import SwiftUI

struct HorizontalLineShape: Shape {

    func path(in rect: CGRect) -> Path {

        let fill = CGRect(x: 0, y: 0, width: rect.size.width, height: rect.size.height)
        var path = Path()
        path.addRoundedRect(in: fill, cornerSize: CGSize(width: 2, height: 2))

        return path
    }
}

struct HorizontalLine: View {
    private var color: Color? = nil
    private var height: CGFloat = 1.0

    init(color: Color, height: CGFloat = 1.0) {
        self.color = color
        self.height = height
    }

    var body: some View {
        HorizontalLineShape().fill(self.color!).frame(minWidth: 0, maxWidth: .infinity, minHeight: height, maxHeight: height)
    }
}

struct HorizontalLine_Previews: PreviewProvider {
    static var previews: some View {
        HorizontalLine(color: .black)
    }
}

接下来我创建了一个包含TextField和HorizontalLine的视图:

import SwiftUI

struct TextFieldWithBottomLine: View {
    @State var text: String = ""
    private var placeholder = ""
    private let lineThickness = CGFloat(2.0)

    init(placeholder: String) {
        self.placeholder = placeholder
    }

    var body: some View {
        VStack {
         TextField(placeholder, text: $text)
            HorizontalLine(color: .black)
        }.padding(.bottom, lineThickness)
    }
}

struct TextFieldWithBottomLine_Previews: PreviewProvider {
    static var previews: some View {
        TextFieldWithBottomLine(placeholder: "My placeholder")
    }
}

为了让您看到它的效果,我创建了一个示例视图:

要查看示例,请参考以下内容:

import SwiftUI

struct SampleView: View {
    @State var text: String = ""
    @ObservedObject var model: LoginModel

    init() {
        self.model = LoginModel()
    }

    init(model: LoginModel) {
        self.model = model
    }

    var body: some View {
        TextFieldWithBottomLine(placeholder: "My placeholder").padding(24)
    }

    func initialActions() {

    }

    func reactOnButtonClick() {

    }
}

struct SampleView_Previews: PreviewProvider {
    static var previews: some View {
        SampleView()
    }
}

如果不支持动画,我们可以将 colorheight 设为 private let - superarts.org

2
我的解决方案是在文本框下面添加一个分隔符:
private let textFieldLength:CGFloat = 200
var body: some View {
     VStack {
         TextField("placeHolder", text: .constant("")).frame(width: textFieldLength, height: 30, alignment: .center)
         Divider().frame(width: textFieldLength, height: 2, alignment: .center)
     }
}

或者使用覆盖层。
 TextField("", text: .constant(""))
  .frame(width: textFieldLength, height: 30, alignment: .center)
  .multilineTextAlignment(.leading)
  .overlay(Divider().frame(width: textFieldLength, height: 2, alignment: .center), alignment: .bottom)

我认为覆盖层的解决方案比其他方案更加干净。 - iGhost
我喜欢第一个片段的简洁性。非常好。 - titusmagnus

1
尝试另一种方式。
struct ContentView: View {
    @State var name: String = ""
    var body: some View {
        VStack {
            // change frame as per requirement
           TextField("Please enter text", text: $name)
            .frame(width: 300, height: 30, alignment: .center)
            .background(Color.gray.opacity(0.2))
            LineView().frame(width: 300, height: 1.0, alignment: .center)
        }
    }
}

LineView:为UIView创建自定义包装器。
struct LineView: UIViewRepresentable {

    typealias UIViewType = UIView
    func makeUIView(context: UIViewRepresentableContext<LineView>) -> UIView {
        let view = UIView()
        view.backgroundColor = UIColor.lightGray
        return view
    }

    func updateUIView(_ uiView: UIView, context: UIViewRepresentableContext<LineView>) {
    }
}

网页内容由stack overflow 提供, 点击上面的
可以查看英文原文,
原文链接