自定义AppBar Flutter

37

我试图实现以下类似的效果, 在此输入图片描述

我很新手Flutter,所以无法搞定。 我需要一个自定义的带抽屉和操作的AppBar,但是排列方式与图片相同。

我尝试在标题小部件中使用StackView

appBar: AppBar(
    title: Stack(
      children: <Widget>[
        Container(
          width: double.infinity,
          color: CustomColors.accentColor,
        ),
        Text(
          'Title',
          style: TextStyle(fontSize: 22.0, color: CustomColors.primaryDark),
        ),
      ],
    ),
  ),

但是我得到了类似这样的东西 在此输入图片描述

有人能帮帮我吗?谢谢。


3
这不是自定义的AppBar,只是一个自定义的小部件。 - diegoveloper
5个回答

50

截图:

在这里输入图片描述


代码:

  • 使用 flexibleSpace

Scaffold(
  appBar: AppBar(
    toolbarHeight: 120, // Set this height
    flexibleSpace: Container(
      color: Colors.orange,
      child: Column(
        children: [
          Text('One'),
          Text('Two'),
          Text('Three'),
          Text('Four'),
        ],
      ),
    ),
  ),
)
  • 使用 PreferredSize

    Scaffold(
      appBar: PreferredSize(
        preferredSize: Size.fromHeight(120), // Set this height
        child: Container(
          color: Colors.orange,
          child: Column(
            mainAxisAlignment: MainAxisAlignment.center,
            children: [
              Text('One'),
              Text('Two'),
              Text('Three'),
              Text('Four'),
            ],
          ),
        ),
      ),
    )
    

  • 只有在你想要覆盖状态栏的情况下,这才是可以的。 - MeLean

    37

    正如我在评论中提到的,您可以创建一个自定义小部件来模仿您所附上的图像,有多种方法可以实现,以下仅为示例:

        class CustomBarWidget extends StatelessWidget {
    
          GlobalKey<ScaffoldState> _scaffoldKey = GlobalKey();
    
          @override
          Widget build(BuildContext context) {
            return Scaffold(
              key: _scaffoldKey,
              body: Container(
                height: 160.0,
                child: Stack(
                  children: <Widget>[
                    Container(
                      color: Colors.red,
                      width: MediaQuery.of(context).size.width,
                      height: 100.0,
                      child: Center(
                        child: Text(
                          "Home",
                          style: TextStyle(color: Colors.white, fontSize: 18.0),
                        ),
                      ),
                    ),
                    Positioned(
                      top: 80.0,
                      left: 0.0,
                      right: 0.0,
                      child: Container(
                        padding: EdgeInsets.symmetric(horizontal: 20.0),
                        child: DecoratedBox(
                          decoration: BoxDecoration(
                              borderRadius: BorderRadius.circular(1.0),
                              border: Border.all(
                                  color: Colors.grey.withOpacity(0.5), width: 1.0),
                              color: Colors.white),
                          child: Row(
                            children: [
                              IconButton(
                                icon: Icon(
                                  Icons.menu,
                                  color: Colors.red,
                                ),
                                onPressed: () {
                                  print("your menu action here");
                                  _scaffoldKey.currentState.openDrawer();
                                },
                              ),
                              Expanded(
                                child: TextField(
                                  decoration: InputDecoration(
                                    hintText: "Search",
                                  ),
                                ),
                              ),
                              IconButton(
                                icon: Icon(
                                  Icons.search,
                                  color: Colors.red,
                                ),
                                onPressed: () {
                                  print("your menu action here");
                                },
                              ),
                              IconButton(
                                icon: Icon(
                                  Icons.notifications,
                                  color: Colors.red,
                                ),
                                onPressed: () {
                                  print("your menu action here");
                                },
                              ),
                            ],
                          ),
                        ),
                      ),
                    )
                  ],
                ),
              ),
            );
          }
        }
    

    更多信息请查看我写的一篇文章,关于如何自定义 AppBar: https://medium.com/flutter-community/flutter-increase-the-power-of-your-appbar-sliverappbar-c4f67c4e076f


    你好,感谢您提供的代码。我已经成功创建了一个类似设计的自定义小部件。之所以特别提到AppBar,是因为我需要保留AppBar的所有功能,例如在导航时更改为返回图标、控制抽屉等。虽然我可以重新创建所有这些功能,但既然AppBar是一个小部件,我们能否对其进行自定义呢? - blisssan
    感谢您提供的代码,这有助于我开始替换AppBar,因为我无法让AppBar做我需要的事情。我需要AppBar工具栏高度大于56,目前无法实现。AppBar的整体高度可以更改,但是通过增加它并不能使AppBar工具栏的高度超过56。这部分参考了Flutter问题#7330和#23373。 - Brian Oh
    1
    @BrianOh 我写了一篇关于这个的文章:https://medium.com/flutter-community/flutter-increase-the-power-of-your-appbar-sliverappbar-c4f67c4e076f - diegoveloper

    17

    只需将整个内容包装在Stack中。然后将AppBar放置在最后一个widget中,并在一些widget之间(例如Container)中间,以便AppBar可以浮动在它们上方。

    仅使用官方AppBar的自定义AppBar

     Widget setPage() {
        Color red800 = Colors.red[800];
    
        return Stack(
          children: <Widget>[
            Container(     // Background
              child: Center(
                 child: Text("Home", style: TextStyle(fontSize: 25.0,
                  fontWeight: FontWeight.w600,
                  color: Colors.white),),),
              color: red800,
              height: MediaQuery.of(context).size.height * 0.2,
              width: MediaQuery.of(context).size.width,
            ),
    
            Container(),   // Required some widget in between to float AppBar
    
            Positioned(    // To take AppBar Size only
              top: 100.0,
              left: 20.0,
              right: 20.0,
              child: AppBar(
                backgroundColor: Colors.white,
                leading: Icon(Icons.menu, color: red800,),
                primary: false,
                title: TextField(
                    decoration: InputDecoration(
                        hintText: "Search",
                        border: InputBorder.none,
                        hintStyle: TextStyle(color: Colors.grey))),
                actions: <Widget>[
                  IconButton(
                    icon: Icon(Icons.search, color: red800), onPressed: () {},),
                  IconButton(icon: Icon(Icons.notifications, color: red800),
                    onPressed: () {},)
                ],
              ),
            )
    
          ],
        );
      }


    15

    截图:

    在此输入图片描述


    代码(空值安全):

    为了简单起见,我没有创建所需的UI,只是想向您展示如何使用PreferredSize创建自定义应用程序栏。

    创建此类:

    class CustomAppBar extends StatelessWidget implements PreferredSizeWidget {
      final Widget child;
      final double height;
    
      CustomAppBar({
        required this.child,
        this.height = kToolbarHeight,
      });
    
      @override
      Size get preferredSize => Size.fromHeight(height);
    
      @override
      Widget build(BuildContext context) {
        return Container(
          height: preferredSize.height,
          color: Colors.orange,
          alignment: Alignment.center,
          child: child,
        );
      }
    }
    

    用法:

    像使用任何其他AppBar一样,但是这次你可以设置height属性:

    Scaffold(
      appBar: CustomAppBar(
        height: 120,
        child: Column(
          children: [
            Text('One'),
            Text('Two'),
            Text('Three'),
            Text('Four'),
          ],
        ),
      ),
    )
    

    3

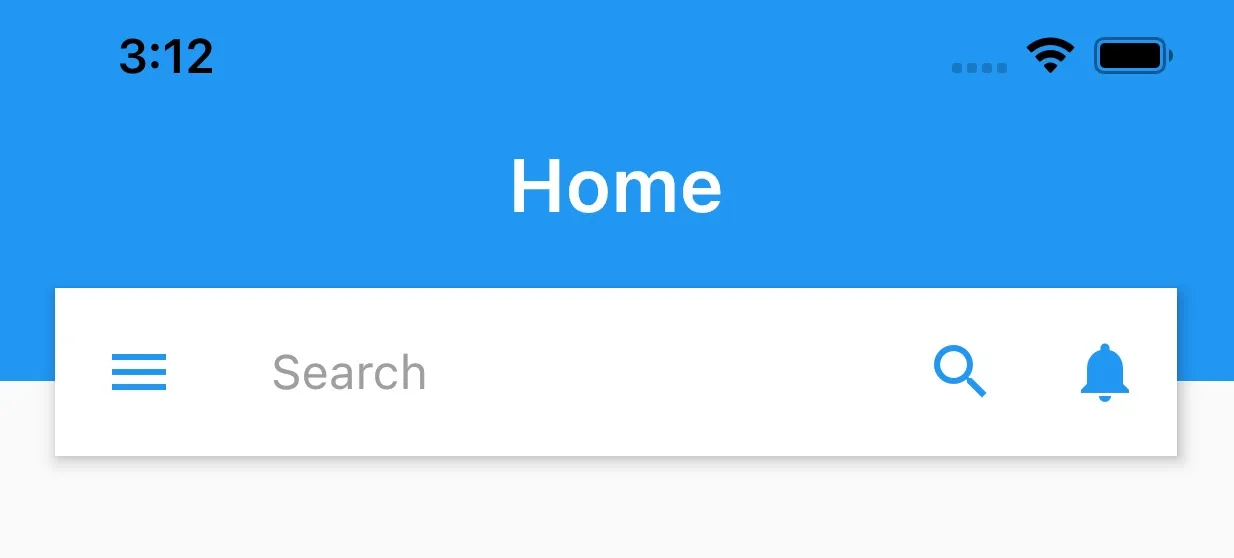
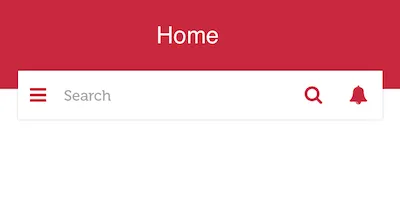
    下面是我用 Stack 和 PreferredSize 来创建它的方式。这样做可以让我们重复使用默认的 AppBar 属性,例如当在 body 中有 ListView 时使 AppBar 粘在屏幕顶部。

    _appBar(height) => PreferredSize(
        preferredSize:  Size(MediaQuery.of(context).size.width, height+80 ),
        child: Stack(
          children: <Widget>[
            Container(     // Background
              child: Center(
                child: Text("Home", style: TextStyle(fontSize: 25.0,
                    fontWeight: FontWeight.w600,
                    color: Colors.white),),),
              color:Theme.of(context).primaryColor,
              height: height+75,
              width: MediaQuery.of(context).size.width,
            ),
    
            Container(),   // Required some widget in between to float AppBar
    
            Positioned(    // To take AppBar Size only
              top: 100.0,
              left: 20.0,
              right: 20.0,
              child: AppBar(
                backgroundColor: Colors.white,
                leading: Icon(Icons.menu, color: Theme.of(context).primaryColor,),
                primary: false,
                title: TextField(
                    decoration: InputDecoration(
                        hintText: "Search",
                        border: InputBorder.none,
                        hintStyle: TextStyle(color: Colors.grey))),
                actions: <Widget>[
                  IconButton(
                    icon: Icon(Icons.search, color: Theme.of(context).primaryColor), onPressed: () {},),
                  IconButton(icon: Icon(Icons.notifications, color: Theme.of(context).primaryColor),
                    onPressed: () {},)
                ],
              ),
            )
    
          ],
        ),
      );


    在脚手架内,我们只需调用上面的 appbar。我们想要传递 AppBar().preferredSize.height 作为默认的 appBar 高度在不同设备(例如:iPhone 8 Plus 和 iPhone 11 Pro Max)上是不同的。
     @override
      Widget build(BuildContext context) {
        return Scaffold(
          appBar: _appBar(AppBar().preferredSize.height),
          body: ListView(),
        );
    })


    enter image description here


    网页内容由stack overflow 提供, 点击上面的
    可以查看英文原文,
    原文链接