为了一个量化项目,我需要颜色校正图像,这些图像可以在任何光照条件下产生相同的结果。
每张图像都包含一个X-Rite色彩检查器,其中颜色以矩阵格式已知:
Reference=[[170, 189, 103],[46, 163, 224],[161, 133, 8],[52, 52, 52],[177, 128, 133],[64, 188, 157],[149, 86, 187],[85, 85, 85],[67, 108, 87],[108, 60, 94],[31, 199, 231],[121, 122, 122], [157, 122, 98],[99, 90, 193],[60, 54, 175],[160, 160, 160],[130, 150, 194],[166, 91, 80],[70, 148, 70],[200, 200, 200],[68, 82, 115],[44, 126, 214],[150, 61, 56],[242, 243, 243]]
对于每一张图片,我都会计算出示例中存在的色卡所对应的矩阵:
Actual_colors=[[114, 184, 137], [2, 151, 237], [118, 131, 55], [12, 25, 41], [111, 113, 177], [33, 178, 188], [88, 78, 227], [36, 64, 85], [30, 99, 110], [45, 36, 116], [6, 169, 222], [53, 104, 138], [98, 114, 123], [48, 72, 229], [29, 39, 211], [85, 149, 184], [66, 136, 233], [110, 79, 90], [41, 142, 91], [110, 180, 214], [7, 55, 137], [0, 111, 238], [82, 44, 48], [139, 206, 242]]
然后,我使用从输入和输出矩阵系数中得出的颜色校正矩阵对整个图像进行校准:
for im in calibrated_img:
    im[:]=colour.colour_correction(im[:], Actual_colors, Reference, "Finlayson 2015")
结果如下:
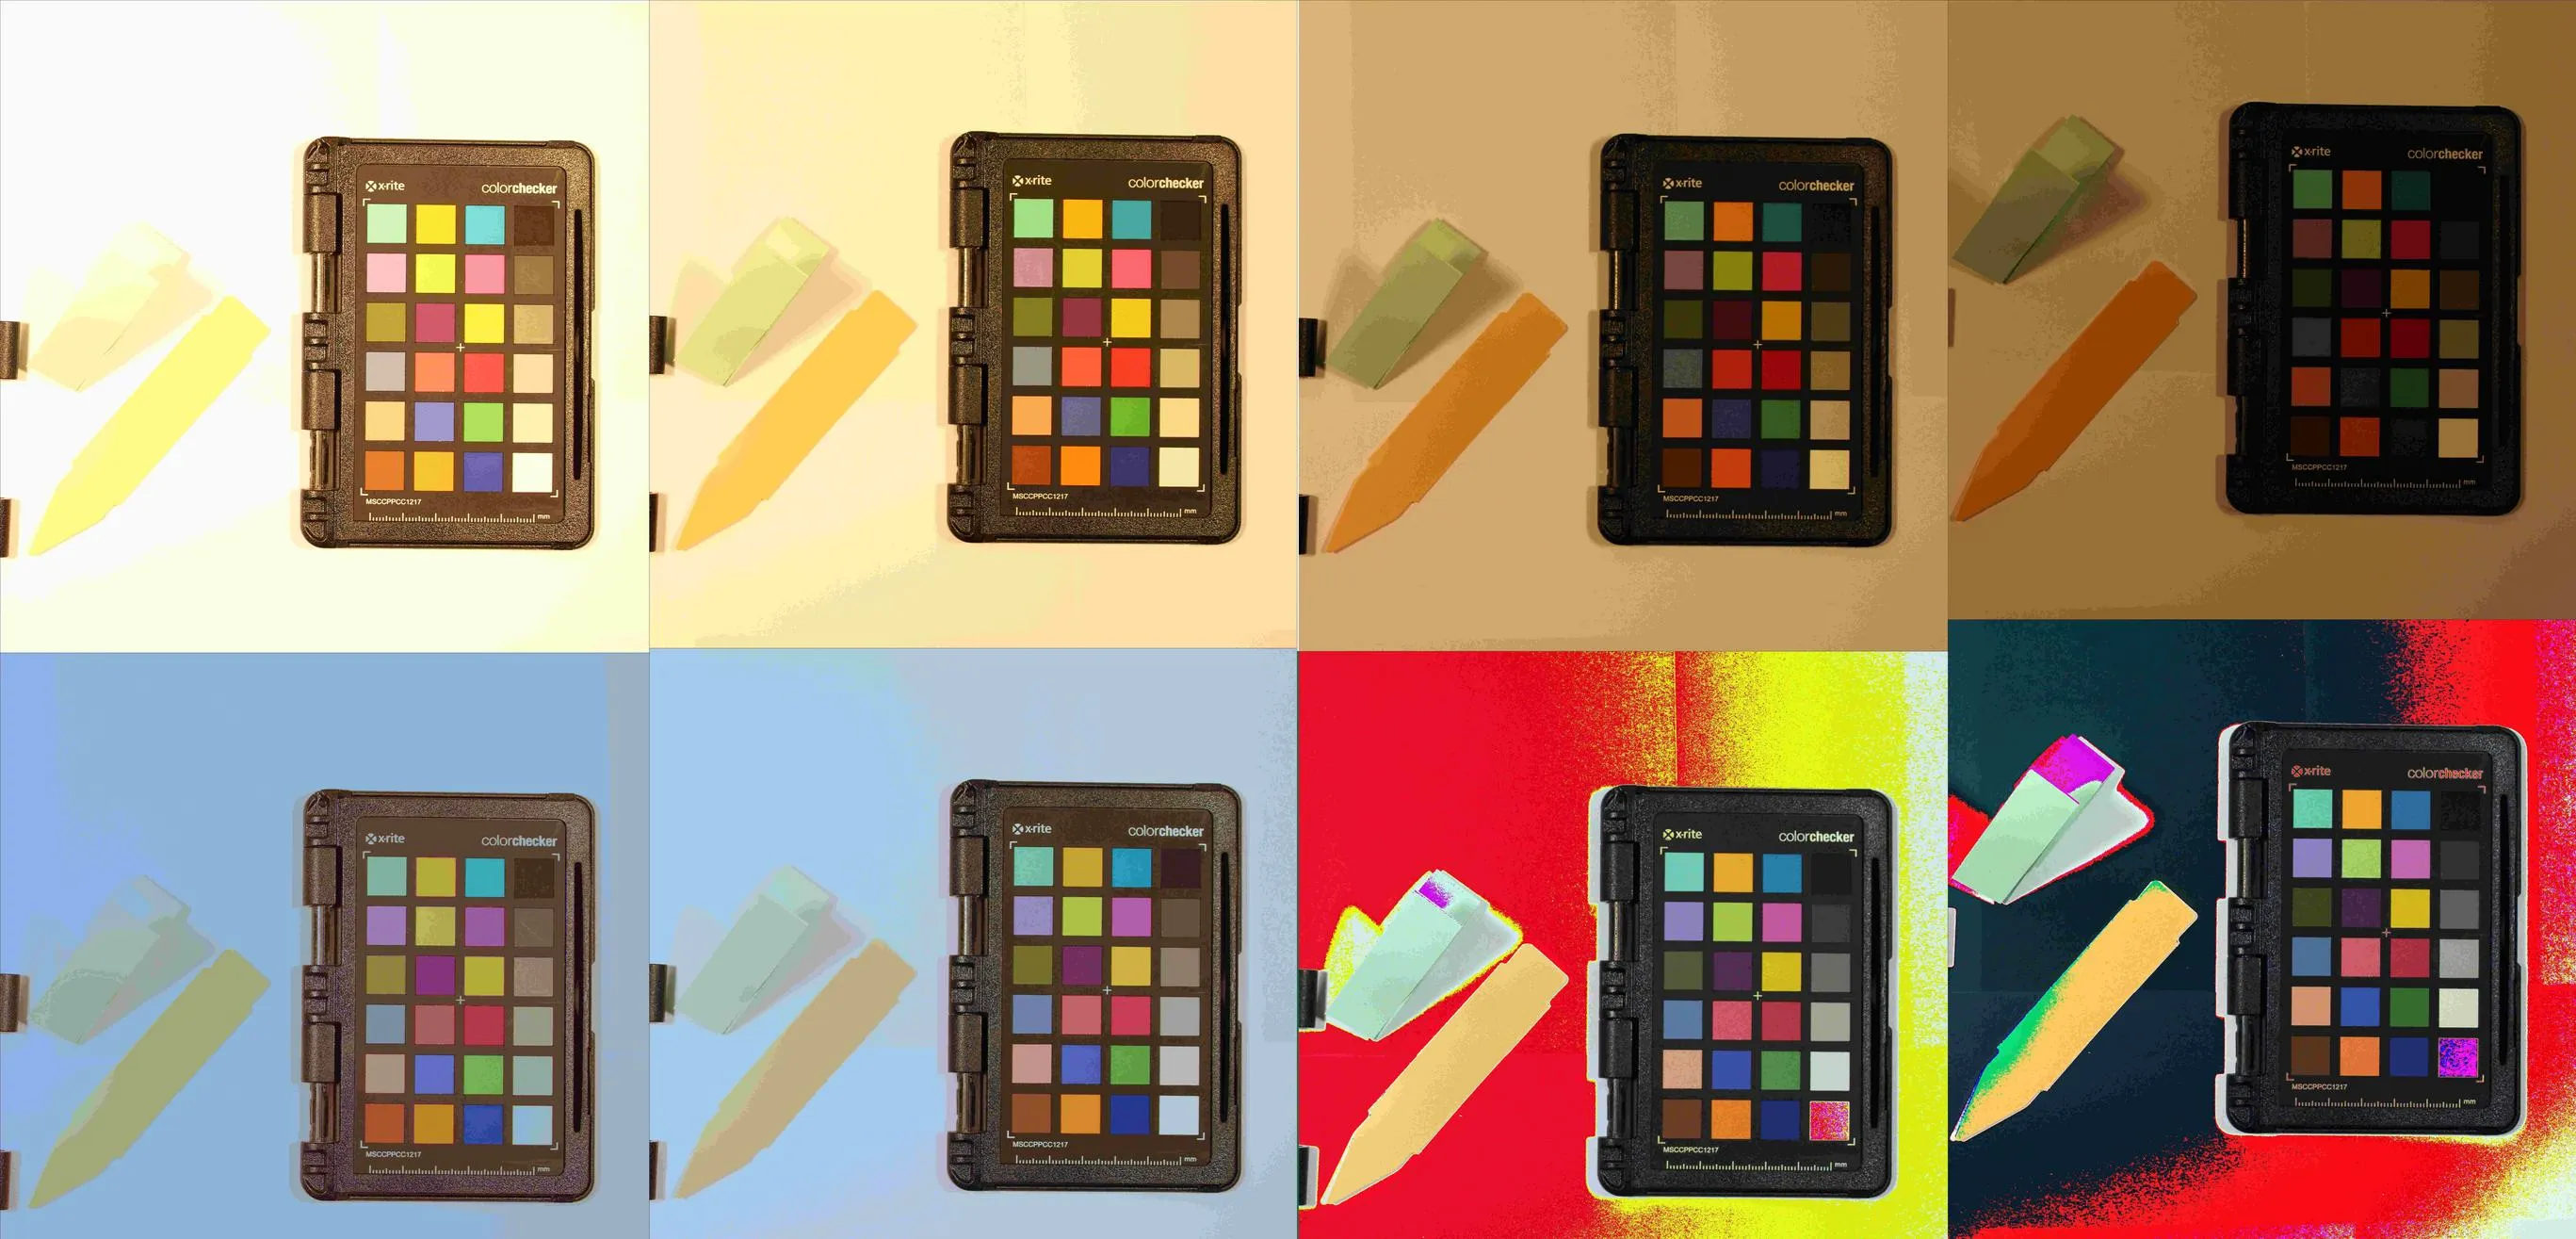
其中,上方的图像代表输入,下方的图像代表输出。 对于颜色校正来说,照明在最终结果中起着关键作用,但左侧的前两幅图像应该会生成相同的输出。一旦图像变得太暗,白色就不知何故转换为红色......我无法理解这是为什么。
我已经尝试在处理之前应用了伽马校正,但没有成功。 另外两种模型Cheung 2004和Vandermonde的结果更差,偏最小二乘法也是如此。这些图像已经从发出黄光的灯泡中得到了很好的校正,但最终结果却不是纯白色,而是在图像上有一层蓝色的雾气。白色应该是白色的......我该怎么做才能进一步改善这些结果?
编辑23-08-2020: 基于@Kel Solaar的评论,我已经对我的脚本进行了更改,包括他提到的步骤。
#Convert image from int to float
Float_image=skimage.img_as_float(img)

#Normalise image to have pixel values from 0 to 1
Normalised_image = (Float_image - np.min(Float_image))/np.ptp(Float_image)

#Decoded the image with sRGB EOTF
Decoded_img=colour.models.eotf_sRGB(Normalised_image)

#Performed Finlayson 2015 color correction to linear data:
for im in Decoded_img:
    im[:]=colour.colour_correction(im[:], Image_list, Reference, "Finlayson 2015")

#Encoded image back to sRGB
Encoded_img=colour.models.eotf_inverse_sRGB(Decoded_img)

#Denormalized image to fit 255 pixel values
Denormalized_image=Encoded_img*255

#Converted floats back to integers
Integer_image=Denormalised_image.astype(int)
如下图所示,这大大提高了图像质量:
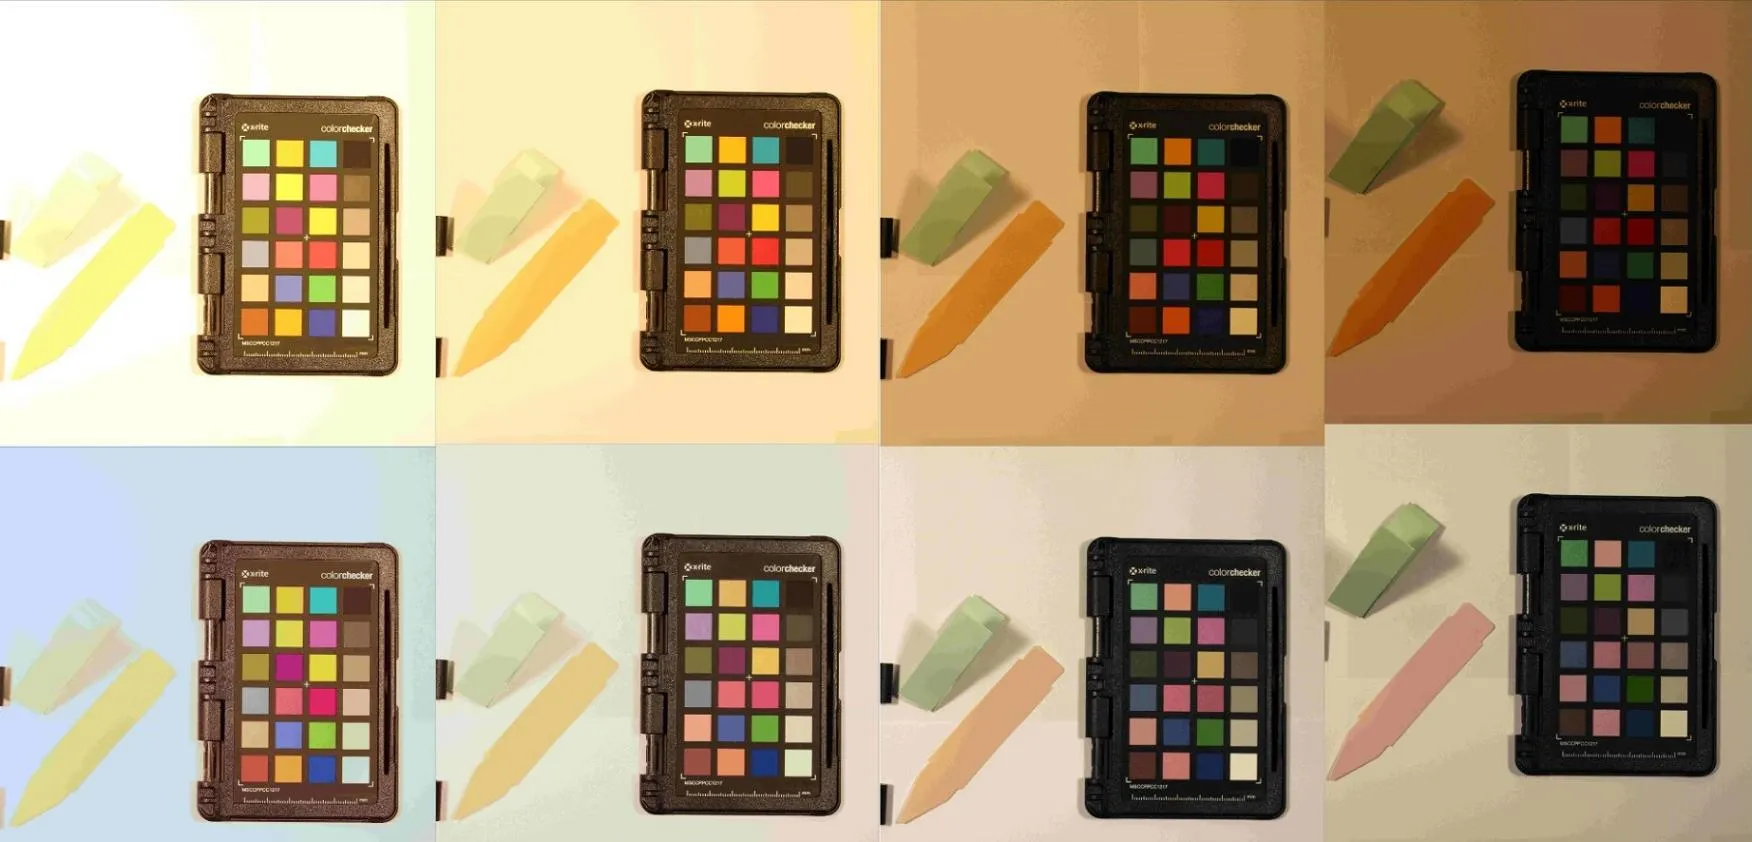
然而,校正后的图像之间仍存在光照/颜色差异。
原始图像可以在此处找到,但需要注意它们是倒立的。
图像中色卡的测量值:
IMG_4244.JPG
[[180, 251, 208], [62, 235, 255], [204, 216, 126], [30, 62, 97], [189, 194, 255], [86, 250, 255], [168, 151, 255], [68, 127, 167], [52, 173, 193], [111, 87, 211], [70, 244, 255], [116, 185, 228], [182, 199, 212], [102, 145, 254], [70, 102, 255], [153, 225, 255], [134, 214, 255], [200, 156, 169], [87, 224, 170], [186, 245, 255], [44, 126, 235], [45, 197, 254], [166, 101, 110], [224, 255, 252]]

IMG_4243.JPG
[[140, 219, 168], [24, 187, 255], [148, 166, 73], [17, 31, 53], [141, 146, 215], [42, 211, 219], [115, 101, 255], [33, 78, 111], [24, 118, 137], [63, 46, 151], [31, 203, 255], [67, 131, 172], [128, 147, 155], [61, 98, 255], [42, 59, 252], [111, 181, 221], [88, 168, 255], [139, 101, 113], [47, 176, 117], [139, 211, 253], [19, 78, 178], [12, 146, 254], [110, 60, 64], [164, 232, 255]]

IMG_4241.JPG
[[66, 129, 87], [0, 90, 195], [65, 73, 26], [9, 13, 18], [60, 64, 117], [20, 127, 135], [51, 38, 176], [15, 27, 39], [14, 51, 55], [21, 15, 62], [1, 112, 180], [29, 63, 87], [54, 67, 69], [20, 33, 179], [10, 12, 154], [38, 92, 123], [26, 81, 178], [58, 44, 46], [23, 86, 54], [67, 127, 173], [5, 26, 77], [2, 64, 194], [43, 22, 25], [84, 161, 207]]

IMG_4246.JPG
[[43, 87, 56], [2, 56, 141], [38, 40, 20], [3, 5, 6], [31, 31, 71], [17, 85, 90], [19, 13, 108], [7, 13, 20], [4, 24, 29], [8, 7, 33], [1, 68, 123], [14, 28, 46], [28, 34, 41], [6, 11, 113], [0, 1, 91], [27, 53, 83], [11, 44, 123], [32, 21, 23], [11, 46, 26], [32, 77, 115], [2, 12, 42], [0, 29, 128], [20, 9, 11], [49, 111, 152]]
本帖子顶部列出的颜色卡(或参考)的实际颜色与图像所给的值具有相同的顺序。
2020年8月30日编辑,我已经应用了@nicdall的评论。
#Remove color chips which are outside of RGB range
New_reference=[]
New_Actual_colors=[]
for L,K in zip(Actual_colors, range(len(Actual_colors))):
    if any(m in L for m in [0, 255]):
        print(L, "value outside of range")
    else:
        New_reference.append(Reference[K])
        New_Actual_colors.append(Actual_colors[K])
除此之外,我意识到我只使用了色卡上的一个像素,所以开始每个颜色块选取15个像素,并对它们进行平均以确保达到良好的平衡。代码太长了无法完全贴在这里,但是大概是这个方向(别在这里评判我的糟糕编码能力):
for i in Chip_list:
    R=round(sum([rotated_img[globals()[i][1],globals()[i][0],][0],
        rotated_img[globals()[i][1]+5,globals()[i][0],][0],
        rotated_img[globals()[i][1]+10,globals()[i][0],][0],
        rotated_img[globals()[i][1],(globals()[i][0]+5)][0],
        rotated_img[globals()[i][1],(globals()[i][0]+10)][0],
        rotated_img[globals()[i][1]+5,(globals()[i][0]+5)][0],
        rotated_img[globals()[i][1]+10,(globals()[i][0]+10)][0]])/(number of pixels which are summed up))
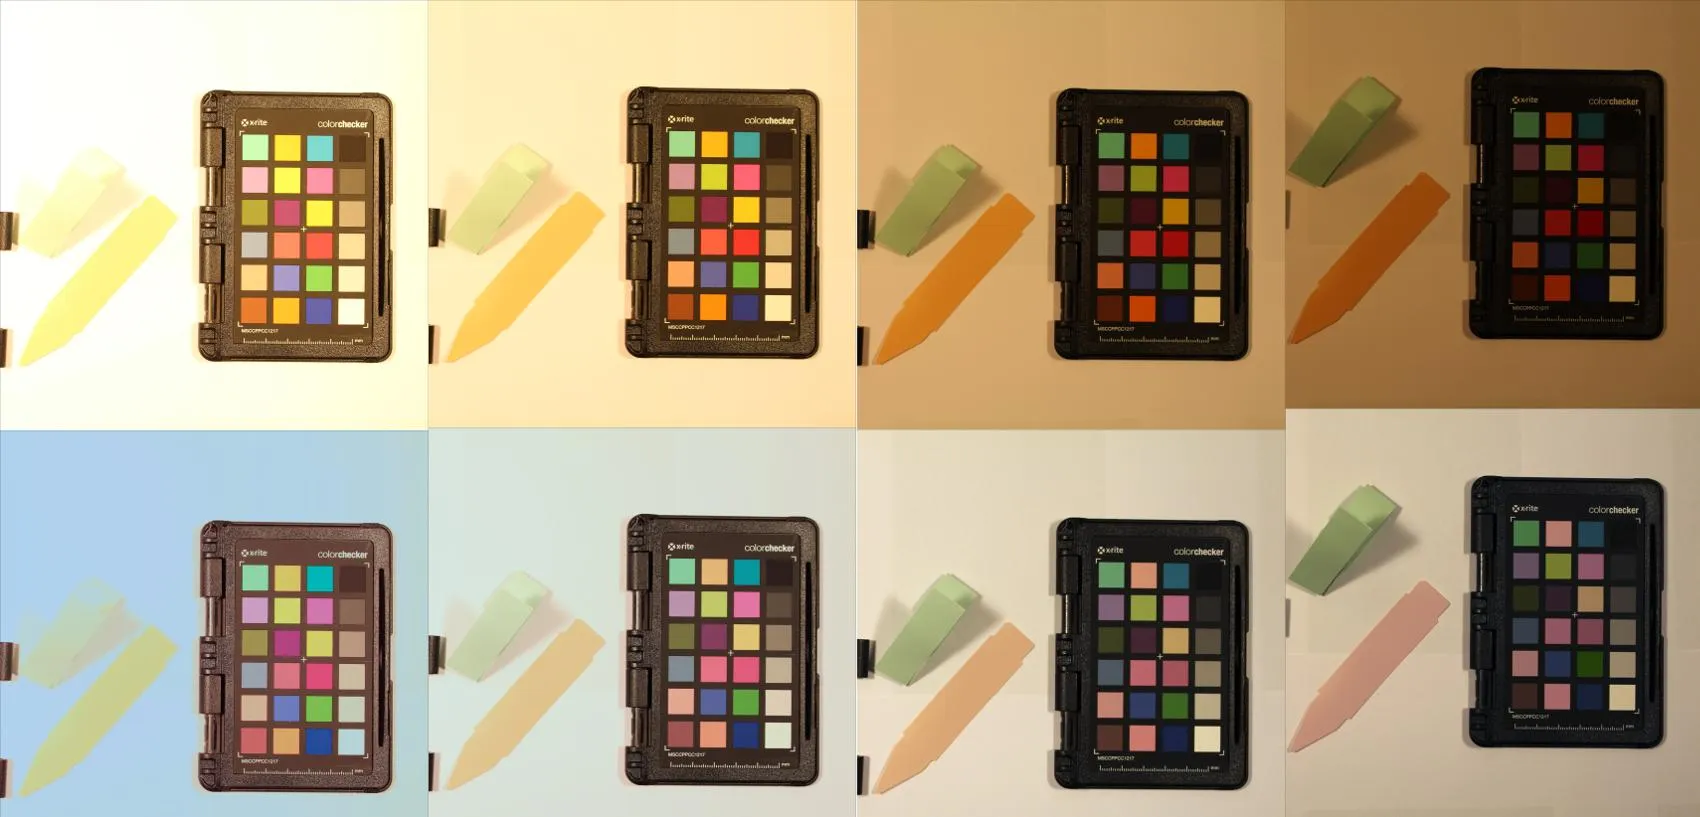
结果令人失望,因为纠正后似乎变得更糟了,但下面显示:
New_reference = [[170, 189, 103], [161, 133, 8], [52, 52, 52], [177, 128, 133], [64, 188, 157], [85, 85, 85], [67, 108, 87], [108, 60, 94], [121, 122, 122], [157, 122, 98], [60, 54, 175], [160, 160, 160], [166, 91, 80], [70, 148, 70], [200, 200, 200], [68, 82, 115], [44, 126, 214], [150, 61, 56]]
#For Image: IMG_4243.JPG:
New_Actual_colors= [[139, 218, 168], [151, 166, 74], [16, 31, 52], [140, 146, 215], [44, 212, 220], [35, 78, 111], [25, 120, 137], [63, 47, 150], [68, 132, 173], [128, 147, 156], [40, 59, 250], [110, 182, 222], [141, 102, 115], [48, 176, 118], [140, 211, 253], [18, 77, 178], [12, 146, 254], [108, 59, 62]]

#The following values were omitted in IMG_4243:
[23, 187, 255] value outside of range
[115, 102, 255] value outside of range
[30, 203, 255] value outside of range
[61, 98, 255] value outside of range
[88, 168, 255] value outside of range
[163, 233, 255] value outside of range
我已开始接近问题的核心,但我不是数学家,然而纠正本身似乎就是个问题.. 这是由color包生成和使用的IMG4243.jpg的颜色校正矩阵:
CCM=colour.characterisation.colour_correction_matrix_Finlayson2015(New_Actual_colors, New_reference, degree=1 ,root_polynomial_expansion=True)
print(CCM)
[[ 1.10079803 -0.03754644  0.18525637]
 [ 0.01519612  0.79700086  0.07502735]
 [-0.11301282 -0.05022718  0.78838144]]
根据我对color包代码的理解,New_Actual_colors是通过CCM进行转换的,如下所示:
Converted_colors=np.reshape(np.transpose(np.dot(CCM, np.transpose(New_Actual_colors))), shape)
当我们将Converted_colors与New_reference进行比较时,可以看到校正已经取得了长足的进步,但仍存在差异(因此最终目标是使用颜色校正矩阵(CCM)将New_Actual_colors转换为Converted_colors,从而完全匹配New_reference):
print("New_reference =",New_reference)
print("Converted_colors =",Converted_colors)
New_reference =    [[170, 189, 103],[161, 133, 8],[52, 52, 52],[177, 128, 133],[64, 188, 157],[85, 85, 85],[67, 108, 87],[108, 60, 94],[121, 122, 122],[157, 122, 98],[60, 54, 175],[160, 160, 160],[166, 91, 80],[70, 148, 70],[200, 200, 200],[68, 82, 115],[44, 126, 214],[150, 61, 56]]
Converted_colors = [[176, 188, 106],[174, 140, 33],[26, 29, 38],[188, 135, 146],[81, 186, 158],[56, 71, 80],[48, 106, 99],[95, 50, 109],[102, 119, 122],[164, 131, 101],[88, 66, 190],[155, 163, 153],[173, 92, 70],[68, 150, 79],[193, 189, 173],[50, 75, 134],[55, 136, 192],[128, 53, 34]]
当我们减去这些差异时,问题就变得清晰起来,那么如何克服这些差异呢?
list(np.array(New_reference) - np.array(Converted_colors))
[array([-6,  1, -3]),
 array([-13,  -7, -25]),
 array([26, 23, 14]),
 array([-11,  -7, -13]),
 array([-17,   2,  -1]),
 array([29, 14,  5]),
 array([ 19,   2, -12]),
 array([ 13,  10, -15]),
 array([19,  3,  0]),
 array([-7, -9, -3]),
 array([-28, -12, -15]),
 array([ 5, -3,  7]),
 array([-7, -1, 10]),
 array([ 2, -2, -9]),
 array([ 7, 11, 27]),
 array([ 18,   7, -19]),
 array([-11, -10,  22]),
 array([22,  8, 22])]