最近在当前地图标记和聚合算法的修改中最简单的是:
改动项:
https://developers.google.com/maps/documentation/javascript/marker-clustering
图片展示如下:
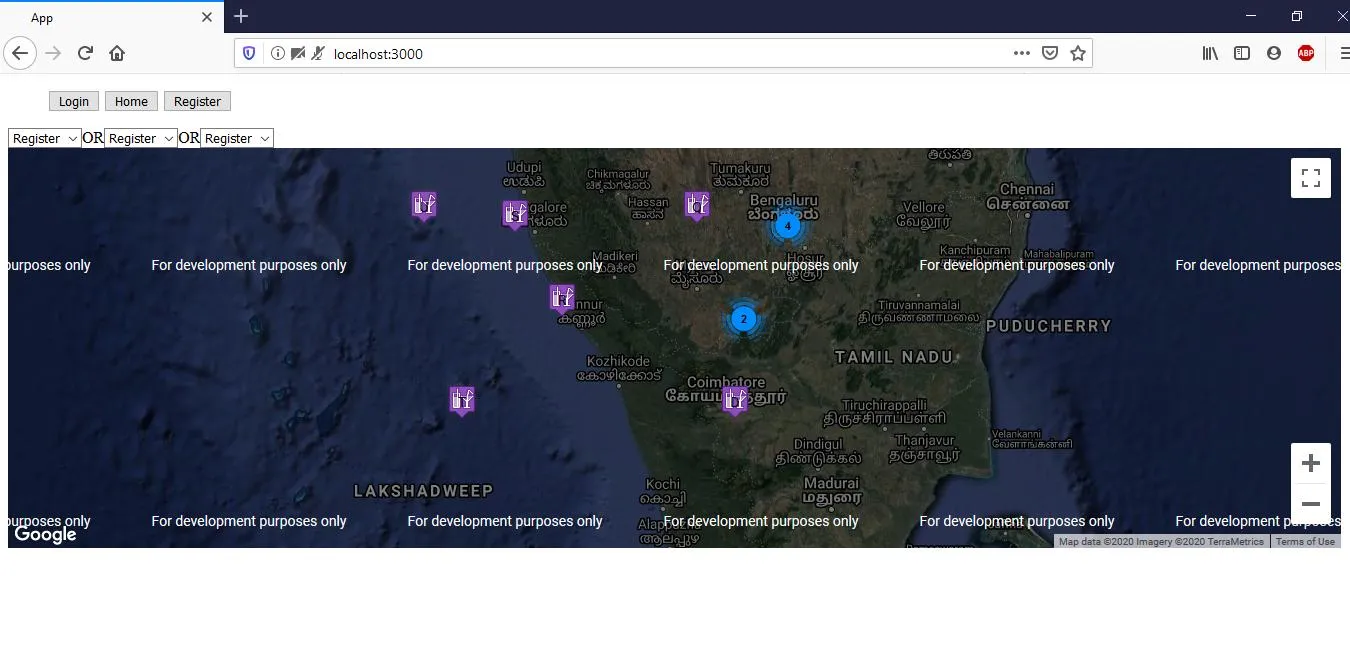
<!DOCTYPE Html>
<html>
<head>
<meta Content-Security-Policy="default-src  'self'; script-src 'self' 'unsafe-eval' https://*/;">
<link type="text/css" href="http://www.mapsmarker.com/wp-content/uploads/leaflet-maps-marker-icons/bar_coktail.png">
<link rel="icon" href="data:,">
<title>App</title>
</head>
<style type="text/css">
   #map {
    height: 500
}
</style>

<body>
<div id='map' style="width:100%; height:400px"></div>
<script type='text/javascript'>
    function initMap() {
        maps = new google.maps.Map(document.getElementById('map'), {
            center: new google.maps.LatLng(12.9824855, 77.637094),
            zoom: 5,
            disableDefaultUI: false,
            mapTypeId: google.maps.MapTypeId.HYBRID
        });
        var labels='ABCDEFGHIJKLMNOPQRSTUVWXYZ';
        var markerImage = 'http://www.mapsmarker.com/wp-content/uploads/leaflet-maps-marker-icons/bar_coktail.png';
        marker = locations.map(function (location, i) {
            return new google.maps.Marker({
                position: new google.maps.LatLng(location.lat, location.lng),
                map: maps,
                title: "Map",
                label: labels[i % labels.length],
                icon: markerImage
            });
        });

        var markerCluster = new MarkerClusterer(maps, marker, {
            imagePath: 'https://developers.google.com/maps/documentation/javascript/examples/markerclusterer/m'
        });
    }
    var locations = [
            { lat: 12.9824855, lng: 77.637094},
            { lat: 11.9824855, lng: 77.154312 },
            { lat: 12.8824855, lng: 77.637094},
            { lat: 10.8824855, lng: 77.054312 },
            { lat: 12.9824855, lng: 77.637094},
            { lat: 11.9824855, lng: 77.154312 },
            { lat: 12.8824855, lng: 77.637094},
            { lat: 13.8824855, lng: 77.054312 },
            { lat: 14.9824855, lng: 54.637094},
            { lat: 15.9824855, lng: 54.154312 },
            { lat: 16.8824855, lng: 53.637094},
            { lat: 17.8824855, lng: 52.054312 },
            { lat: 18.9824855, lng: 51.637094},
            { lat: 19.9824855, lng: 69.154312 },
            { lat: 20.8824855, lng: 68.637094},
            { lat: 21.8824855, lng: 67.054312 },
            { lat: 12.9824855, lng: 76.637094},
            { lat: 11.9824855, lng: 75.154312 },
            { lat: 12.8824855, lng: 74.637094},
            { lat: 10.8824855, lng: 74.054312 },
            { lat: 12.9824855, lng: 73.637094},
            { lat: 3.9824855, lng: 72.154312 },
            { lat: 2.8824855, lng: 71.637094},
            { lat: 1.8824855, lng: 70.054312 }
        ];

</script>
<script src="https://unpkg.com/@google/markerclustererplus@4.0.1/dist/markerclustererplus.min.js">
</script>
<script src="https:maps.googleapis.com/maps/api/js?key=AIzaSyDWu6_Io9xA1oerfOxE77YAv31etN4u3Dw&callback=initMap">
</script>
<script type='text/javascript'></script>