主要步骤如下:
- 创建用于生成证书的系统(如果是生产系统,则容易但不平凡)
- 将证书传输到iPad上(不要嵌入在应用商店捆绑包中!)
- 将所有接收到的凭据保存在应用程序密钥链中(苹果指定的位置)
- 从密钥链检索保存的凭据以在NSURLConnections中使用
- 实际认证服务器证书并返回客户端凭据
第1步:生成证书
参考:
http://developer-should-know.tumblr.com/post/127063737582/how-to-create-your-own-pki-with-openssl
您可以使用其他方法,但是Windows的OpenSSL [http://slproweb.com/products.html]非常出色,除了标准界面是命令行界面,文档难以理解之外。
我希望有人能事先向我解释明显但不明显的内容:
[a] 应用程序安装到根级目录,并包括默认情况下用于未在命令行中指定的设置的配置文件
[b] 中间和输出文件的位置应在配置文件中指定
[c] 某些文件需要手动创建才能运行命令
[d] 您应该构建适合您要执行的操作的文件/文件夹结构,然后相应地自定义cfg文件。
在我的情况下,这意味着为我的公司一个RootCA,每个客户一个中间证书(设置为只生成客户端证书),每个客户一个服务器证书和根据需要的客户端证书。(这是最小配置,请勿使用CA /客户对,请将根放在锁箱中)
下面是我的文件结构:
c:\sslcert
    root
    certs
        YourCompany (duplicate this structure as required)
             intermediate
             server
             client
             crl (optional)
在顶层sslcert文件夹中。
.rnd        (empty file)
certindex.txt   (empty file)
serial.txt  (Text file seeded with the text “01”, hold the quotes)
在根目录中
RootCA.cfg
在certs\template文件夹中。
IntermediateCA.cfg
设置工作目录并启动OpenSSL
cd \sslcert
c:\OpenSSL-Win32\bin\openssl.exe
一步创建根密钥和证书
req -config ./root/RootCA.cfg -new -x509 -days 7300 -extensions v3_ca -keyout root/YourCompanyRootCAkey.pem -out root/YourCompanyRootCAcert.cer
对于初学者的注意事项:-extensions选项允许您在同一cfg文件中选择应用多个子部分中的一个。
检查密钥和证书(可选)
x509 -noout -text -in root/YourCompanyRootCAcert.cer
请求一个新的中间证书
req -config certs/YourCompany/IntermediateCA.cfg -new -keyout certs/YourCompany/intermediate/intermediateCAkey.pem -out certs/YourCompany/intermediate/intermediateCAreq.pem
使用根配置中找到的根证书来签署中间证书。
ca -config root/RootCA.cfg -extensions v3_intermediate_ca -days 3650 -notext -in certs/YourCompany/intermediate/intermediateCAreq.pem -out certs/YourCompany/intermediate/YourCompanyIntermediateCAcert.cer
检查密钥和证书(可选)
x509 -noout -text -in certs/YourCompany/intermediate/YourCompanyIntermediateCAcert.cer
通过将中间证书和根证书连接起来创建证书链文件(这只是从命令行进行的简单追加操作 - 新的链将被添加到最终的p12包中)。
c:\sslcert> type c:\sslcert\certs\YourCompany\intermediate\YourCompanyIntermediateCAcert.cer c:\sslcert\root\YourCompanyRootCAcert.cer > c:\sslcert\certs\YourCompany\intermediate\YourCompanyCAchain.cer
请求新的客户端密钥和证书
genrsa -aes256 -out certs/YourCompany/client/YourCompanyClientkey.pem 2048
req -config certs/YourCompany/IntermediateCA.cfg -key
certs/YourCompany/client/YourCompanyClientkey.pem -new -sha256 -out         certs/YourCompany/client/YourCompanyClientreq.pem
使用中间颁发机构签署并测试客户端证书
ca -config certs/YourCompany/IntermediateCA.cfg -extensions usr_cert -days 1095 -notext -md sha256 -in certs/YourCompany/client/YourCompanyClientreq.pem -out certs/YourCompany/client/YourCompanyClientcert.cer
x509 -noout -text -in certs/YourCompany/client/YourCompanyClientcert.cer
verify -CAfile certs/YourCompany/intermediate/YourCompanyCAchain.cer certs/YourCompany/client/YourCompanyClientcert.cer
打包客户端证书
pkcs12 -export -in certs/YourCompany/client/YourCompanyClientcert.cer -name “YourCompany Smips Client” -inkey certs/YourCompany/client/YourCompanyClientkey.pem -certfile certs/YourCompany/intermediate/YourCompanyCAchain.cer -out certs/YourCompany/client/YourCompanyClientWithName.p12
将 PKCS 重命名以便从电子邮件/ iTunes 导入 iOS
c:\sslcert> copy c:\sslcert\certs\YourCompany\client\YourCompanyClient.p12 c:\sslcert\certs\YourCompany\client\YourCompanyClient.yourext12
请求一个新的服务器密钥和证书
genrsa -aes256 -out certs/YourCompany/server/YourCompanyServerkey.pem 2048
req -config certs/YourCompany/IntermediateCA.cfg -key certs/YourCompany/server/YourCompanyServerkey.pem -new -sha256 -out certs/YourCompany/server/YourCompanyServerreq.pem
使用中间机构签署和测试服务器证书
ca -config certs/YourCompany/IntermediateCA.cfg -extensions server_cert -days 1095 -notext -md sha256 -in certs/YourCompany/server/YourCompanyServerreq.pem -out certs/YourCompany/server/YourCompanyServercert.cer
x509 -noout -text -in certs/YourCompany/server/YourCompanyServercert.cer
verify -CAfile certs/YourCompany/intermediate/YourCompanyCAchain.cer certs/YourCompany/server/YourCompanyServercert.cer
打包服务器证书
pkcs12 -export -in certs/YourCompany/server/YourCompanyServercert.cer -name “YourCompany Smips Server” -inkey certs/YourCompany/server/YourCompanyServerkey.pem -certfile certs/YourCompany/intermediate/YourCompanyCAchain.cer -out certs/YourCompany/server/YourCompanyServer.p12
这里是配置文件:
根目录
dir = .
[ ca ]
default_ca = CA_default
[ CA_default ]
serial = $dir/serial.txt
database = $dir/certindex.txt
new_certs_dir = $dir/certs
certs = $dir/certs
private_key = $dir/root/yourcompanyRootCAkey.pem
certificate = $dir/root/yourcompanyRootCAcert.cer
default_days = 7300
default_md = sha256
preserve = no
email_in_dn = no
nameopt = default_ca
certopt = default_ca
policy = policy_strict
[ policy_strict ]
countryName = match
stateOrProvinceName = match
organizationName = match
organizationalUnitName = optional
commonName = supplied
emailAddress = optional
[ req ]
default_bits = 4096
default_keyfile = key.pem
default_md = sha256
string_mask = nombstr
distinguished_name = req_distinguished_name
x509_extensions = v3_ca
[ req_distinguished_name ]
0.organizationName = Organization Name
organizationalUnitName = Organizational Unit Name
emailAddress = Email Address
emailAddress_max = 40
localityName = Locality Name (city, district)
stateOrProvinceName = State or Province Name (full name)
countryName = Country Name (2 letter code)
countryName_min = 2
countryName_max = 2
commonName = Common Name (hostname, IP, or your name)
commonName_max = 64
0.organizationName_default = yourcompany
organizationalUnitName_default = yourcompanyRoot Certification
emailAddress_default = info@yourcompany.com
localityName_default = Okeefenokee
stateOrProvinceName_default = Wisconsin
countryName_default = US
[ v3_ca ]
subjectKeyIdentifier = hash
authorityKeyIdentifier = keyid:always,issuer
basicConstraints = critical, CA:true
keyUsage = critical, digitalSignature, cRLSign, keyCertSign
[ v3_intermediate_ca ]
subjectKeyIdentifier = hash
authorityKeyIdentifier = keyid:always,issuer
basicConstraints = critical, CA:true, pathlen:0
keyUsage = critical, digitalSignature, cRLSign, keyCertSign
[ crl_ext ]
authorityKeyIdentifier=keyid:always
中级
dir = .
[ ca ]
default_ca = CA_default
[ CA_default ]
serial = $dir/serial.txt
database = $dir/certindex.txt
crl_dir = $dir/certs/yourcompany/crl
new_certs_dir = $dir/certs
certs = $dir/certs
private_key = $dir/certs/yourcompany/intermediate/IntermediateCAkey.pem
certificate = $dir/certs/yourcompany/intermediate/yourcompanyIntermediateCAcert.cer
default_days = 3650
default_md = sha256
preserve = no
email_in_dn = no
nameopt = default_ca
certopt = default_ca
crlnumber = $dir/certs/yourcompany/crl/crlnumber
crl = $dir/certs/yourcompany/crl/crl.pem
crl_extensions = crl_ext
default_crl_days = 365
policy = policy_loose
[ policy_loose ]
countryName = optional
stateOrProvinceName = optional
localityName = optional
organizationName = optional
organizationalUnitName = optional
commonName = supplied
emailAddress = optional
[ req ]
default_bits = 4096
default_keyfile = $dir/certs/yourcompany/intermediate/IntermediateCAkey.pem
default_md = sha256
algorithm
string_mask = nombstr
distinguished_name = req_distinguished_name
x509_extensions = v3_intermediate_ca
[ req_distinguished_name ]
0.organizationName = Organization Name
organizationalUnitName = Organizational Unit Name
emailAddress = Email Address
emailAddress_max = 40
localityName = Locality Name (city, district)
stateOrProvinceName = State or Province Name (full name)
countryName = Country Name (2 letter code)
countryName_min = 2
countryName_max = 2
commonName = Common Name (hostname, IP, or your name)
commonName_max = 64
0.organizationName_default = yourcompany
organizationalUnitName_default = yourcompany Intermediate Certification
emailAddress_default = info@yourcompany.com
localityName_default = Okeefenokee
stateOrProvinceName_default = Wisconsin [should be spelled out]
countryName_default = US
[ v3_intermediate_ca ]
subjectKeyIdentifier = hash
authorityKeyIdentifier = keyid:always,issuer
basicConstraints = critical, CA:true, pathlen:0
keyUsage = critical, digitalSignature, cRLSign, keyCertSign
[ usr_cert ]
basicConstraints = CA:FALSE
nsCertType = client, email
nsComment = "OpenSSL Generated Client Certificate"
subjectKeyIdentifier = hash
authorityKeyIdentifier = keyid,issuer
keyUsage = critical, nonRepudiation, digitalSignature, keyEncipherment
extendedKeyUsage = clientAuth, emailProtection
[ server_cert ]
basicConstraints = CA:FALSE
nsCertType = server
nsComment = "OpenSSL Generated Server Certificate"
subjectKeyIdentifier = hash
authorityKeyIdentifier = keyid,issuer:always
keyUsage = critical, digitalSignature, keyEncipherment
extendedKeyUsage = serverAuth
[ crl_ext ]
authorityKeyIdentifier = keyid:always
2. 将证书传输到iPad
参考: 如何在iPad上注册应用程序以打开PDF文件
苹果公司建议注册应用程序处理的新文件类型,并将重命名为新自定义扩展名的p12文件传输到设备(手动或电子邮件)以安装客户端证书。 p12文件应包括公共证书链以及在步骤1中定义的客户端证书信息。当您尝试打开此类文件时,设备会向您的应用程序委托发送启动/唤醒消息,您需要处理此消息(不要在didload中处理,因为它可能是唤醒消息)。
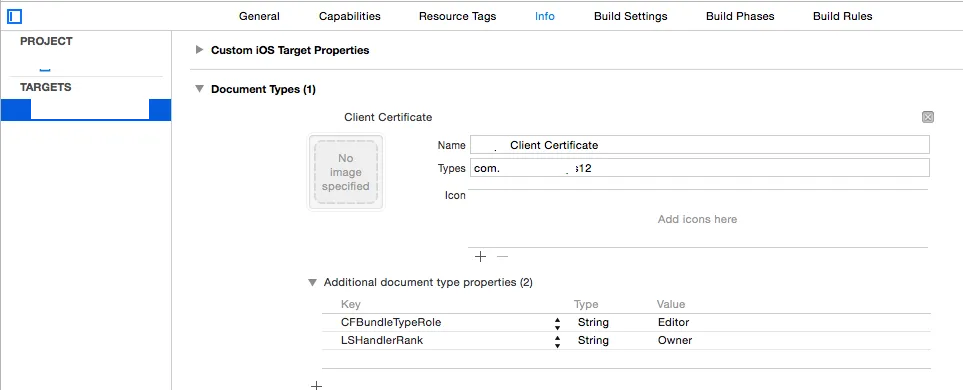
这在v8或9中有所改变,但我需要支持7,因此这是针对已弃用的处理程序。不过解决方案相同,并从添加到应用程序plist文件开始,如下面的屏幕截图所示。
请注意,您将需要两个新的图标和文件扩展名,这不太可能被其他应用程序使用。

接下来,您需要委托/处理程序,其应该是不言自明的。由于此部分与正常控制流程无关,因此我在AppDelegate.m中处理所有委托处理(这样做是否有问题?)根据需要设置方法/变量,并请忽略对文件存在性的过度检查...
参考: https://www.raywenderlich.com/6475/basic-security-in-ios-5-tutorial-part-1
- (BOOL) application:(UIApplication *)application openURL:(NSURL *)url sourceApplication:(NSString *)sourceApplication
annotation:(id)annotation {
if (url) {
self.p12Data = [NSData dataWithContentsOfFile:[url path]];
if (!p12Data) {
[self messageBox:@"Warning" : @"Failed to read data file, cancelling certificate import"];
}
else {
[self presentAlertViewForPassPhrase];
}
NSFileManager * fileManager = [NSFileManager defaultManager];
if ( [fileManager fileExistsAtPath:[url path]] ) {
[fileManager removeItemAtPath:[url path] error:NULL];
}
}
return YES;
}
- (void)presentAlertViewForPassPhrase {
UIAlertView *alert = [[UIAlertView alloc] initWithTitle:@"Certificate Credentials"
message:@"Please enter the passphrase for your certificate"
delegate:self
cancelButtonTitle:@"Cancel"
otherButtonTitles:@"Done", nil];
[alert setAlertViewStyle:UIAlertViewStyleSecureTextInput];
[alert show];
}
- (void)alertView:(UIAlertView *)alertView didDismissWithButtonIndex:(NSInteger)buttonIndex {
if (buttonIndex == 1) {
UITextField *ppField = [alertView textFieldAtIndex:0];
if ([ppField.text length] > 0) {
[self loadCertificates:ppField.text];
}
}
else
{
[self messageBox:@"Information" : @"Certificate import cancelled"];
}
}
3. 将接收到的凭据保存在应用程序钥匙串中
现在您已经获得了原始的p12数据,接下来应该很容易想出下一步要做什么...并不是这样。所有文档似乎都是关于名称/密码存储的,许多帖子建议将服务器证书保存到文件系统中,这样做还可以,但当你有钥匙串时绝对没有意义,而苹果也说这就是它的用途。最后但并非最不重要的是,如何区分已存储的证书,并如何更新它们?
长话短说,我决定在尝试各种行不通的方法后进行完全删除/重新保存,以检查应该是更新还是初始加载 - 因为这是我的应用程序链。所有这些都是CF内容,我没有使用ARC,因为我拒绝移植我不必要的任何东西。据我所知,只要分配CF、转换为NS,并在使用后CFRelease,就没有警告。
以下是关键参考:
枚举iOS应用程序中的所有钥匙串项
[有助于帮助可视化您的钥匙串是什么样子]
如何删除应用程序可以访问的所有钥匙串项?
什么使iOS中的钥匙串项成为唯一的?
http://help.sap.com/saphelp_smp307sdk/helpdata/en/7c/03830b70061014a937d8267bb3f358/content.htm
[https://developer.apple.com/library/ios/samplecode/AdvancedURLConnections/Listings/Credentials_m.html,其中说:
// IMPORTANT: SecCertificateRef's are not uniqued (that is, you can get two
// different SecCertificateRef values that described the same fundamental
// certificate in the keychain), nor can they be compared with CFEqual. So
// we match up certificates based on their data values.
总结一下,最简单的方法就是给证书分配一个标签,这样你就可以独立查找它并意识到如果你保存一个身份,它将自动分成密钥和证书,这可能会导致替换时出现一些困难。
代码(解释如下):
- (void) loadCertificates:(NSString *)passPhrase {
BOOL lastError = false;
NSMutableDictionary * p12Options = [[NSMutableDictionary alloc] init];
[p12Options setObject:passPhrase forKey:(id)kSecImportExportPassphrase];
CFArrayRef items = CFArrayCreate(NULL, 0, 0, NULL);
OSStatus err = SecPKCS12Import((CFDataRef)p12Data, (CFDictionaryRef)p12Options, &items);
if (err != noErr) {
[self messageBox:@"Error" : @"Unable to extract security information with the supplied credentials. Please retry"];
lastError = true;
}
if (!lastError && err == noErr && CFArrayGetCount(items) > 0) {
CFDictionaryRef identityDict = CFArrayGetValueAtIndex(items, 0);
NSArray *secItemClasses = [NSArray arrayWithObjects:
(id)kSecClassCertificate,
(id)kSecClassKey,
(id)kSecClassIdentity,
nil];
for (id secItemClass in secItemClasses) {
NSDictionary *spec = @{(id)kSecClass: secItemClass};
err = SecItemDelete((CFDictionaryRef)spec);
}
SecIdentityRef clientIdentity = (SecIdentityRef)CFDictionaryGetValue(identityDict, kSecImportItemIdentity);
NSDictionary *addIdentityQuery = [NSDictionary dictionaryWithObjectsAndKeys:
kClientIdentityLabel, kSecAttrLabel,
(id)clientIdentity, kSecValueRef,
nil];
err = SecItemAdd((CFDictionaryRef)addIdentityQuery, NULL);
if (err == errSecDuplicateItem) {
NSLog(@"Duplicate identity");
}
if (err != noErr) {
[self messageBox:@"Warning" : @"Failed to save the new identity"];
lastError = true;
}
CFArrayRef chain = CFDictionaryGetValue(identityDict, kSecImportItemCertChain);
CFIndex N = CFArrayGetCount(chain);
BOOL brk = false;
for (CFIndex i=0; (i < N) && (brk == false); i++) {
SecCertificateRef cert = (SecCertificateRef)CFArrayGetValueAtIndex(chain, i);
CFStringRef summary = SecCertificateCopySubjectSummary(cert);
NSString* strSummary = [[NSString alloc] initWithString:(NSString *)summary];
if ([strSummary containsString:@"Root"] || (i == N)) {
NSDictionary *addCertQuery = [NSDictionary dictionaryWithObjectsAndKeys:
kServerCertificateLabel, kSecAttrLabel,
(id)cert, kSecValueRef,
nil];
err = SecItemAdd((CFDictionaryRef)addCertQuery, NULL);
if (err == errSecDuplicateItem) {
NSLog(@"Duplicate root certificate");
}
if (err != noErr) {
[self messageBox:@"Warning" : @"Failed to save the new server certificate"];
lastError = true;
}
brk = true;
}
[strSummary release];
CFRelease(summary);
}
}
else {
[self messageBox:@"Error" : @"Unable to extract security information with the supplied credentials. Please retry"];
lastError = true;
}
[p12Options release];
CFRelease(items);
if (!lastError) [self messageBox:@"Information" : @"Certificate import succeeded"];
}
其中kClientIdentityLabel和kServerCertificateLabel是任意的标签。
kSec函数太多/复杂,无法在此详细解释。只需说明一切都被清除,然后保存提取的客户端身份,接着提取根CA,然后分别保存。为什么要循环呢?因为我不知道是否正确假设根在链的末尾,但如果我生成p12文件,它将在末尾,所以代码现在就在那里。
请注意,来自kSec的错误是编码的,因此该网站是必不可少的:https://www.osstatus.com
4.从钥匙串中检索保存的凭据
一旦凭据在钥匙串中,您可以按如下方式提取它们(失败模式有待改进):
- (void) reloadCredentials {

    self.clientCredential = nil;
    self.serverCertificateData = nil;

    if (self.useClientCertificateIfPresent) {

        NSDictionary* idQuery = [NSDictionary dictionaryWithObjectsAndKeys:
                                 kClientIdentityLabel,            kSecAttrLabel,
                                 (id)kSecClassIdentity,           kSecClass,
                                 kCFBooleanTrue,                  kSecReturnRef,
                                 kSecMatchLimitAll,               kSecMatchLimit,
                                 nil];
        CFArrayRef result = nil;
        OSStatus err = SecItemCopyMatching((CFDictionaryRef)idQuery, (CFTypeRef*)&result);
        if (err == errSecItemNotFound) {
            [self messageBox:@"Warning" : @"Client credentials not found. Server connection may fail"];
        }
        else if (err == noErr && result != nil ) {

            SecIdentityRef clientIdentity = (SecIdentityRef)CFArrayGetValueAtIndex(result, 0);

            SecCertificateRef clientCertificate;
            SecIdentityCopyCertificate(clientIdentity, &clientCertificate);
            const void *certs[] = { clientCertificate };
            CFArrayRef certsArray = CFArrayCreate(NULL, certs, 1, NULL);
            self.clientCredential = [NSURLCredential credentialWithIdentity:clientIdentity certificates:(NSArray*)certsArray
                                                                      persistence:NSURLCredentialPersistenceNone];
            CFRelease(certsArray);
            CFRelease(clientCertificate);
            CFRelease(result);
        }
        else {
            [self messageBox:@"Warning" : @"Client or Server credentials not found. Server connection may fail"];
        }

        NSDictionary* serverCertQuery = [NSDictionary dictionaryWithObjectsAndKeys:
                                         kServerCertificateLabel,         kSecAttrLabel,
                                         (id)kSecClassCertificate,        kSecClass,
                                         kCFBooleanTrue,                  kSecReturnRef,
                                         kSecMatchLimitAll,               kSecMatchLimit,
                                         nil];
        CFArrayRef result1 = nil;
        err = SecItemCopyMatching((CFDictionaryRef)serverCertQuery, (CFTypeRef*)&result1);
        if (err == errSecItemNotFound) {
            [self messageBox:@"Warning" : @"Server certificate not found. Server connection may fail"];
        }
        else if (err == noErr && result1 != nil ) {

            SecCertificateRef certRef = (SecCertificateRef)CFArrayGetValueAtIndex(result1, 0);
            CFDataRef certRefData = SecCertificateCopyData(certRef);
            self.serverCertificateData = (NSData *)certRefData;
            CFRelease(certRefData);
            CFRelease(result1);
        }
        else {
            [self messageBox:@"Warning" : @"Client or Server credentials not found. Server connection may fail"];
        }
    }
}
5. 认证服务器证书并返回客户端凭据
哎呀。这是一个编辑,解释如何实际使用检索到的证书(它本来应该是容易明显的部分...)
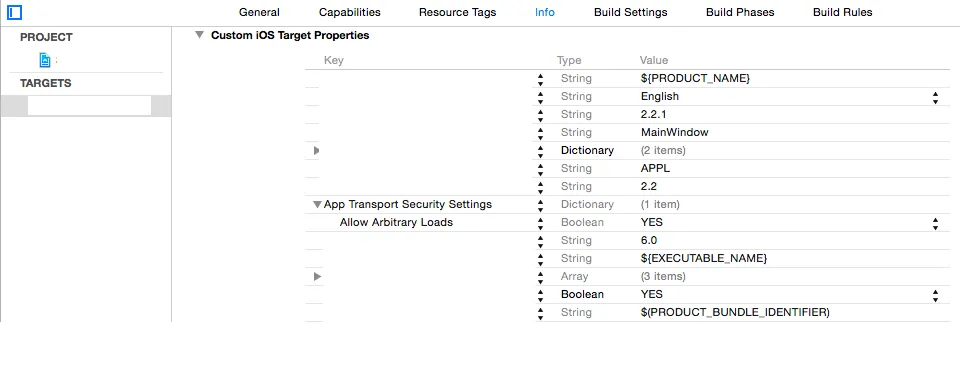
首先,苹果已经可疑的文档被新的应用程序传输安全框架所取代(例如: http://useyourloaf.com/blog/app-transport-security/)。我不会在这里详细讨论,但其想法是通过默认强制每个人始终使用https和受信任的证书来强制执行。对于我的场景,使用证书固定和专用客户端与私有服务器之间的相互认证,您可以通过添加字典到您的plist中安全地关闭此功能,如下所示:
接下来,在第4步中,您已经拥有了客户端凭据以立即响应该挑战,但服务器证书作为DER格式的NSData漂浮在周围,由SecCertificateCopyData创建,不清楚该挑战到达时应该发生什么。
事实证明,您应该实现“X.509标准”第6节中的算法(https://www.rfc-editor.org/rfc/rfc5280)。幸运的是,iOS SecTrustEvaluate函数在幕后实现了这一点,但需要构建脚手架和理解奇怪的东西。
[轻微问题-空间不足!添加了一个新问题,包括此步骤的结尾。]
https://stackoverflow.com/questions/35964632/correctly-use-a-pinned-self-signed-certificate-in-ios-9-2
[从其他帖子继续]
就是这样。对于不太成熟的质量我很抱歉,但是我想在脑海中清晰时把这个东西拍起来。如果我发现错误,我会更新帖子。
希望这有所帮助,这里是一本非常好的书的最后链接,其中将让您感到不安的是信任商业CA...
https://www.cs.auckland.ac.nz/~pgut001/pubs/book.pdf