我正在尝试使用PFQueryTableViewController来展示包括照片在内的地点名称列表。它包含在parse.com的ParseUI SDK中。
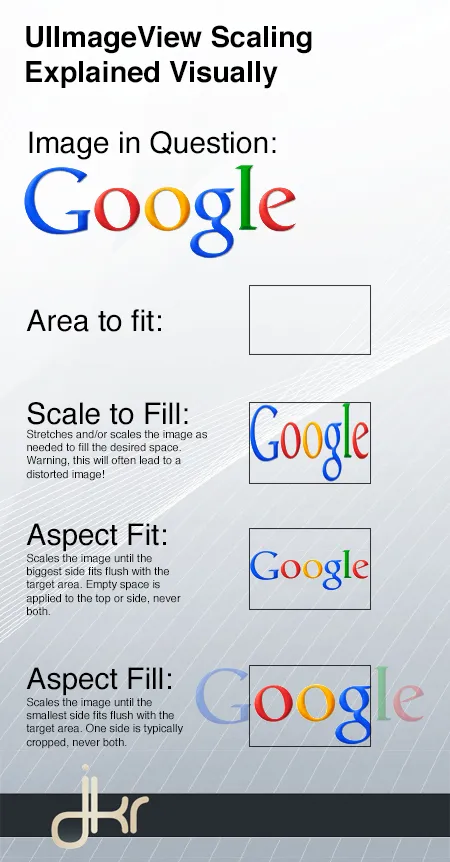
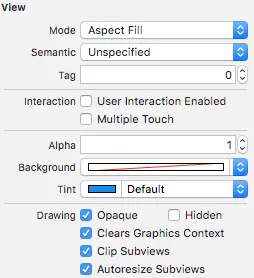
我已经成功显示了图片,但是当我将UIImageView模式更改为Aspect fill时,图片变得比应该更大。
以下是图片:
https://dl.dropboxusercontent.com/u/86529526/pic_normal.png https://dl.dropboxusercontent.com/u/86529526/pic_error.png
在pic_normal中,您将看到两个单元格,每个单元格都有一个正常大小的图像。
在pic_error中,您会发现第二个单元格被第一个单元格的图像覆盖。
有人能帮我解决这个问题吗?我也将我的全部代码放在这里:
import UIKit

class TableViewController: PFQueryTableViewController, UISearchBarDelegate {

    @IBOutlet var searchBar: UISearchBar!


    // Initialise the PFQueryTable tableview
    override init(style: UITableViewStyle, className: String!) {
        super.init(style: style, className: className)
    }

    required init(coder aDecoder: NSCoder) {
        super.init(coder: aDecoder)

        // Configure the PFQueryTableView
        self.pullToRefreshEnabled = true
        self.paginationEnabled = false
    }

    // Define the query that will provide the data for the table view
    override func queryForTable() -> PFQuery {

        // Start the query object
        var query = PFQuery(className: "Places")

        // query with pointer
        query.includeKey("mainPhoto")

        // Add a where clause if there is a search criteria
        if searchBar.text != "" {
            query.whereKey("name", containsString: searchBar.text)
        }

        // Order the results
        query.orderByAscending("name")

        // Return the qwuery object
        return query
    }


    //override func tableView(tableView: UITableView, cellForRowAtIndexPath indexPath: NSIndexPath) -> UITableViewCell
    override func tableView(tableView: UITableView, cellForRowAtIndexPath indexPath: NSIndexPath, object: PFObject) -> PFTableViewCell? {
        var cell = tableView.dequeueReusableCellWithIdentifier("CustomCell") as! CustomTableViewCell!
        if cell == nil {
            cell = CustomTableViewCell(style: UITableViewCellStyle.Default, reuseIdentifier: "CustomCell")
        }

        // Extract values from the PFObject to display in the table cell
        if let name = object["name"] as? String{
            cell.name.text = name
        }

        // display initial image
        var initialThumbnail = UIImage(named: "question")
        cell.photo.image = initialThumbnail


        // extract image from pointer
        if let pointer = object["mainPhoto"] as? PFObject {
            cell.detail.text = pointer["photoTitle"] as? String!
            if let thumbnail = pointer["photo"] as? PFFile {
                cell.photo.file = thumbnail
                cell.photo.loadInBackground()
            }
        }
        cell.sendSubviewToBack(cell.photo)

        // return the cell
        return cell
    }


    // In a storyboard-based application, you will often want to do a little preparation before navigation
    override func prepareForSegue(segue: UIStoryboardSegue, sender: AnyObject?) {

        // Get the new view controller using [segue destinationViewController].
        var detailScene = segue.destinationViewController as! DetailViewController

        // Pass the selected object to the destination view controller.
        if let indexPath = self.tableView.indexPathForSelectedRow() {
            let row = Int(indexPath.row)
            detailScene.currentObject = objects[row] as? PFObject
        }
    }

    override func viewDidLoad(){
        super.viewDidLoad()
        let tapGesture = UITapGestureRecognizer(target:self, action:Selector("hideKeyboard"))
        tapGesture.cancelsTouchesInView = true
        tableView.addGestureRecognizer(tapGesture)
    }

    func hideKeyboard(){
        tableView.endEditing(true)
    }

    override func viewDidAppear(animated: Bool) {

        // Refresh the table to ensure any data changes are displayed
        tableView.reloadData()

        // Delegate the search bar to this table view class
        searchBar.delegate = self
    }

    func searchBarTextDidEndEditing(searchBar: UISearchBar) {

        // Dismiss the keyboard
        searchBar.resignFirstResponder()

        // Force reload of table data
        self.loadObjects()
    }

    func searchBarSearchButtonClicked(searchBar: UISearchBar) {

        // Dismiss the keyboard
        searchBar.resignFirstResponder()

        // Force reload of table data
        self.loadObjects()
    }

    func searchBarCancelButtonClicked(searchBar: UISearchBar) {

        // Clear any search criteria
        searchBar.text = ""

        // Dismiss the keyboard
        searchBar.resignFirstResponder()

        // Force reload of table data
        self.loadObjects()
    }

}

