你提供的文章建议使用基本图形(也就是矢量图形)绘制线条。例如,像Paint这样的应用程序大多数都是基于像素的(即使更高级的软件如Photoshop也具有矢量和光栅化功能)。
位图编辑器
既然您希望它类似于“Paint”,那么我肯定会选择基于像素的方法:
- 创建一个颜色值网格。(扩展System.Drawing.Bitmap类或实现自己的类。)
- 开始(游戏)循环:
- 保存位图,如果需要。
在位图上绘制
我在答案底部添加了我正在使用的图像类的草稿。但是,代码应该相当不言自明。
如前所述,您还需要实现一种将图像转换为Texture2D并将其绘制到屏幕上的方法。
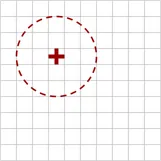
首先,我们创建一个新的 10x10 图像并将所有像素设置为白色。
var image = new Grid<Color>(10, 10);
image.Initilaize(() => Color.White);
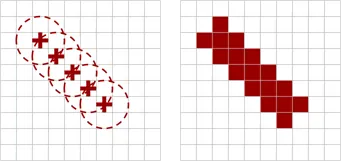
接下来我们要设置一个画刷。画刷本质上只是一个应用于整个图像的函数。在这种情况下,该函数应该将指定圆内的所有像素设置为深红色。
// Create a circular brush
float brushRadius = 2.5f;
int brushX = 4;
int brushY = 4;
Color brushColor = new Color(0.5f, 0, 0, 1); // dark red
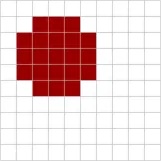
现在我们开始使用画笔。可以参考我的这个Stack Overflow回答,了解如何
确定圆形内的像素。
您可以使用鼠标输入来调整画笔的偏移量,并允许用户实际在位图上绘制。
double radiusSquared = brushRadius * brushRadius;

image.Modify((x, y, oldColor) =>
{
    // Use the circle equation
    int deltaX = x - brushX;
    int deltaY = y - brushY;
    double distanceSquared = Math.Pow(deltaX, 2) + Math.Pow(deltaY, 2);

    // Current pixel lies inside the circle
    if (distanceSquared <= radiusSquared)
    {
        return brushColor;
    }

    return oldColor;
});
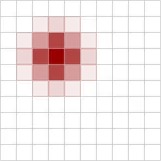
你还可以在画笔颜色和旧像素之间进行插值。例如,您可以通过让混合量取决于画笔中心和当前像素之间的距离来实现“柔和”画笔。
画一条线
为了绘制自由手线条,只需反复应用刷子,每次使用不同的偏移量(取决于鼠标移动):
自定义图像类
显然,我省略了一些必要的属性、方法和数据验证,但你可以理解这个想法:
public class Image
{
    public Color[,] Pixels { get; private set; }

    public Image(int width, int height)
    {
        Pixels= new Color[width, height];
    }

    public void Initialize(Func<Color> createColor)
    {
         for (int x = 0; x < Width; x++)
         {
             for (int y = 0; y < Height; y++)
             {
                  Pixels[x, y] = createColor();
             }
         }
    }

    public void Modify(Func<int, int, Color, Color> modifyColor)
    {
         for (int x = 0; x < Width; x++)
         {
             for (int y = 0; y < Height; y++)
             {
                  Color current = Pixels[x, y];
                  Pixels[x, y] = modifyColor(x, y, current);
             }
         }
    }
}
Color[]缓冲区直接传递给Texture2D.GetData/SetData,而不是从2D数组或Bitmap中进行额外的转换步骤。 - Andrew RussellImage方法中的循环将会被展开成一个单独的循环,并且偏移量需要计算:int x = i / Height;和int y = i % Height;。 - Lucius