我会为你的前两个问题使用掩码。
1. 创建平滑渐变
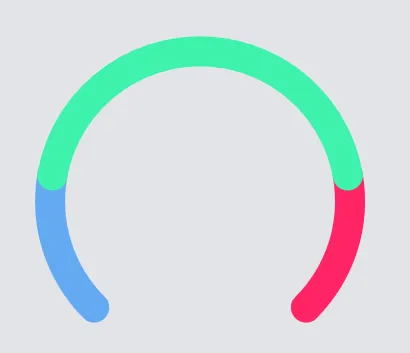
第一步是使用线性渐变绘制两个矩形。第一个矩形包含蓝色和绿色,而第二个矩形包含绿色和红色,如下图所示。我用黑色标记了两个矩形接触的线以澄清它们实际上是两个不同的矩形。

这可以通过以下代码(摘录)实现:
private Shader shader1 = new LinearGradient(0, 400, 0, 500, Color.rgb(59, 242, 174), Color.rgb(101, 172, 242), Shader.TileMode.CLAMP);
private Shader shader2 = new LinearGradient(0, 400, 0, 500, Color.rgb(59, 242, 174), Color.rgb(255, 31, 101), Shader.TileMode.CLAMP);
private Paint paint = new Paint();
@Override
protected void onDraw(Canvas canvas) {
float width = 800;
float height = 800;
float radius = width / 3;
Bitmap.Config conf = Bitmap.Config.ARGB_8888;
Bitmap mImage = Bitmap.createBitmap(800, 800, conf);
Canvas imageCanvas = new Canvas(mImage);
paint.setShader(shader1);
imageCanvas.drawRect(0, 0, 400, 800, paint);
paint.setShader(shader2);
imageCanvas.drawRect(400, 0, 800, 800, paint);
canvas.save();
canvas.drawBitmap(mImage, 0, 0, null);
canvas.restore();
}
作为您的目标是具有带有圆头的彩色弧形,因此我们接下来需要定义用户应该看到的两个矩形的区域。这意味着大多数矩形将被遮蔽,因此不可见。相反,唯一留下的就是弧形区域。
结果应该如下所示:

为了实现所需的行为,我们定义一个掩码,只显示矩形内的弧区域。为此,我们大量使用
Paint的
setXfermode方法。作为参数,我们使用不同实例的
PorterDuffXfermode。
private Paint maskPaint;
private Paint imagePaint;
private void init() {
maskPaint = new Paint();
maskPaint.setXfermode(new PorterDuffXfermode(PorterDuff.Mode.CLEAR));
imagePaint = new Paint();
imagePaint.setXfermode(new PorterDuffXfermode(PorterDuff.Mode.DST_OVER));
}
@Override
protected void onDraw(Canvas canvas) {
Bitmap mMask = Bitmap.createBitmap(800, 800, conf);
Canvas maskCanvas = new Canvas(mMask);
paint.setColor(Color.WHITE);
paint.setShader(null);
paint.setStrokeWidth(70);
paint.setStyle(Paint.Style.STROKE);
paint.setStrokeCap(Paint.Cap.ROUND);
paint.setAntiAlias(true);
final RectF oval = new RectF();
center_x = 400;
center_y = 400;
oval.set(center_x - radius,
center_y - radius,
center_x + radius,
center_y + radius);
maskCanvas.drawArc(oval, 135, 270, false, paint);
canvas.save();
canvas.drawBitmap(mMask, 0, 0, maskPaint);
canvas.drawBitmap(mImage, 0, 0, imagePaint);
canvas.restore();
}
2. 创建白色叠加缩略图
这解决了您的第一个问题。第二个问题可以再次使用遮罩来实现,但这次我们想要实现不同的效果。之前,我们只想显示背景图像(两个矩形)的特定区域(弧线)。这次我们想做相反的事情:我们定义一个背景图像(缩略图),并掩盖其内部内容,以便仅剩下描边。应用于弧形图像时,缩略图将透明的内容区域与彩色弧线叠加。
因此,第一步是绘制缩略图。我们使用一个弧线,半径与背景弧线相同,但角度不同,结果是一个更小的弧线。但是,由于缩略图应该“包围”背景弧线,因此其描边宽度必须大于背景弧线。
@Override
protected void onDraw(Canvas canvas) {
mImage = Bitmap.createBitmap(800, 800, conf);
imageCanvas = new Canvas(mImage);
paint.setColor(Color.WHITE);
paint.setStrokeWidth(120);
final RectF oval2 = new RectF();
center_x = 400;
center_y = 400;
oval2.set(center_x - radius,
center_y - radius,
center_x + radius,
center_y + radius);
imageCanvas.drawArc(oval2, 270, 45, false, paint);
canvas.save();
canvas.drawBitmap(RotateBitmap(mImage, 90f), 0, 0, null);
canvas.restore();
}
public static Bitmap RotateBitmap(Bitmap source, float angle)
{
Matrix matrix = new Matrix();
matrix.postRotate(angle);
return Bitmap.createBitmap(source, 0, 0, source.getWidth(), source.getHeight(), matrix, true);
}
代码的结果如下所示。

现在我们有了一个覆盖背景弧形的拇指,我们需要定义一个掩码来删除拇指内部的部分,使得背景弧再次可见。
为了实现这一点,我们基本上使用与之前相同的参数来创建另一个弧形,但是这次描边宽度必须与用于背景弧的宽度相同,因为这标志着我们希望在拇指内部删除的区域。
使用以下代码,生成的图像显示在第4张图片中。

@Override
protected void onDraw(Canvas canvas) {
mMask = Bitmap.createBitmap(800, 800, conf);
maskCanvas = new Canvas(mMask);
paint.setColor(Color.WHITE);
paint.setStrokeWidth(70);
paint.setXfermode(new PorterDuffXfermode(PorterDuff.Mode.CLEAR));
final RectF oval3 = new RectF();
center_x = 400;
center_y = 400;
oval3.set(center_x - radius,
center_y - radius,
center_x + radius,
center_y + radius);
maskCanvas.drawBitmap(mImage, 0, 0, null);
maskCanvas.drawArc(oval3, 270, 45, false, paint);
canvas.save();
canvas.drawBitmap(RotateBitmap(mMask, 90f), 0, 0, null);
canvas.restore();
}
3. 动画白色拇指
你的问题的最后一部分是如何动画地移动弧线。我没有确定的解决方案,但可以指引你朝一个有用的方向去尝试。我会尝试以下步骤:
首先将拇指定义为整个弧形图表的 ImageView 的一部分。当更改图表的选定值时,您需要围绕背景弧线的中心旋转拇指图像。因为我们想要动画效果,仅设置拇指图像的旋转不足够。相反,我们使用类似于 RotateAnimation 的方法:
final RotateAnimation animRotate = new RotateAnimation(0.0f, -90.0f, // You have to replace these values with your calculated angles
        RotateAnimation.RELATIVE_TO_SELF, // This may be a tricky part. You probably have to change this to RELATIVE_TO_PARENT
        0.5f, // x pivot
        RotateAnimation.RELATIVE_TO_SELF,
        0.5f); // y pivot

animRotate.setDuration(1500);
animRotate.setFillAfter(true);
animSet.addAnimation(animRotate);

thumbView.startAnimation(animSet);
这可能并不是最终版本,但它很可能会帮助您找到所需的解决方案。非常重要的是,您的枢轴值必须参考背景弧的中心,因为这是您的拇指图像应该围绕旋转的点。
我已经测试过我的(完整)代码,使用API 16和22、23级别,因此我希望这个答案至少给您提供了解决问题的新思路。
请注意,在onDraw方法中进行分配操作是一个坏主意,应该避免。为简单起见,我没有遵循这个建议。此外,该代码应作为正确方向的指南,而不是简单地复制和粘贴,因为它大量使用魔术数字,通常不遵循良好的编码标准。


drawArc方法的重载也可能有所帮助。这应该允许在给定的起始和扫描角度基础上,线性插值一对值setRange(double from, double to)在0.0和1.0之间设置范围。 - isaias-b