你如何使用NSAttributedString?

318
NSStringNSMutableStrings中不可能使用多种颜色。所以我听说过有一个NSAttributedString,它是在iPad SDK 3.2(或约为3.2)推出的,并在iPhone SDK 4.0 beta中可用。

我想要一个具有三种颜色的字符串。

我之所以不使用三个单独的 NSStrings,是因为这三个 NSAttributedString 字符串的长度经常发生变化,因此我宁愿不使用任何计算来重新定位三个单独的 NSString 对象。

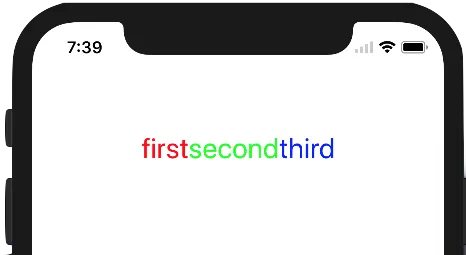
如果可以使用 NSAttributedString,那么如何制作以下内容(如果不能使用 NSAttributed string,则如何实现):

alt text

编辑: 请记住,@"first"@"second"@"third" 将随时被其他字符串替换。因此,使用硬编码的 NSRange 值将无法起作用。


Swift中的属性字符串 - Suragch
NSAttributeString的Swift代码:https://dev59.com/o14c5IYBdhLWcg3wnrb9#27728516 - Kirit Modi
15个回答

486

在构建属性字符串时,我更喜欢使用可变的子类,这样可以使代码更加干净清晰。

话虽如此,下面是创建三色属性字符串的方法:

NSMutableAttributedString *string = [[NSMutableAttributedString alloc] initWithString:@"firstsecondthird"];
[string addAttribute:NSForegroundColorAttributeName value:[UIColor redColor] range:NSMakeRange(0,5)];
[string addAttribute:NSForegroundColorAttributeName value:[UIColor greenColor] range:NSMakeRange(5,6)];
[string addAttribute:NSForegroundColorAttributeName value:[UIColor blueColor] range:NSMakeRange(11,5)];

在浏览器中输入。 实现者需注意

显然,你不会像这样硬编码范围。也许你可以尝试:

NSDictionary *wordToColorMapping = ....;  //an NSDictionary of NSString => UIColor pairs
NSMutableAttributedString *string = [[NSMutableAttributedString alloc] initWithString:@""];
for (NSString *word in wordToColorMapping) {
  UIColor *color = [wordToColorMapping objectForKey:word];
  NSDictionary *attributes = [NSDictionary dictionaryWithObject:color forKey:NSForegroundColorAttributeName];
  NSAttributedString *subString = [[NSAttributedString alloc] initWithString:word attributes:attributes];
  [string appendAttributedString:subString];
  [subString release];
}

//display string

4
请告诉我如何将属性字符串分配给标签? - Pooja M. Bohora
5
@SyedFarazHaiderZaidi UIKit中没有内置接受NSAttributedString的功能。但是,有一些开源工具,例如OHAttributedLabel - Dave DeLong
4
如果你在iOS上使用CoreText.framework,你可能会需要常量kCTForegroundColorAttributeName而不是NSForegroundColorAttributeName - Phil Calvin
33
在刚刚发布的iOS6中(我可以谈论而不需要签署保密协议),你可以像这样做:myLabel.attributedText = attributedString; 终于等到这个功能了...我已经等了好多年。 - Kevin Hoffman
5
警告:字典键是无序的。不要使用上面的代码,否则您将失去对显示字符串顺序的控制。 - Matt-Lloyd
显示剩余11条评论

118

这个问题已经得到了解答...但我想展示如何使用NSAttributedString添加阴影和更改字体,这样当人们搜索此主题时,他们就不必一直寻找。

#define FONT_SIZE 20
#define FONT_HELVETICA @"Helvetica-Light"
#define BLACK_SHADOW [UIColor colorWithRed:40.0f/255.0f green:40.0f/255.0f blue:40.0f/255.0f alpha:0.4f]

NSString*myNSString = @"This is my string.\nIt goes to a second line.";                

NSMutableParagraphStyle *paragraphStyle = [[NSMutableParagraphStyle alloc] init];
               paragraphStyle.alignment = NSTextAlignmentCenter;
             paragraphStyle.lineSpacing = FONT_SIZE/2;
                     UIFont * labelFont = [UIFont fontWithName:FONT_HELVETICA size:FONT_SIZE];
                   UIColor * labelColor = [UIColor colorWithWhite:1 alpha:1];
                       NSShadow *shadow = [[NSShadow alloc] init];
                 [shadow setShadowColor : BLACK_SHADOW];
                [shadow setShadowOffset : CGSizeMake (1.0, 1.0)];
            [shadow setShadowBlurRadius : 1];

NSAttributedString *labelText = [[NSAttributedString alloc] initWithString : myNSString
                      attributes : @{
   NSParagraphStyleAttributeName : paragraphStyle,
             NSKernAttributeName : @2.0,
             NSFontAttributeName : labelFont,
  NSForegroundColorAttributeName : labelColor,
           NSShadowAttributeName : shadow }];

这里是一份Swift版本的代码...

警告!这只适用于4s。

对于5s,您需要将所有Float值更改为Double值(因为编译器尚未正确工作)。

字体选择的Swift枚举:

enum FontValue: Int {
    case FVBold = 1 , FVCondensedBlack, FVMedium, FVHelveticaNeue, FVLight, FVCondensedBold, FVLightItalic, FVUltraLightItalic, FVUltraLight, FVBoldItalic, FVItalic
}

Swift数组用于访问枚举(因为枚举无法使用“-”):

func helveticaFont (index:Int) -> (String) {
    let fontArray = [
    "HelveticaNeue-Bold",
    "HelveticaNeue-CondensedBlack",
    "HelveticaNeue-Medium",
    "HelveticaNeue",
    "HelveticaNeue-Light",
    "HelveticaNeue-CondensedBold",
    "HelveticaNeue-LightItalic",
    "HelveticaNeue-UltraLightItalic",
    "HelveticaNeue-UltraLight",
    "HelveticaNeue-BoldItalic",
    "HelveticaNeue-Italic",
    ]
    return fontArray[index]
}

Swift属性文本函数:

func myAttributedText (myString:String, mySize: Float, myFont:FontValue) -> (NSMutableAttributedString) {

    let shadow = NSShadow()
    shadow.shadowColor = UIColor.textShadowColor()
    shadow.shadowOffset = CGSizeMake (1.0, 1.0)
    shadow.shadowBlurRadius = 1

    let paragraphStyle = NSMutableParagraphStyle.alloc()
    paragraphStyle.lineHeightMultiple = 1
    paragraphStyle.lineBreakMode = NSLineBreakMode.ByWordWrapping
    paragraphStyle.alignment = NSTextAlignment.Center

    let labelFont = UIFont(name: helveticaFont(myFont.toRaw()), size: mySize)
    let labelColor = UIColor.whiteColor()

    let myAttributes :Dictionary = [NSParagraphStyleAttributeName : paragraphStyle,
                                              NSKernAttributeName : 3, // (-1,5)
                                              NSFontAttributeName : labelFont,
                                   NSForegroundColorAttributeName : labelColor,
                                            NSShadowAttributeName : shadow]

    let myAttributedString = NSMutableAttributedString (string: myString, attributes:myAttributes)

    // add new color 
    let secondColor = UIColor.blackColor()
    let stringArray = myString.componentsSeparatedByString(" ")
    let firstString: String? = stringArray.first
    let letterCount = countElements(firstString!)
    if firstString {
        myAttributedString.addAttributes([NSForegroundColorAttributeName:secondColor], range:NSMakeRange(0,letterCount))
    }

    return  myAttributedString
}

在字符串数组中查找范围时,使用的第一个和最后一个扩展名:

extension Array {
    var last: T? {
        if self.isEmpty {
            NSLog("array crash error - please fix")
            return self [0]
        } else {
            return self[self.endIndex - 1]
        }
    }
}

extension Array {
    var first: T? {
        if self.isEmpty {
            NSLog("array crash error - please fix")
            return self [0]
        } else {
            return self [0]
        }
    }
}

新颜色:

extension UIColor {
    class func shadowColor() -> UIColor {
        return UIColor(red: 0.0/255.0, green: 0.0/255.0, blue: 0.0/255.0, alpha: 0.3)
    }
    class func textShadowColor() -> UIColor {
        return UIColor(red: 50.0/255.0, green: 50.0/255.0, blue: 50.0/255.0, alpha: 0.5)
    }
    class func pastelBlueColor() -> UIColor {
        return UIColor(red: 176.0/255.0, green: 186.0/255.0, blue: 255.0/255.0, alpha: 1)
    }
    class func pastelYellowColor() -> UIColor {
        return UIColor(red: 255.0/255.0, green: 238.0/255.0, blue: 140.0/255.0, alpha: 1)
    }
}

我的宏替换:
enum MyConstants: Float {
    case CornerRadius = 5.0
}

我的按钮生成器,带有属性文本:

func myButtonMaker (myView:UIView) -> UIButton {

    let myButton = UIButton.buttonWithType(.System) as UIButton
    myButton.backgroundColor = UIColor.pastelBlueColor()
    myButton.showsTouchWhenHighlighted = true;
    let myCGSize:CGSize = CGSizeMake(100.0, 50.0)
    let myFrame = CGRectMake(myView.frame.midX - myCGSize.height,myView.frame.midY - 2 * myCGSize.height,myCGSize.width,myCGSize.height)
    myButton.frame = myFrame
    let myTitle = myAttributedText("Button",20.0,FontValue.FVLight)
    myButton.setAttributedTitle(myTitle, forState:.Normal)

    myButton.layer.cornerRadius = myButton.bounds.size.width / MyConstants.CornerRadius.toRaw()
    myButton.setTitleColor(UIColor.whiteColor(), forState: .Normal)
    myButton.tag = 100
    myButton.bringSubviewToFront(myView)
    myButton.layerGradient()

    myView.addSubview(myButton)

    return  myButton
}

我的UIView/UILabel制造者,具有属性文本、阴影和圆角:
func myLabelMaker (myView:UIView) -> UIView {

    let myFrame = CGRectMake(myView.frame.midX / 2 , myView.frame.midY / 2, myView.frame.width/2, myView.frame.height/2)
    let mylabelFrame = CGRectMake(0, 0, myView.frame.width/2, myView.frame.height/2)

    let myBaseView = UIView()
    myBaseView.frame = myFrame
    myBaseView.backgroundColor = UIColor.clearColor()

    let myLabel = UILabel()
    myLabel.backgroundColor=UIColor.pastelYellowColor()
    myLabel.frame = mylabelFrame

    myLabel.attributedText = myAttributedText("This is my String",20.0,FontValue.FVLight)
    myLabel.numberOfLines = 5
    myLabel.tag = 100
    myLabel.layer.cornerRadius = myLabel.bounds.size.width / MyConstants.CornerRadius.toRaw()
    myLabel.clipsToBounds = true
    myLabel.layerborders()

    myBaseView.addSubview(myLabel)

    myBaseView.layerShadow()
    myBaseView.layerGradient()

    myView.addSubview(myBaseView)

    return myLabel
}

通用阴影添加:

func viewshadow<T where T: UIView> (shadowObject: T)
{
    let layer = shadowObject.layer
    let radius = shadowObject.frame.size.width / MyConstants.CornerRadius.toRaw();
    layer.borderColor = UIColor.whiteColor().CGColor
    layer.borderWidth = 0.8
    layer.cornerRadius = radius
    layer.shadowOpacity = 1
    layer.shadowRadius = 3
    layer.shadowOffset = CGSizeMake(2.0,2.0)
    layer.shadowColor = UIColor.shadowColor().CGColor
}

视图扩展用于视图样式:

extension UIView {
    func layerborders() {
        let layer = self.layer
        let frame = self.frame
        let myColor = self.backgroundColor
        layer.borderColor = myColor.CGColor
        layer.borderWidth = 10.8
        layer.cornerRadius = layer.borderWidth / MyConstants.CornerRadius.toRaw()
    }

    func layerShadow() {
        let layer = self.layer
        let frame = self.frame
        layer.cornerRadius = layer.borderWidth / MyConstants.CornerRadius.toRaw()
        layer.shadowOpacity = 1
        layer.shadowRadius = 3
        layer.shadowOffset = CGSizeMake(2.0,2.0)
        layer.shadowColor = UIColor.shadowColor().CGColor
    }

    func layerGradient() {
        let layer = CAGradientLayer()
        let size = self.frame.size
        layer.frame.size = size
        layer.frame.origin = CGPointMake(0.0,0.0)
        layer.cornerRadius = layer.bounds.size.width / MyConstants.CornerRadius.toRaw();

        var color0 = CGColorCreateGenericRGB(250.0/255, 250.0/255, 250.0/255, 0.5)
        var color1 = CGColorCreateGenericRGB(200.0/255, 200.0/255, 200.0/255, 0.1)
        var color2 = CGColorCreateGenericRGB(150.0/255, 150.0/255, 150.0/255, 0.1)
        var color3 = CGColorCreateGenericRGB(100.0/255, 100.0/255, 100.0/255, 0.1)
        var color4 = CGColorCreateGenericRGB(50.0/255, 50.0/255, 50.0/255, 0.1)
        var color5 = CGColorCreateGenericRGB(0.0/255, 0.0/255, 0.0/255, 0.1)
        var color6 = CGColorCreateGenericRGB(150.0/255, 150.0/255, 150.0/255, 0.1)

        layer.colors = [color0,color1,color2,color3,color4,color5,color6]
        self.layer.insertSublayer(layer, atIndex: 2)
    }
}

实际的视图加载函数:

func buttonPress (sender:UIButton!) {
    NSLog("%@", "ButtonPressed")
}

override func viewDidLoad() {
    super.viewDidLoad()

    let myLabel = myLabelMaker(myView)
    let myButton = myButtonMaker(myView)

    myButton.addTarget(self, action: "buttonPress:", forControlEvents:UIControlEvents.TouchUpInside)

    viewshadow(myButton)
    viewshadow(myLabel)

}

33

我认为使用 正则表达式 查找应用属性范围是一种非常方便的方法。这就是我做的方式:

NSMutableAttributedString *goodText = [[NSMutableAttributedString alloc] initWithString:articleText];

NSRange range = [articleText rangeOfString:@"\\[.+?\\]" options:NSRegularExpressionSearch|NSCaseInsensitiveSearch];
if (range.location != NSNotFound) {
    [goodText addAttribute:NSFontAttributeName value:[UIFont fontWithName:@"Georgia" size:16] range:range];
    [goodText addAttribute:NSForegroundColorAttributeName value:[UIColor brownColor] range:range];
}

NSString *regEx = [NSString stringWithFormat:@"%@.+?\\s", [self.article.titleText substringToIndex:0]];
range = [articleText rangeOfString:regEx options:NSRegularExpressionSearch|NSCaseInsensitiveSearch];
if (range.location != NSNotFound) {
    [goodText addAttribute:NSFontAttributeName value:[UIFont fontWithName:@"Georgia-Bold" size:20] range:range];
    [goodText addAttribute:NSForegroundColorAttributeName value:[UIColor blueColor] range:range];
}

[self.textView setAttributedText:goodText];

我正在寻找可用属性的列表,但在这里和类参考的第一页都没有找到。因此,我决定在这里发布有关此信息的内容。

标准属性

属性字符串支持以下文本的标准属性。如果键不在字典中,则使用下面描述的默认值。

NSString *NSFontAttributeName;
NSString *NSParagraphStyleAttributeName;
NSString *NSForegroundColorAttributeName;
NSString *NSUnderlineStyleAttributeName;
NSString *NSSuperscriptAttributeName;
NSString *NSBackgroundColorAttributeName;
NSString *NSAttachmentAttributeName;
NSString *NSLigatureAttributeName;
NSString *NSBaselineOffsetAttributeName;
NSString *NSKernAttributeName;
NSString *NSLinkAttributeName;
NSString *NSStrokeWidthAttributeName;
NSString *NSStrokeColorAttributeName;
NSString *NSUnderlineColorAttributeName;
NSString *NSStrikethroughStyleAttributeName;
NSString *NSStrikethroughColorAttributeName;
NSString *NSShadowAttributeName;
NSString *NSObliquenessAttributeName;
NSString *NSExpansionAttributeName;
NSString *NSCursorAttributeName;
NSString *NSToolTipAttributeName;
NSString *NSMarkedClauseSegmentAttributeName;
NSString *NSWritingDirectionAttributeName;
NSString *NSVerticalGlyphFormAttributeName;
NSString *NSTextAlternativesAttributeName;

NSAttributedString编程指南

完整的类参考资料在这里


感谢列出属性键(否则很难找到) - Ali Saeed
你会用Swift怎么做这个? - Thomas Martinez

29

这个解决方案适用于任何长度

NSString *strFirst = @"Anylengthtext";
NSString *strSecond = @"Anylengthtext";
NSString *strThird = @"Anylengthtext";

NSString *strComplete = [NSString stringWithFormat:@"%@ %@ %@",strFirst,strSecond,strThird];

NSMutableAttributedString *attributedString =[[NSMutableAttributedString alloc] initWithString:strComplete];

[attributedString addAttribute:NSForegroundColorAttributeName
              value:[UIColor redColor]
              range:[strComplete rangeOfString:strFirst]];

[attributedString addAttribute:NSForegroundColorAttributeName
              value:[UIColor yellowColor]
              range:[strComplete rangeOfString:strSecond]];

[attributedString addAttribute:NSForegroundColorAttributeName
              value:[UIColor blueColor]
              range:[strComplete rangeOfString:strThird]];


self.lblName.attributedText = attributedString;

请注意,对于SWIFT,您仍需要使用NSString,因为涉及到范围,请查看此答案:https://dev59.com/Pl8d5IYBdhLWcg3wNQRg#27041376 - Efren

15

我写了一个帮助程序,可以轻松地添加属性:

- (void)addColor:(UIColor *)color substring:(NSString *)substring;
- (void)addBackgroundColor:(UIColor *)color substring:(NSString *)substring;
- (void)addUnderlineForSubstring:(NSString *)substring;
- (void)addStrikeThrough:(int)thickness substring:(NSString *)substring;
- (void)addShadowColor:(UIColor *)color width:(int)width height:(int)height radius:(int)radius substring:(NSString *)substring;
- (void)addFontWithName:(NSString *)fontName size:(int)fontSize substring:(NSString *)substring;
- (void)addAlignment:(NSTextAlignment)alignment substring:(NSString *)substring;
- (void)addColorToRussianText:(UIColor *)color;
- (void)addStrokeColor:(UIColor *)color thickness:(int)thickness substring:(NSString *)substring;
- (void)addVerticalGlyph:(BOOL)glyph substring:(NSString *)substring;

https://github.com/shmidt/MASAttributes

你也可以通过 CocoaPods 安装:pod 'MASAttributes','~> 1.0.0'


11

自从 iOS 7 开始,您可以使用具有 HTML 语法的 NSAttributedString

NSURL *htmlString = [[NSBundle mainBundle]  URLForResource: @"string"     withExtension:@"html"];
NSAttributedString *stringWithHTMLAttributes = [[NSAttributedString alloc] initWithFileURL:htmlString
                                                                                       options:@{NSDocumentTypeDocumentAttribute:NSHTMLTextDocumentType}
                                                                            documentAttributes:nil
                                                                                         error:nil];
textView.attributedText = stringWithHTMLAttributes;// you can use a label also

你需要将文件 "string.html" 添加到你的项目中,HTML 的内容可以像这样:

<html>
  <head>
    <style type="text/css">
      body {
        font-size: 15px;
        font-family: Avenir, Arial, sans-serif;
      }
      .red {
        color: red;
      }
      .green {
        color: green;
      }
      .blue {
        color: blue;
      }
    </style>
  </head>
  <body>
    <span class="red">first</span><span class="green">second</span><span class="blue">third</span>
  </body>
</html>  

现在,你可以随心所欲地使用 NSAttributedString,即使没有HTML文件,例如:
//At the top of your .m file
#define RED_OCCURENCE -red_occurence-
#define GREEN_OCCURENCE -green_occurence-
#define BLUE_OCCURENCE -blue_occurence-
#define HTML_TEMPLATE @"<span style=\"color:red\">-red_occurence-</span><span style=\"color:green\">-green_occurence-</span><span style=\"color:blue\">-blue_occurence-</span></body></html>"

//Where you need to use your attributed string
NSString *string = [HTML_TEMPLATE stringByReplacingOccurrencesOfString:RED_OCCURENCE withString:@"first"] ;
string = [string stringByReplacingOccurrencesOfString:GREEN_OCCURENCE   withString:@"second"];
string = [string stringByReplacingOccurrencesOfString:BLUE_OCCURENCE    withString:@"third"];

NSData* cData = [string dataUsingEncoding:NSUTF8StringEncoding];

NSAttributedString *stringWithHTMLAttributes = [[NSAttributedString alloc] initWithData:cData
                                                                                options:@{NSDocumentTypeDocumentAttribute:NSHTMLTextDocumentType}
                                                                        documentAttributes:nil
                                                                                     error:nil];
textView.attributedText = stringWithHTMLAttributes;

Source


10

这里还有一个关于使NSAttributed字符串更容易的类别/博客文章。http://www.raizlabs.com/dev/2014/03/nsattributedstring-creation-helpers/ - Alex Rouse

3
使用属性字符串扩展的更简单解决方案。
extension NSMutableAttributedString {

    // this function attaches color to string    
    func setColorForText(textToFind: String, withColor color: UIColor) {
        let range: NSRange = self.mutableString.range(of: textToFind, options: .caseInsensitive)
        self.addAttribute(NSAttributedStringKey.foregroundColor, value: color, range: range)
    }

}

试一下,看看效果(在Swift 3和4中测试过)

let label = UILabel()
label.frame = CGRect(x: 120, y: 100, width: 200, height: 30)
let first = "first"
let second = "second"
let third = "third"
let stringValue = "\(first)\(second)\(third)"  // or direct assign single string value like "firstsecondthird"

let attributedString: NSMutableAttributedString = NSMutableAttributedString(string: stringValue)
attributedString.setColorForText(textToFind: first, withColor: UIColor.red)   // use variable for string "first"
attributedString.setColorForText(textToFind: "second", withColor: UIColor.green) // or direct string like this "second"
attributedString.setColorForText(textToFind: third, withColor: UIColor.blue)
label.font = UIFont.systemFont(ofSize: 26)
label.attributedText = attributedString
self.view.addSubview(label)

Here is expected result:

enter image description here


3

在Swift 4中:

let string:NSMutableAttributedString = {

    let mutableString = NSMutableAttributedString(string: "firstsecondthird")

    mutableString.addAttribute(NSForegroundColorAttributeName, value: UIColor.red , range: NSRange(location: 0, length: 5))
    mutableString.addAttribute(NSForegroundColorAttributeName, value: UIColor.green , range: NSRange(location: 5, length: 6))
    mutableString.addAttribute(NSForegroundColorAttributeName, value: UIColor.blue , range: NSRange(location: 11, length: 5))
    return mutableString
}()

print(string)

1
请勿在多个问题中发布相同的答案。 发布一个好答案,然后投票/标记关闭其他重复的问题。 如果问题不是重复的,请根据问题量身定制您的答案 - Paul Roub
我正在尝试用Swift给出答案。我接受了它的重复。不期望得到赞同。 - garg
抱歉,我已经删除了答案。 - garg

2
您可以按以下方式在Swift中加载一个带有HTML属性的字符串。
   var Str = NSAttributedString(
   data: htmlstring.dataUsingEncoding(NSUnicodeStringEncoding, allowLossyConversion: true),
   options: [ NSDocumentTypeDocumentAttribute: NSHTMLTextDocumentType],
   documentAttributes: nil,
   error: nil)

   label.attributedText = Str  

从文件中加载 HTML:
   if let rtf = NSBundle.mainBundle().URLForResource("rtfdoc", withExtension: "rtf", subdirectory: nil, localization: nil) {

   let attributedString = NSAttributedString(fileURL: rtf, options: [NSDocumentTypeDocumentAttribute:NSRTFTextDocumentType], documentAttributes: nil, error: nil)
        textView.attributedText = attributedString
        textView.editable = false
    }

点击此处了解如何从HTML创建NSAttributedString,并按所需属性设置字符串。可参考此链接学习如何在Swift中使用NSAttributedString。


网页内容由stack overflow 提供, 点击上面的
可以查看英文原文,
原文链接