在Android中实现简单的SeekBar

14

过滤器.java

public class Filters extends Activity implements OnSeekBarChangeListener{
    private SeekBar PRICEbar,DISTANCEbar, RATINGbar; // declare seekbar object variable
    // declare text label objects
    private TextView PRICEtextProgress,DISTANCEtextProgress, RATINGtextProgress;
    /** Called when the activity is first created. */
    @Override
    public void onCreate(Bundle savedInstanceState)
    {
        super.onCreate(savedInstanceState);
        // load the layout
        setContentView(R.layout.filters);     
        PRICEbar = (SeekBar)findViewById(R.id.PRICEseekBarID); // make seekbar object
        PRICEbar.setOnSeekBarChangeListener(this); 
        PRICEbar.setOnSeekBarChangeListener(new OnSeekBarChangeListener() {

            @Override
            public void onStopTrackingTouch(SeekBar seekBar) {
                // TODO Auto-generated method stub

            }

            @Override
            public void onStartTrackingTouch(SeekBar seekBar) {
                // TODO Auto-generated method stub

            }

            @Override
            public void onProgressChanged(SeekBar seekBar, int progress,
                    boolean fromUser) {
                // TODO Auto-generated method stub
                PRICEtextProgress = (TextView)findViewById(R.id.PRICEtextViewProgressID);
                PRICEtextProgress.setText("Price:: Rs "+progress);

            }
        });

}
    @Override
    public void onProgressChanged(SeekBar seekBar, int progress, boolean fromUser) {
        if (seekBar == PRICEbar)
            PRICEtextProgress.setText("Price:: Rs "+progress);
    }
    @Override
    public void onStartTrackingTouch(SeekBar seekBar) {
        // TODO Auto-generated method stub

    }
    @Override
    public void onStopTrackingTouch(SeekBar seekBar) {
        // TODO Auto-generated method stub

    }


}

filters.xml

<LinearLayout xmlns:android="http://schemas.android.com/apk/res/android"
    xmlns:tools="http://schemas.android.com/tools"
    android:layout_width="match_parent"
    android:layout_height="match_parent"
    android:orientation="vertical" >

    <RelativeLayout
        android:id="@+id/relativeLayoutforPRICE"
        android:layout_width="fill_parent"
        android:layout_height="wrap_content" >

        <TextView
            android:id="@+id/PRICEtextViewProgressID"
            android:layout_width="wrap_content"
            android:layout_height="wrap_content"
            android:layout_alignParentLeft="true"
            android:layout_alignParentTop="true"
            android:text="Price"
            android:textAppearance="?android:attr/textAppearanceLarge" >
        </TextView>

        <SeekBar
            android:id="@+id/PRICEseekBarID"
            android:layout_width="match_parent"
            android:layout_height="wrap_content"
            android:layout_alignParentLeft="true"
            android:layout_below="@+id/textView1"
            android:layout_marginTop="26dp"            
            android:max="100" >
        </SeekBar>
    </RelativeLayout>
</LinearLayout>

我有这样一个输出:

选择金额的滑块图片

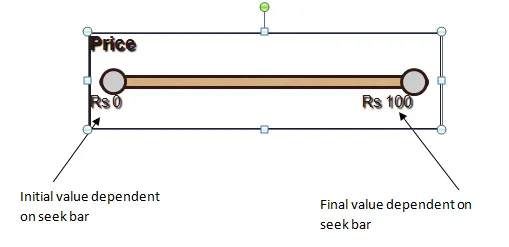
如何修改我的代码,以获得初始值和最终值在滑块中,就像下图所示?

最小值为0,最大值为100的滑块图片,但这些值应该可以从其他输入进行配置


完全自定义SeekBar http://codingsignals.com/crystal-range-seekbar-in-android/ - Asif
谁可能想使用滑块来输入精确的数字值呢? - tripleee
5个回答

9

您已经定义了SeekBar的最大值

android:max="100"

现在你需要在seekbar的左右添加两个textview。使用Relative layout并将textview左对齐和右对齐于父容器


6
的提示解决了我的问题。我只需要修改XML即可。我想在这里分享结果:
<RelativeLayout
        android:id="@+id/relativeLayoutforPRICE"
        android:layout_width="fill_parent"
        android:layout_height="wrap_content" >

        <TextView
            android:id="@+id/PRICEtextViewProgressID"
            android:layout_width="wrap_content"
            android:layout_height="wrap_content"
            android:layout_alignParentLeft="true"
            android:layout_alignParentTop="true"
            android:text="Price"
            android:textAppearance="?android:attr/textAppearanceLarge" >
        </TextView>

        <SeekBar
            android:id="@+id/PRICEseekBarID"
            android:layout_width="match_parent"
            android:layout_height="wrap_content"
            android:layout_alignParentLeft="true"
            android:layout_below="@+id/textView1"
            android:layout_marginTop="26dp"
            android:max="100" >
        </SeekBar>

        <TextView
            android:id="@+id/PRICEinitialvaluetextID"
            android:layout_width="wrap_content"
            android:layout_height="wrap_content"
            android:layout_below="@+id/PRICEseekBarID"
            android:text="Rs 0" >
        </TextView>

        <TextView
            android:id="@+id/PRICEinitialvaluetextID"
            android:layout_width="wrap_content"
            android:layout_height="wrap_content"
            android:layout_alignParentRight="true"
            android:layout_below="@+id/PRICEseekBarID"
            android:text="Rs 100" />
    </RelativeLayout>

2

首先,我认为您应该扩展SeekBar
其次,在onDraw()方法中调用canvas.drawText()SeekBar之前和之后绘制文本。

这样您就可以在onDraw方法回调中刷新textView


1

看一下,你实现了OnSeekBarChangeListener创建的方法,并设置了

public class Filters extends Activity implements OnSeekBarChangeListener{

 PRICEbar.setOnSeekBarChangeListener(this); 

接下来,您将使用新的OnSeekBarChangeListener覆盖它。

 PRICEbar.setOnSeekBarChangeListener(new OnSeekBarChangeListener() {

你可以从你的活动中删除OnSeekBarChangeListener实现以及这3个空方法(onSeekBarChange,onStartTracking,onStopTracking)。

1

在 main.xml 中使用空的线性布局,只是为了好玩。 这是一个带有 seekbar 的示例。

import android.app.*;
import android.os.*;
import android.view.*;
import android.content.*;
import android.graphics.*;
import android.graphics.Color.*;
import android.graphics.drawable.*;
import android.graphics.drawable.shapes.*;
import android.widget.*;
import android.widget.ProgressBar;
import android.text.*;
//import org.apache.http.impl.conn.*;
import android.util.*;
import android.view.View.*;
import android.widget.SeekBar.*;

public class MainActivity extends Activity {
    public int angle=30;
    @Override
    //CustomDrawableView customDrawableView;
    LinearLayout myLayout;

    protected void onCreate(Bundle savedInstanceState) {
        super.onCreate(savedInstanceState);
        setContentView(R.layout.main);

        myLayout = findViewById(R.id.linear_layout);

        //setContentView(customDrawableView);

/*      TextView text1 = new TextView(this);
        text1.setText(R.string.hello_world);
        myLayout.addView(text1);
    */  
        final TextView text2 = new TextView(this);
        text2.setText("30");
        myLayout.addView(text2);

        SeekBar seek = new SeekBar(this);
        //seek.setMin(2);
        seek.setMax(180);
        seek.setProgress(30);
        myLayout.addView(seek);

        final CustomDrawableView customDrawableView = new CustomDrawableView(this);
        myLayout.addView(customDrawableView);
        customDrawableView.setBackgroundColor(0x00888888);

        seek.setOnSeekBarChangeListener(new SeekBar.OnSeekBarChangeListener(){
                public void onProgressChanged(SeekBar seek,int value,boolean usr){
                    angle = value;
                    if (angle<=2) angle = 2;
                    text2.setText(String.valueOf(value));
                    customDrawableView.invalidate();
                }
                public void onStartTrackingTouch(SeekBar seek){

                }
                public void onStopTrackingTouch(SeekBar seek){

                }
            });

        //customDrawableView.setRotationX(45);

    }; // MainActivity_onCreate

    public class CustomDrawableView extends View {

        private int n=16;
        private ShapeDrawable[] drws = new ShapeDrawable[4*n];
        protected Canvas canvas;

        public CustomDrawableView(Context context) {
            super(context);

            setContentDescription(context.getResources().getString(
                                      R.string.my_view_desc));
            angle = 30;
        };

        protected void onDraw(Canvas oCanvas) {
            canvas = oCanvas;
            show();

        }; // onDraw

        public void show() {

            int cx = canvas.getWidth()/2;
            int cy = canvas.getHeight()/2;
            int color = Color.argb(0x88,0x00,0x99,0xff);
            int stp;

            for (int s=0;s<180;s+=angle){
                canvas.rotate(angle,cx,cy);
                for (int i=0;i<=15;i++){

                    stp = 29 - i;

                    color = Color.argb(i*10, i*17, 0xaa, 0xff - i*10);

                    drws[i] = new ShapeDrawable(new OvalShape());
                    drws[i].getPaint().setColor(color);
                    drws[i].setBounds(cx+stp*i, cy+10, cx+30+stp*i, cy+20);

                    drws[n+i] = new ShapeDrawable(new OvalShape());
                    drws[n+i].getPaint().setColor(color);
                    drws[n+i].setBounds(cx+10+stp*i, cy, cx+20+stp*i, cy+30);

                    drws[2*n+i] = new ShapeDrawable(new OvalShape());
                    drws[2*n+i].getPaint().setColor(color);
                    drws[2*n+i].setBounds(cx-stp*i-30, cy-20, cx-stp*i, cy-10);

                    drws[3*n+i] = new ShapeDrawable(new OvalShape());
                    drws[3*n+i].getPaint().setColor(color);
                    drws[3*n+i].setBounds(cx-stp*i-20, cy-30, cx-stp*i-10, cy);

                    canvas.rotate(22.5f,cx,cy);
                    drws[i].draw(canvas);
                    drws[n+i].draw(canvas);
                    drws[2*n+i].draw(canvas);
                    drws[3*n+i].draw(canvas);

                }
                canvas.rotate(angle,cx,cy);
            }
        }
    }; // CustomDrawableView

};  // MainActivity

网页内容由stack overflow 提供, 点击上面的
可以查看英文原文,
原文链接