有趣的问题! :)
我最近创建了一个SwipeableSplitView,它扩展了SplitView控件,以在DisplayMode设置为Overlay时启用从左边缘滑动手势(因为我认为在其他模式下没有意义,但随时可以根据需要进行扩展)。
我所做的一切就是,在控件的样式中,在PaneRoot层之上创建另一个层,并在那里处理所有手势。
<Grid x:Name="PaneRoot" ManipulationMode="TranslateX" Grid.ColumnSpan="2" HorizontalAlignment="Left" Background="" Width="}">
<Grid.Clip>
<RectangleGeometry x:Name="PaneClipRectangle">
<RectangleGeometry.Transform>
<CompositeTransform x:Name="PaneClipRectangleTransform" />
</RectangleGeometry.Transform>
</RectangleGeometry>
</Grid.Clip>
<Grid.RenderTransform>
<CompositeTransform x:Name="PaneTransform" TranslateX="" />
</Grid.RenderTransform>
<Border Child="" />
<Rectangle x:Name="HCPaneBorder" Fill="" HorizontalAlignment="Right" Visibility="Collapsed" Width="1" x:DeferLoadStrategy="Lazy" />
</Grid>
<!--a new layer here to handle all the gestures -->
<Grid x:Name="OverlayRoot" Grid.ColumnSpan="2">
<Grid.ColumnDefinitions>
<ColumnDefinition Width="}" />
<ColumnDefinition Width="Auto" />
<ColumnDefinition />
</Grid.ColumnDefinitions>
<!--the actual element for panning, manipulations happen here-->
<Rectangle x:Name="PanArea" Fill="Transparent" ManipulationMode="TranslateX" Width="}" Grid.Column="1">
<Rectangle.RenderTransform>
<CompositeTransform TranslateX="}" />
</Rectangle.RenderTransform>
</Rectangle>
<!--this is used to dismiss this swipeable pane-->
<Rectangle x:Name="DismissLayer" Fill="Transparent" Grid.Column="2" />
</Grid>
当我更新新图层的变换对象的TranslateX时,同时也更新了PaneRoot的位置,以保持它们的同步。
void OnManipulationStarted(object sender, ManipulationStartedRoutedEventArgs e)
{
_panAreaTransform = PanArea.RenderTransform as CompositeTransform;
_paneRootTransform = PaneRoot.RenderTransform as CompositeTransform;
if (_panAreaTransform == null || _paneRootTransform == null)
{
throw new ArgumentException("Make sure you have copied the default style to Generic.xaml!!");
}
}
void OnManipulationDelta(object sender, ManipulationDeltaRoutedEventArgs e)
{
var x = _panAreaTransform.TranslateX + e.Delta.Translation.X;
if (x < PanAreaInitialTranslateX || x > 0) return;
_paneRootTransform.TranslateX = _panAreaTransform.TranslateX = x;
}
void OnManipulationCompleted(object sender, ManipulationCompletedRoutedEventArgs e)
{
var x = e.Velocities.Linear.X;
if (x <= -0.1)
{
CloseSwipeablePane();
}
else if (x > -0.1 && x < 0.1)
{
if (Math.Abs(_panAreaTransform.TranslateX) > Math.Abs(PanAreaInitialTranslateX) / 2)
{
CloseSwipeablePane();
}
else
{
OpenSwipeablePane();
}
}
else
{
OpenSwipeablePane();
}
}
请记住,由于IsPaneOpen属性不是虚拟的,我必须创建另一个IsSwipeablePaneOpen来包装前者。因此,每当您想使用IsPaneOpen属性时,请改用IsSwipeablePaneOpen。
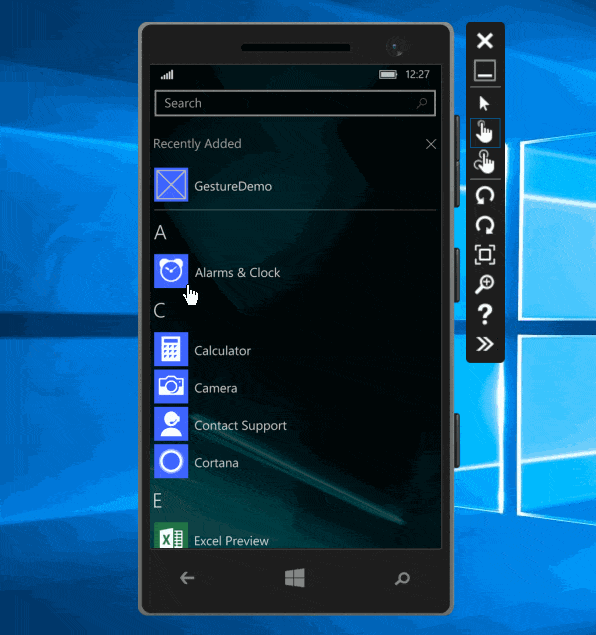
这就是我在GitHub上创建的演示应用程序的工作方式。 您可以在此处找到完整的源代码。
制作者信息
Pivot或启用水平滑动的页面(例如,左右滑动以删除/完成项目)时,可能不是一个好主意使用它。但我认为开发人员至少应该有选择适合他们应用程序的选项。 :) - Justin XL