如何使用HTML5 Canvas平滑连续地连接两条Bezier曲线

4

我正在尝试将两条分开的贝塞尔曲线连接成一条连续的曲线。目前,我的效果如下:

两条分开的贝塞尔曲线

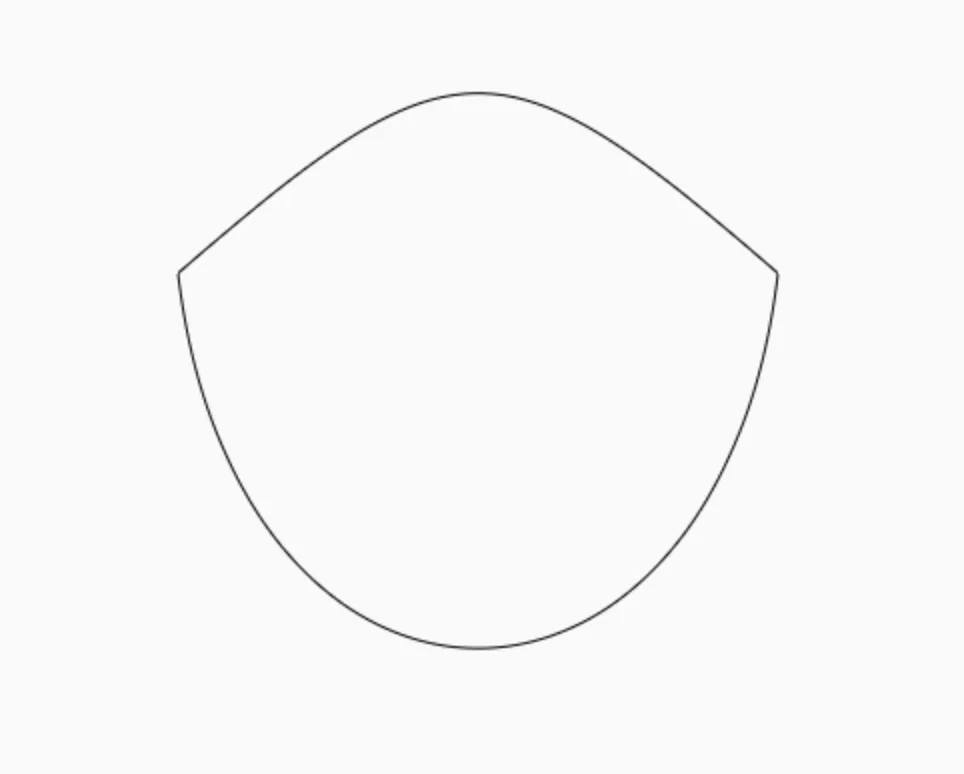
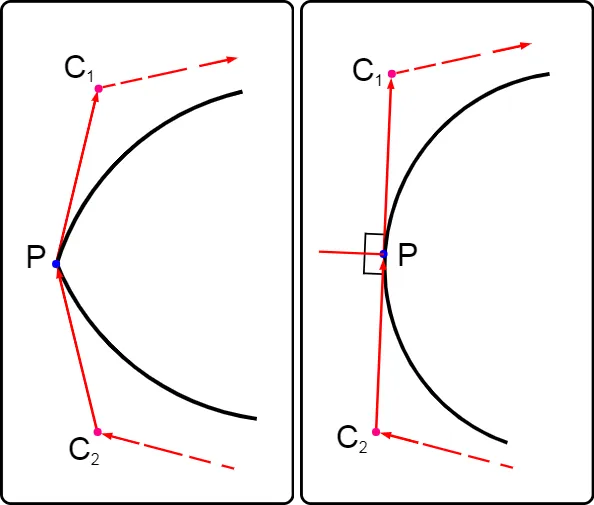
问题是它们没有连接在一起,因此它们相遇的地方看起来是尖锐的而不是光滑的。我查阅了P5.js中关于连接贝塞尔曲线的文档,但不确定如何将其转化为HTML5 Canvas。如何将这两条贝塞尔曲线连接起来,使它们看起来像一条平滑连续的曲线?

这是我的代码:

const canvas = document.getElementById('canvas');
const c = canvas.getContext("2d");
width = 800;
height = 500;
canvas.width = width;
canvas.height = height;
let face;
let centerX = width / 2;
let centerY = height / 3;

setup();

function setup() {
    c.clearRect(0, 0, canvas.width, canvas.height);
    face = new Face();
    draw();
};

function draw() {
    setBackground(`rgba(250, 250, 250, 1)`);
    c.beginPath();
    c.moveTo(centerX - face.hsx, centerY + face.hsy);
    c.bezierCurveTo(centerX - face.hcp1x / 10, centerY - face.hsy2,
        centerX + face.hcp1x / 10, centerY - face.hsy2,
        centerX + face.hsx, centerY + face.hsy);
    c.moveTo(centerX - face.hsx, centerY + face.hsy);
    c.bezierCurveTo(centerX - face.hcp1x, centerY + face.hcp1y,
        centerX + face.hcp1x, centerY + face.hcp1y,
        centerX + face.hsx, centerY + face.hsy);
    c.stroke();
    c.fillStyle = (`rgba(25, 250, 211, 0)`);
    c.fill();
}

function setBackground(color) {
    c.fillStyle = color;
    c.fillRect(0, 0, width, height);
}

function Face() {
    this.hsx = 150; 
    this.hsy = 0;
    this.hsy2 = 120;
    this.hcp1x = 120;
    this.hcp1y = 250; 
}

1
不是最简单的,但仍然可以参考:http://html5tutorial.com/how-to-join-two-bezier-curves-with-the-canvas-api/ - john-jones
如果您能够计算出每个贝塞尔曲线末端的线条角度,那么您可以在下一个贝塞尔曲线的开头沿着同一方向继续前进。 - john-jones
2个回答

4

公切线

为了使两个贝塞尔曲线平滑连接,需要使得相交点的两条线段平行,从而定义了两个贝塞尔曲线端点处切线方向相同。

下图说明了这一过程:

enter image description here

由控制点(C2, C1)和相交点(P)确定的直线即为该点处的切线。直线段长度没有约束条件。

如何实现?

有很多方法可以实现公切线,具体实现方法取决于曲线的需求、类型和其他因素。

示例

这里不提供完整的示例,因为它需要对向量数学有一定理解,且涵盖所有情况的解决方案可能会很复杂。

因此,以下伪代码示例仅使用先前的控制点和终点来计算下一个控制点:?表示未知量,其值不受保持线段平行所需的约束条件限制。

 // From illustration in answer
 corner = ?        // Distance to next control point as fraction of distance
                   // from previous control point
 C2 = {x:?, y:?}   // Last control point of previous bezier
 P  = {x:?, y:?}   // Start of next bezier
 C1 = {            // Next control point along line from previous and scaled
     x: P.x + (P.x - C2.x) * corner,
     y: P.y + (P.y - C2.y) * corner,
 }

 // two beziers with common point P
 ctx.bezierCurveTo(?,?, C2.x, C2.y, P.x, P.y)  
 ctx.bezierCurveTo(C1.x, C1.y, ?, ?, ?, ?)

2
在下面的页面中:
https://www.w3schools.com/tags/tryit.asp?filename=tryhtml5_canvas_beziercurveto 您需要将画布的宽度和高度更改为1000。
然后,您将在beginpath和stroke之间的两行替换为以下代码。
points=[
{x:0,  y:300},//0

{x:100,y:500},//1
{x:200,y:300},//2

{x:300,y:100},//3
{x:400,y:300},//4

{x:100,y:500},//5
{x:100,y:300},//6
];


ctx.rect(points[0].x-5, points[0].y-5, 10,10);


var smoother={};
smoother.x=((points[1].x-points[0].x)/10)+points[0].x;
smoother.y=((points[1].y-points[0].y)/10)+points[0].y;

ctx.rect(smoother.x-5, smoother.y-5, 10,10);
ctx.rect(points[1].x-5, points[1].y-5, 10,10);
ctx.rect(points[2].x-5, points[2].y-5, 10,10);
ctx.moveTo(points[0].x,points[0].y);
ctx.bezierCurveTo(
    smoother.x, smoother.y,
    points[1].x, points[1].y,
    points[2].x, points[2].y
    );


var smoother={};
var dx=(points[2].x-points[1].x);
var dy=(points[2].y-points[1].y);
var yperx=(dy/dx);
travel_x=dx;
travel_y=(dx*yperx);
smoother.x=points[2].x+travel_x/3;
smoother.y=points[2].y+travel_y/3;

ctx.rect(smoother.x-5, smoother.y-5, 10,10);
ctx.rect(points[3].x-5, points[3].y-5, 10,10);
ctx.rect(points[4].x-5, points[4].y-5, 10,10);
ctx.moveTo(points[2].x,points[2].y);
ctx.bezierCurveTo(
    smoother.x, smoother.y,
    points[3].x, points[3].y,
    points[4].x, points[4].y
    );


var smoother={};
var dx=(points[4].x-points[3].x);
var dy=(points[4].y-points[3].y);
var yperx=(dy/dx);
travel_x=dx;
travel_y=(dx*yperx);
smoother.x=points[4].x+travel_x/3;
smoother.y=points[4].y+travel_y/3;

ctx.rect(smoother.x-5, smoother.y-5, 10,10);
ctx.rect(points[5].x-5, points[5].y-5, 10,10);
ctx.rect(points[6].x-5, points[6].y-5, 10,10);
ctx.moveTo(points[4].x,points[4].y);
ctx.bezierCurveTo(
    smoother.x, smoother.y,
    points[5].x, points[5].y,
    points[6].x, points[6].y
    );

您可以通过按下运行按钮在此处运行它:
https://www.w3schools.com/code/tryit.asp?filename=GSP1RKBFHGGK 在这里,您可以操纵points[]中的像素,并注意到贝塞尔曲线始终连接得相当平滑。
这是因为在每个新的贝塞尔曲线中,系统自动创建第一个贝塞尔点,其仅起到平滑线条的作用。基本上只是一个点,沿着先前贝塞尔曲线的任何方向继续一小段。然后,贝塞尔中的下一个像素是实际目标,给定的贝塞尔曲线会平滑处理该像素。
其中有数字3,它代表您希望开始实际方向的速度。如果太大,我们开始过快地朝所需方向前进,平滑性会受到影响。如果太小,我们会忽略线应该去哪里,而更注重平滑性。

网页内容由stack overflow 提供, 点击上面的
可以查看英文原文,
原文链接