如标题所述 - 如何将本地代码添加到现有的Android Studio项目中,而不会破坏当前项目,包括gradle和proguard设置?
4个回答
76
自Android Studio 3.1起,可以采取以下简单方式:
1. 在app\src\main文件夹中创建cpp文件夹。
2. 在app\src\main\cpp路径下创建<YOUR_FILE_NAME>.cpp文件(例如:native-lib.cpp)。
3. 向app文件夹添加CMakeLists.txt文件。
在该文件中应定义库的名称、.cpp文件路径和其他一些设置,例如(从支持C++的新项目开始):
# For more information about using CMake with Android Studio, read the
# documentation: https://d.android.com/studio/projects/add-native-code.html

# Sets the minimum version of CMake required to build the native library.

cmake_minimum_required(VERSION 3.4.1)

# Creates and names a library, sets it as either STATIC
# or SHARED, and provides the relative paths to its source code.
# You can define multiple libraries, and CMake builds them for you.
# Gradle automatically packages shared libraries with your APK.

add_library( # Sets the name of the library.
             native-lib

             # Sets the library as a shared library.
             SHARED

             # Provides a relative path to your source file(s).
             src/main/cpp/native-lib.cpp )
                          ^^^^^^^^^^^^^^
                          YOUR_CPP_FILE_NAME

# Searches for a specified prebuilt library and stores the path as a
# variable. Because CMake includes system libraries in the search path by
# default, you only need to specify the name of the public NDK library
# you want to add. CMake verifies that the library exists before
# completing its build.

find_library( # Sets the name of the path variable.
              log-lib

              # Specifies the name of the NDK library that
              # you want CMake to locate.
              log )

# Specifies libraries CMake should link to your target library. You
# can link multiple libraries, such as libraries you define in this
# build script, prebuilt third-party libraries, or system libraries.

target_link_libraries( # Specifies the target library.
                       native-lib

                       # Links the target library to the log library
                       # included in the NDK.
                       ${log-lib} )
4. 在 build.gradle(Module app)中添加externalNativeBuild标签,并将其引用CMakeLists.txt,加入到android部分:
android {
    compileSdkVersion 26
    defaultConfig {
        ...
    }
    buildTypes {
        ...
    }
    externalNativeBuild {               <--- these lines should be added
        cmake {                         <--- these lines should be added
            path "CMakeLists.txt"       <--- these lines should be added
        }                               <--- these lines should be added
    }                                   <--- these lines should be added
}
5. 在 build.gradle(Module app) 文件中的 defaultConfig 部分添加 externalNativeBuild 标签和其中的 cmake 标签:
...
defaultConfig {
    applicationId "<YOUR_APP_ID>"
    minSdkVersion 26
    targetSdkVersion 26
    versionCode 1
    versionName "1.0"
    testInstrumentationRunner "android.support.test.runner.AndroidJUnitRunner"


    externalNativeBuild {   <--- these lines should be added
        cmake {             <--- these lines should be added
            cppFlags ""     <--- these lines should be added
        }                   <--- these lines should be added
    }                       <--- these lines should be added
}
...
(新的、空的带有 C++ 支持的 Android Studio 项目中也提供了“基本”build.gradle文件的示例)
6. 与 Gradle 文件重新同步项目
通过在工具栏中点击 Sync Project  ,请注意!在 Android Studio 3.3 中,图标是
  。
。
此外,请查看官方教程。
附注:如果 cpp 文件夹中没有显示文件:
尝试像Thinh Vu在他的评论中提到的那样,选择File/Invalidate Caches & Restart。
- Andrii Omelchenko
12
9
请按照以下步骤从您的现有项目开始:
1. 修改build.gradle(模块应用程序)以如下形式显示(有很多更改!):
    apply plugin: 'com.android.model.application'

    model {
        android.signingConfigs {
            create ("myConfig") {
                keyAlias '--your-key-alias--'
                keyPassword '--key-password--'
                storeFile file('--/path/to/keystore.jks--')
                storePassword '--store-password--'
            }
        }
        android {
            compileSdkVersion 25
            buildToolsVersion '25.0.2'

            defaultConfig {
                applicationId "--your.app.name--"
                minSdkVersion.apiLevel 19
                targetSdkVersion.apiLevel 25
                versionCode 1
                versionName "1.0"
            }
            buildTypes {
                release {
                    minifyEnabled true
                    proguardFiles.add(file('proguard-android-optimize.txt'))
                    proguardFiles.add(file('proguard-rules.pro'))
                    signingConfig = $("android.signingConfigs.myConfig")
                }
            }
            ndk {
                moduleName "--c-file--"
                ldLibs.addAll(["android", "log"])
            }

        }
        android.dexOptions {
            javaMaxHeapSize "2048m"
        }
    }

    dependencies {
        compile fileTree(dir: 'libs', include: ['*.jar'])
        testCompile 'junit:junit:4.12'
        compile 'com.android.support:appcompat-v7:25.3.1'
    }
您可以复制/粘贴上面的代码,并修改至少带有“--value--”的值以匹配您的值。
2. 修改 build.gradle(项目)
在其中类似以下内容的位置:
dependencies {
    classpath 'com.android.tools.build:gradle:2.3.3'
}
转换为:
dependencies {
    classpath 'com.android.tools.build:gradle-experimental:0.9.3'
}
在我的示例中,0.9.3是gradle-experimental的最新版本,可以在此处找到。如果您还没有这样做,请将gradle版本更改为Android Studio推荐的版本。
3. 移动proguard设置文件
将proguard-android-optimize.txt移动到app/proguard-android-optimize.txt
4. 从Java中添加调用
像这样
static {
    System.loadLibrary("--c-file--");
}
private native byte my_jni(Context context, byte[] mByte, int i);
根据您的需求进行更改。上面的示例加载C文件(去除扩展名),该文件在gradle文件中声明,并调用my_jni函数,传递应用程序的Context、一些字节数组和一些整数,期望该函数返回一个字节。
5. 在JNI中创建函数:
现在您的函数名称被突出显示为红色 - 允许Android Studio创建它,方法是点击行上的红色灯泡 Create function ...。这将在您的c文件中创建函数并将焦点改为该函数。
完成
进一步阅读请点击 此处。
技巧:
小心释放每个malloc的内存,对于每个GetByteArrayElements使用ReleaseByteArrayElements等等
小心如何正确地将一些“危险”的值从C返回到Java,例如数组和字符串
- Vladimir
2
不要尝试使用实验性的Gradle,因为它已经被弃用并且不再维护,尽快迁移到CMake。 - Dragos Rachieru
我有一个已反编译的其他应用程序的.so文件,但我没有该.so文件的native-lib.cpp文件,也就是说我没有原生代码,我只有.so文件。我能否将其集成并在我的项目中运行?因为当我运行项目时,会出现以下错误:java.lang.UnsatisfiedLinkError: No implementation found for int com.krunal.camarademo.Libs.nativesystem.DMDHDR.getBracketedCount() (tried Java_com_krunal_camarademo_Libs_nativesystem_DMDHDR_getBracketedCount and Java_com_krunal_camarademo_Libs_nativesystem_DMDHDR_getBracketedCount__) - karan
3
现在有一种简单的方法,只需在项目资源管理器中右键单击您的模块,然后单击“添加C++到模块”即可:
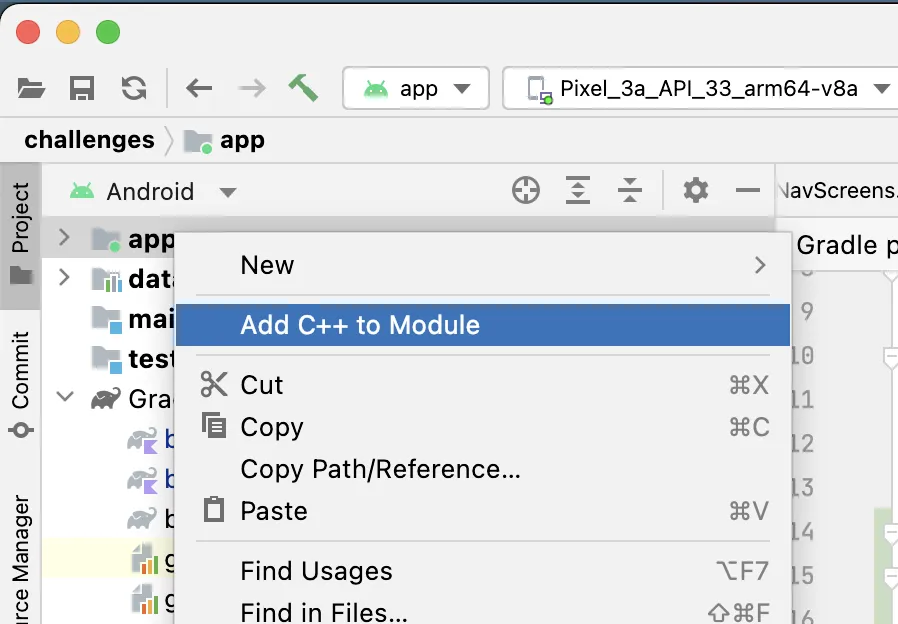
- Amin Keshavarzian
-3
要使用JNI查看代码结构,请使用C ++创建一个空项目。 文件=>新建=>新项目=>本机C ++。
- toto_tata
网页内容由stack overflow 提供, 点击上面的可以查看英文原文,
原文链接
原文链接
- 相关问题
- 4 如何在现有的Android Studio项目中添加谷歌地图
- 3 如何将现有的.so库添加到Android Studio项目中?
- 4 如何将linkedin-sdk添加到新的Android Studio项目中?
- 4 将测试包添加到现有的Android Studio项目中
- 3 如何将构建为AAR的多个Flutter模块添加到现有的Android项目中?
- 3 我们能否将Flutter模块添加到现有的Android Studio项目中?
- 5 将LibGDX添加到现有的Android Studio项目中
- 7 如何将Maven添加到现有的IntelliJ Android项目中
- 9 如何将Linphone集成到现有的Android项目中
- 12 如何在现有的Android Studio项目中添加另一个项目?
CMakeList.txt。 - Andrii Omelchenko