Python OpenCV 实现图像的 Pinch/ Bulge 扭曲效果

4
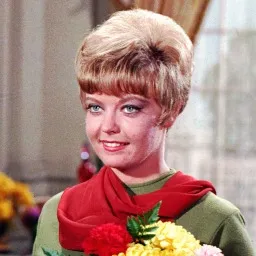
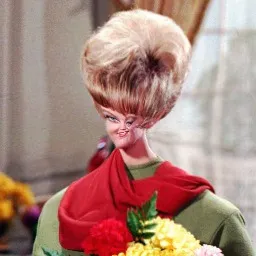
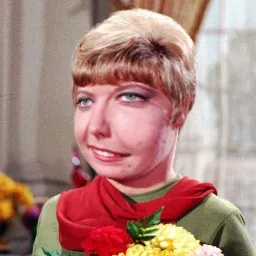
我想使用Python OpenCV在图像上应用捏/鼓凸滤镜。 结果应该类似于此示例:

https://pixijs.io/pixi-filters/tools/screenshots/dist/bulge-pinch.gif

我读了以下stackoverflow的帖子,应该是正确的筛选公式:桶形/枕形失真的公式
但我在Python OpenCV中实现这个公式时遇到了困难。
我了解到可以使用映射将滤镜应用于图像:使用OpenCv-python进行失真效果
就我理解而言,代码可能如下所示:
import numpy as np
import cv2 as cv

f_img = 'example.jpg'
im_cv = cv.imread(f_img)

# grab the dimensions of the image
(h, w, _) = im_cv.shape

# set up the x and y maps as float32
flex_x = np.zeros((h, w), np.float32)
flex_y = np.zeros((h, w), np.float32)

# create map with the barrel pincushion distortion formula
for y in range(h):
    for x in range(w):
        flex_x[y, x] = APPLY FORMULA TO X
        flex_y[y, x] = APPLY FORMULA TO Y

# do the remap  this is where the magic happens
dst = cv.remap(im_cv, flex_x, flex_y, cv.INTER_LINEAR)

cv.imshow('src', im_cv)
cv.imshow('dst', dst)

cv.waitKey(0)
cv.destroyAllWindows()

这是实现示例图像中呈现的扭曲效果的正确方法吗?非常感谢任何有关有用资源或最好是示例的帮助。

2个回答

8

在熟悉了ImageMagick源代码后,我找到了一种应用扭曲公式的方法。借助于OpenCV remap函数,这是一种扭曲图像的方法:

import numpy as np
import cv2 as cv

f_img = 'example.jpg'
im_cv = cv.imread(f_img)

# grab the dimensions of the image
(h, w, _) = im_cv.shape

# set up the x and y maps as float32
flex_x = np.zeros((h, w), np.float32)
flex_y = np.zeros((h, w), np.float32)

# create map with the barrel pincushion distortion formula
for y in range(h):
    delta_y = scale_y * (y - center_y)
    for x in range(w):
        # determine if pixel is within an ellipse
        delta_x = scale_x * (x - center_x)
        distance = delta_x * delta_x + delta_y * delta_y
        if distance >= (radius * radius):
            flex_x[y, x] = x
            flex_y[y, x] = y
        else:
            factor = 1.0
            if distance > 0.0:
                factor = math.pow(math.sin(math.pi * math.sqrt(distance) / radius / 2), -amount)
            flex_x[y, x] = factor * delta_x / scale_x + center_x
            flex_y[y, x] = factor * delta_y / scale_y + center_y

# do the remap  this is where the magic happens
dst = cv.remap(im_cv, flex_x, flex_y, cv.INTER_LINEAR)

cv.imshow('src', im_cv)
cv.imshow('dst', dst)

cv.waitKey(0)
cv.destroyAllWindows()

这与使用ImageMagick的 convert -implode 函数具有相同的效果。


我相信你的公式是针对implode(来自ImageMagick)的。桶形/枕形方程是半径的多项式,与你编码的不同。尽管如此,做得很好,很可能更符合你的期望。 - fmw42
@fm42,你能给我指一下桶形畸变/枕形畸变的公式吗? - Davi Jones
请查看https://imagemagick.org/Usage/distorts/#barrel以及distort.c文件中第1309行的内容。 - fmw42

7
你可以使用Python Wand中的implode和explode选项来实现这一点,它使用ImageMagick。
输入: enter image description here
from wand.image import Image
import numpy as np
import cv2

with Image(filename='zelda1.jpg') as img:
    img.virtual_pixel = 'black'
    img.implode(0.5)
    img.save(filename='zelda1_implode.jpg')
    # convert to opencv/numpy array format
    img_implode_opencv = np.array(img)
    img_implode_opencv = cv2.cvtColor(img_implode_opencv, cv2.COLOR_RGB2BGR)

with Image(filename='zelda1.jpg') as img:
    img.virtual_pixel = 'black'
    img.implode(-0.5 )
    img.save(filename='zelda1_explode.jpg')
    # convert to opencv/numpy array format
    img_explode_opencv = np.array(img)
    img_explode_opencv = cv2.cvtColor(img_explode_opencv, cv2.COLOR_RGB2BGR)

# display result with opencv
cv2.imshow("IMPLODE", img_implode_opencv)
cv2.imshow("EXPLODE", img_explode_opencv)
cv2.waitKey(0)

implode(破裂):

图片描述

explode(分解):

图片描述


我也了解过ImageMagick滤镜,但我想避免额外的依赖。不过,这是我的问题的合法解决方案。谢谢。 - Davi Jones
有没有办法为implode效果指定一个中心点,而不是应用于图像的中心? - Tina J
我不确定我理解了。您可以制作一个适用于您想要的区域的蒙版(在您想要的地方是白色,在您不想要的地方是黑色)。然后处理整个图像,并使用蒙版将处理后的图像与原始图像合并。在蒙版为白色的地方,使用处理后的图像,在蒙版为黑色的地方使用原始图像。请参考np.where(mask=0, original, processed)。或者,修改捏/鼓凸等方程式,使用蒙版进行相同操作。 - fmw42

网页内容由stack overflow 提供, 点击上面的
可以查看英文原文,
原文链接