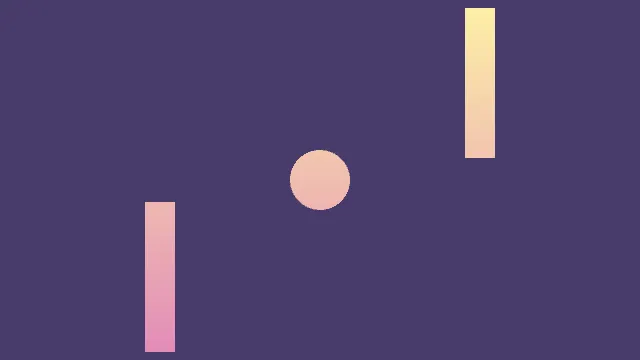
我想把球拍从白色变成渐变(线性),并使球具有径向渐变。谢谢你的帮助!您可以在`void drawPaddle`中找到球拍的代码。
这是我的目标: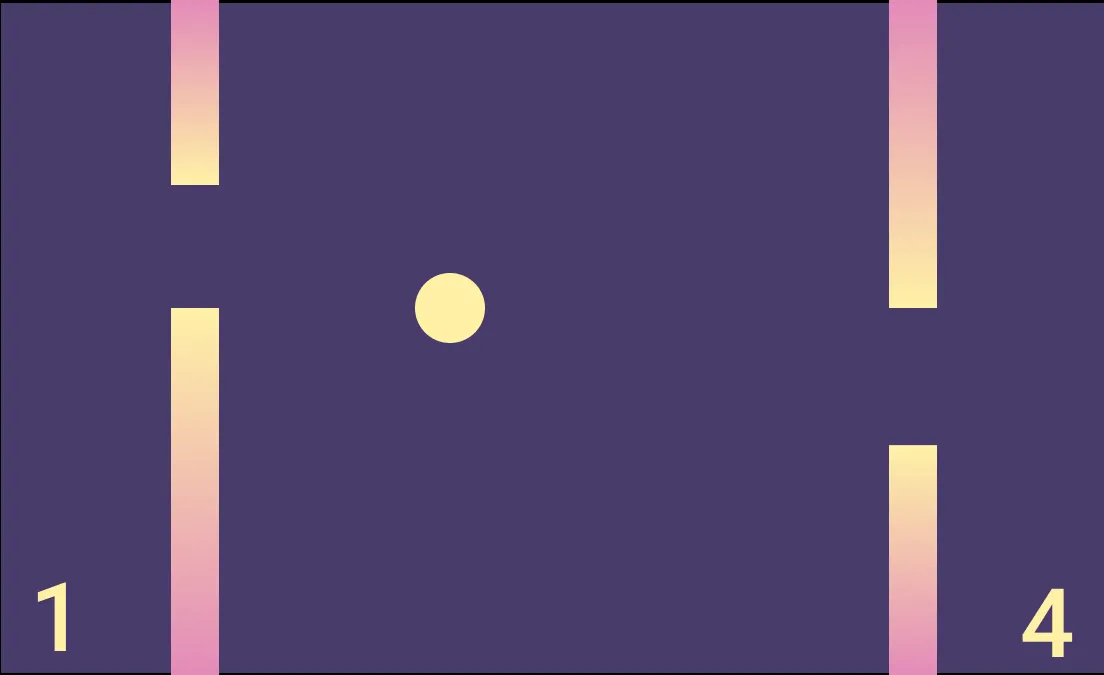 这是我的代码:
//球
int ballX = 500;
int ballY = 350;
int ballHeight = 35;
int ballWidth = 35;
int speedX = 4;
int speedY = 4;
int directionX = 1;
int directionY = 1;
这是我的代码:
//球
int ballX = 500;
int ballY = 350;
int ballHeight = 35;
int ballWidth = 35;
int speedX = 4;
int speedY = 4;
int directionX = 1;
int directionY = 1;
这是我的目标:
这是我的代码:
//球
int ballX = 500;
int ballY = 350;
int ballHeight = 35;
int ballWidth = 35;
int speedX = 4;
int speedY = 4;
int directionX = 1;
int directionY = 1;//Paddles
int player1X = 30;
int player2X = 830;
int player1Y = 350;
int player2Y = 350;
//Healthbars
int bar1X = 100;
int bar1Y = 20;
int player1health = 100;
int bar1colour = #22E515;
int bar2X = 700;
int bar2Y = 20;
int player2health = 100;
int bar2colour = #22E515;
//Movements
boolean upX = false;
boolean downX = false;
boolean upY = false;
boolean downY = false;
void setup() {
size(900, 700);
}
void draw() {
background(55, 68, 120);
drawPaddle();
//EmptySpace**
fill(55, 68, 120);
noStroke();
rect(player1X, player1Y, 40, 140);
rect(player2X, player2Y, 40, 140);
//Healthbars
fill(bar1colour);
rect(bar1X, bar1Y, player1health, 15);
fill(bar2colour);
rect(bar2X, bar2Y, player2health, 15);
//Ball
fill(194, 16, 0);
ellipse(ballX, ballY, ballHeight, ballWidth);
moveCircle();
movePaddle();
moveCollisions();
}
void drawPaddle() {
fill(255);
noStroke();
rect(30, 0, 40, 1000);
rect(830, 0, 40, 1000);
}
void moveCircle() {
ballX = ballX + speedX * 1;
ballY = ballY + speedY * 1;
if (ballX > width- ballWidth +20 || ballX < ballWidth) {
speedX *= -1;
}
if (ballY > height- ballHeight +20 || ballY < ballHeight) {
speedY *= -1;
}
}
void movePaddle() {
//key movements
if (upX == true) {
player1Y = player1Y - 5;
}
if (downX == true) {
player1Y = player1Y + 5;
}
if (upY == true) {
player2Y = player2Y - 5;
}
if (downY == true) {
player2Y = player2Y + 5;
}
//Wrap around
if (player1Y > 700) {
player1Y = 0;
} else if (player1Y + 140 < 0) {
player1Y = 700;
}
if (player2Y > 700) {
player2Y = 0;
} else if (player2Y + 140 < 0) {
player2Y = 700;
}
}
void moveCollisions() {
//Collisions
if ((ballX - ballWidth / 2 < player1X + 40) && ((ballY - ballHeight / 2 > player1Y + 140) || (ballY + ballHeight / 2 < player1Y))) {
if (speedX < 0) {
player1health -= 20;
speedX = -speedX*1;
if (player1health == 20) {
bar1colour = #F51911;
}
}
} else if ((ballX + ballWidth / 2 > player2X) && ((ballY - ballHeight / 2 > player2Y + 140) || (ballY + ballHeight/2 < player2Y))) {
if (speedX > 0) {
player2health -= 20;
bar2X += 20;
speedX = -speedX*1;
if (player2health == 20) {
bar2colour = #F51911;
}
}
}
}
void keyPressed() {
if (key == 'w' || key == 'W') {
upX = true;
} else if (key == 's' || key == 'S') {
downX = true;
} else if (keyCode == UP) {
upY = true;
} else if (keyCode == DOWN) {
downY = true;
}
}
void keyReleased() {
if (key == 'w' || key == 'W') {
upX = false;
} else if (key == 's' || key == 'S') {
downX = false;
} else if (keyCode == UP) {
upY = false;
} else if (keyCode == DOWN) {
downY = false;
}
}