FlowLayoutPanel - 控件的自动宽度?

50

是否有可能使FlowLayoutPanel中插入的项目自动适应FlowLayoutPanel的大小?以下是示例:

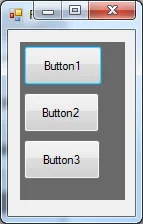
一个包含1个FlowLayoutPanel和3个按钮的窗体:

enter image description here

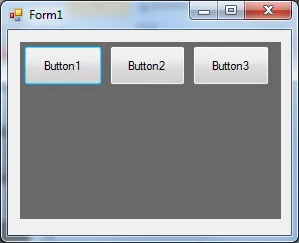
如果我调整窗体的大小,控件将如下所示:它们从“左到右”排列

enter image description here

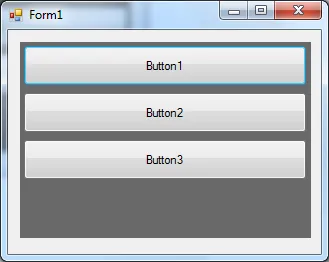
我想要的是这样的效果:控件应该具有FlowLayoutPanel的宽度:

enter image description here

有什么好的想法如何做到这一点吗?我已经更改了FlowDirection并尝试了Anchor属性,但没有成功。

当然,我可以在FlowLayoutPanel_Resize事件中调整控件大小,但我想添加大约500个用户控件- 我测试过,会很慢。


4
是的,调整大小功能正常。无论你做什么,都不要添加500个控件,这会使它变得非常糟糕。一个表单不应该有超过50个控件。 - Hans Passant
我正在尝试创建类似于Apple Automator中的“ListView”的某种形式:http://bit.ly/fxkMaH - MilMike
我只看到你提供的链接中有4个项目,而不是500个。 - Justin
1
@Justin 这些截图是简化过的。 - MilMike
我只是想指出对我来说,调整大小功能正常工作。我还在很多地方使用双缓冲,所以也许这使它感觉更快(因为它不会闪烁)。但是我肯定没有添加500个控件...我无法想象那将会是多么难用,可怜的用户。 - Camilo Martin
7个回答

51

我建议你在这种情况下使用只有一列的TableLayoutPanel。我发现TableLayoutPanel比FlowLayoutPanel更加可预测和稳定。

另一个选择是,如果你仍然想使用FlowLayoutPanel,则将第一个控件的宽度设置为所需的宽度,并对所有其他控件使用Dock = Top。


3
但是每次在其中添加控件时,您都必须管理表的行数,对吗? - J4N
当您添加控件时,只需设置Dock=Top,其行为将遵循列表中第一个控件的行为。您只需要确保在更改FlowLayoutPanel的大小时,设置flayoutpanel.Controls [0] .Width = flayoutpanel.Width。 - tedebus
因此,流式布局中项目的宽度由第一个项目确定。明白了。 - Cillié Malan

20

这是一个简单的方法。 只需绑定flowLayoutPanel的SizeChanged事件并调整包含控件的大小。 例如:

private void myFlowLayoutPannel_SizeChanged(object sender, EventArgs e)
{
    myFlowLayoutPannel.SuspendLayout();
    foreach (Control ctrl in pnSMS.Controls)
    {
        if (ctrl is Button) ctrl.Width = pnSMS.ClientSize.Width;
    }
    myFlowLayoutPannel.ResumeLayout();
}

当遇到这个问题时,这也是我的第一个想法,但是这样做会不会减慢图形用户界面的速度呢? - ASA
超级棒,对我来说运行得很好。我将上面的解决方案与这个混合使用 :) - Amir
4
虽然有些老旧,但我建议使用 FlowLayoutPannelLayout 事件来调整控件的大小。 - bansi

12

这里是我的StackPanel类:

/// <summary>
/// A stackpanel similar to the Wpf stackpanel.
/// </summary>
public class StackPanel: FlowLayoutPanel
{
    public StackPanel(): base()
    {
        InitializeComponent();
        this.ForceAutoresizeOfControls = true;
    }

    private void InitializeComponent()
    {
        this.SuspendLayout();
        //
        // StackPanel
        //
        this.AutoSizeMode = System.Windows.Forms.AutoSizeMode.GrowAndShrink;
        this.WrapContents = false;
        this.ResumeLayout(false);
    }

    /// <summary>
    /// Override it just in order to hide it in design mode.
    /// </summary>
    [Browsable(false)]
    [DesignerSerializationVisibility(DesignerSerializationVisibility.Hidden)]
    public new bool WrapContents
    {
        get { return base.WrapContents; }
        set { base.WrapContents = value; }
    }

    /// <summary>
    /// Override it just in order to set its default value.
    /// </summary>
    [DefaultValue(typeof(AutoSizeMode), "GrowAndShrink")]
    public override AutoSizeMode AutoSizeMode
    {
        get { return base.AutoSizeMode; }
        set { base.AutoSizeMode = value; }
    }

    /// <summary>
    /// Get or set a value that when is true forces the resizing of each control.
    /// If this value is false then only control that have AutoSize == true will be resized to
    /// fit the client size of this container.
    /// </summary>
    [DefaultValue(true)]
    public bool ForceAutoresizeOfControls { get; set; }

    protected override void OnSizeChanged(EventArgs e)
    {
        base.OnSizeChanged(e);
        this.SuspendLayout();
        switch (FlowDirection)
        {
            case FlowDirection.BottomUp:
            case FlowDirection.TopDown:
                foreach (Control control in this.Controls)
                    if (ForceAutoresizeOfControls || control.AutoSize)
                        control.Width = this.ClientSize.Width - control.Margin.Left - control.Margin.Right;
                break;
            case FlowDirection.LeftToRight:
            case FlowDirection.RightToLeft:
                foreach (Control control in this.Controls)
                    if (ForceAutoresizeOfControls || control.AutoSize)
                        control.Height = this.ClientSize.Height - control.Margin.Top - control.Margin.Bottom;
                break;
            default:
                break;
        }
        this.ResumeLayout();
    }

    protected override void OnLayout(LayoutEventArgs levent)
    {
        base.OnLayout(levent);

        if (levent != null && levent.AffectedControl != null)
        {
            Control control = levent.AffectedControl;
            if (ForceAutoresizeOfControls || control.AutoSize)
            {
                switch (FlowDirection)
                {
                    case FlowDirection.BottomUp:
                    case FlowDirection.TopDown:
                        control.Width = this.ClientSize.Width - control.Margin.Left - control.Margin.Right;
                        break;
                    case FlowDirection.LeftToRight:
                    case FlowDirection.RightToLeft:
                        control.Height = this.ClientSize.Height - control.Margin.Top - control.Margin.Bottom;
                        break;
                    default:
                        break;
                }
            }
        }
    }
}

7

这里不需要使用 FlowLayoutPanel

您应该可以使用普通的Panel控件来实现您想要的效果。 将其四个方向都设置为锚定,以便它随着您的表单拉伸,然后添加按钮并将所有按钮的停靠方式都设置为顶部。

编辑 - 回复@UsamaAziz评论。

要确保超出面板底部隐藏的控件可访问,请将面板的“AutoScroll”属性设置为True。当需要时,这将在面板上添加垂直滚动条。

完成。


如果我想在其中添加100个控件怎么办?我认为面板无法处理,因为它没有滚动条。 - Usama Aziz
1
@UsamaAziz 可以。只需将面板的“AutoScroll”属性设置为True。然后,当控件超出面板底部时,垂直滚动条将自动添加。 - Gravitate

3
FlowLayoutPanel 可以按照MSDN中的说明以特定方式排列控件:

...对于垂直流方向,FlowLayoutPanel 控件从该列中最宽的子控件计算出一个隐含列的宽度。AnchorDock 属性的所有其他控件都对齐或拉伸以适应此隐含列。对于水平流方向的行为也类似。

虽然不是最理想的方法,但只要一个子控件的宽度与容器相同,而其余控件设置为Dock,就可以本地完成此操作。

2
我建议...尝试调整按钮的锚点...将其设置为
Button1.Anchor = (AnchoreStyle.Left or AnchoreStyle.Right)

或者在属性中设置它...然后将其放入面板而不是FlowLayoutPanel中...;)

同意。但是,面板不能正确处理子控件的边距。 - Larry

1

就像其他答案所述,面板本身足以处理您的按钮。以下是适用于我的代码:

public class ButtonWindow : Panel
{
    public ButtonWindow()
    {
        Dock = DockStyle.Fill;
        AutoScroll = true;

        for (int i = 0; i < 500; i++) 
        {
           Button button = new Button() { Height = 100, Dock = DockStyle.Top };
           Controls.Add(button);
        }
    }
}

祝您有美好的一天。


网页内容由stack overflow 提供, 点击上面的
可以查看英文原文,
原文链接