我尝试使用padding来增加按钮的触摸区域。我使用了{{padding}}。
<ImageButton
    android:paddingRight="32dp"
    android:paddingEnd="32dp"
    android:id="@+id/confirm_image_button"
    android:layout_width="wrap_content"
    android:layout_height="wrap_content"
    android:layout_alignParentEnd="true"
    android:layout_alignParentRight="true"
    android:layout_centerVertical="true"
    android:background="?selectableItemBackgroundBorderless"
    android:src="?attr/confirmIcon" />
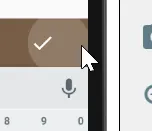
点击区域变大了。但是,
selectableItemBackgroundBorderless 的点击效果不再呈现为完美的圆形。
我尝试使用{{duplicateParentState}}技术来解决。
<FrameLayout
    android:clickable="true"
    android:paddingRight="32dp"
    android:paddingEnd="32dp"
    android:layout_width="wrap_content"
    android:layout_height="wrap_content"
    android:layout_alignParentEnd="true"
    android:layout_alignParentRight="true"
    android:layout_centerVertical="true">
    <ImageButton
        android:duplicateParentState="true"
        android:id="@+id/confirm_image_button"
        android:layout_width="wrap_content"
        android:layout_height="wrap_content"
        android:background="?selectableItemBackgroundBorderless"
        android:src="?attr/confirmIcon" />
</FrameLayout>
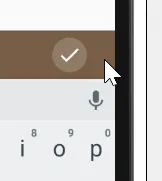
现在,
- 点击区域被放大。
selectableItemBackgroundBorderless圆形效果是完美的圆形。
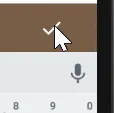
然而,它似乎有一些奇怪的行为。当我点击ImageButton的实际区域时,圆形按压效果不会显示。
请注意,我尽量避免使用
TouchDelegate技术,除非被迫这样做,因为它会使我们的代码更加复杂。
附加信息
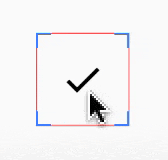
以下是Toolbar按钮的正确行为。
当点击区域在按钮外部时,会显示涟漪效果

当点击区域在按钮内部时,会显示涟漪效果

然而,我不知道他们如何实现这样的行为。