如何将图片的坐标(x,y)以特定角度旋转

3

为了更好地理解,请在Jupyternotebook中复制代码:

我有两个文件:img.jpg和img.txt。Img.jpg是图像,img.txt是面部特征点....如果将它们都绘制出来,会看起来像这样:

enter image description here

我将图像旋转了24.5度...但是如何旋转坐标?

enter image description here

import cv2
img = cv2.imread('img.jpg')
plt.imshow(img)
plt.show()


# In[130]:


landmarks = []
with open('img.txt') as f:
    for line in f:
        landmarks.extend([float(number) for number in line.split()])
landmarks.pop(0) #Remove first line. 
#Store all points inside the variable. 
landmarkPoints = [] #Store the points in this
for j in range(int(len(landmarks))):
    if j%2 == 1:
        continue
    landmarkPoints.append([int(landmarks[j]),int(landmarks[j+1])])


# In[ ]:

def rotate_bound(image, angle):
# grab the dimensions of the image and then determine the
# center
(h, w) = image.shape[:2]
(cX, cY) = (w // 2, h // 2)

# grab the rotation matrix (applying the negative of the
# angle to rotate clockwise), then grab the sine and cosine
# (i.e., the rotation components of the matrix)
M = cv2.getRotationMatrix2D((cX, cY), -angle, 1.0)
cos = np.abs(M[0, 0])
sin = np.abs(M[0, 1])

# compute the new bounding dimensions of the image
nW = int((h * sin) + (w * cos))
nH = int((h * cos) + (w * sin))

# adjust the rotation matrix to take into account translation
M[0, 2] += (nW / 2) - cX
M[1, 2] += (nH / 2) - cY

# perform the actual rotation and return the image
return cv2.warpAffine(image, M, (nW, nH)) 


# In[131]:


imgcopy = img.copy()
for i in range(len(landmarkPoints)):
    cv2.circle(imgcopy, (landmarkPoints[i][0], landmarkPoints[i][1]), 5, (0, 255, 0), -1)
plt.imshow(imgcopy)
plt.show()
landmarkPoints


# In[146]:


print(img.shape)
print(rotatedImage.shape)


# In[153]:


face_angle = 24.5
rotatedImage = rotate_bound(img, -face_angle)
for i in range(len(landmarkPoints)):
    x,y = (landmarkPoints[i][0], landmarkPoints[i][1])
    cv2.circle(rotatedImage, (int(x),int(y)), 5, (0, 255, 0), -1)
plt.imshow(rotatedImage)
plt.show()

请下载img.jpg和img.txt以重现此问题:https://drive.google.com/file/d/1FhQUFvoKi3t7TrIepx2Es0mBGAfT755w/view?usp=sharing 我尝试了这个函数,但是y轴是错误的。
def rotatePoint(angle, pt):
    a = np.radians(angle)
    cosa = np.cos(a)
    sina = np.sin(a)
    return pt[0]*cosa - pt[1]*sina, pt[0] * sina + pt[1] * cosa

编辑:上述函数给我这个结果:

enter image description here


为什么不直接旋转“imgcopy”而不是“img”呢? - Cabara
我也添加了 rotate_bound 函数。 - John Bott
好的...我明白了.....答案是将rotate_bound中"M"的最后一行+最后一列的值添加到y轴上。 - John Bott
1
@JohnBott 如果您自己找到了答案,鼓励您写下自己的答案。这样将来其他人也可以找到答案! - Kraay89
如果只有perspectiveTransform函数存在,只需将(0,0,1)行添加到您的转换即可。 - Micka
显示剩余2条评论
2个回答

1

虽然这个问题已经很久了,但我决定回答它,因为它还没有被接受的答案,即使它是一个广为接受的问题。我添加了很多注释来使实现清晰明了。所以,代码应该是自解释的。但我也描述了 ImageAugmentation 的参数以进一步澄清:

在这里,original_data_dir 是父文件夹的目录,其中存在所有图像文件夹(是的,它可以从多个图像文件夹中读取)。这个参数是强制性的

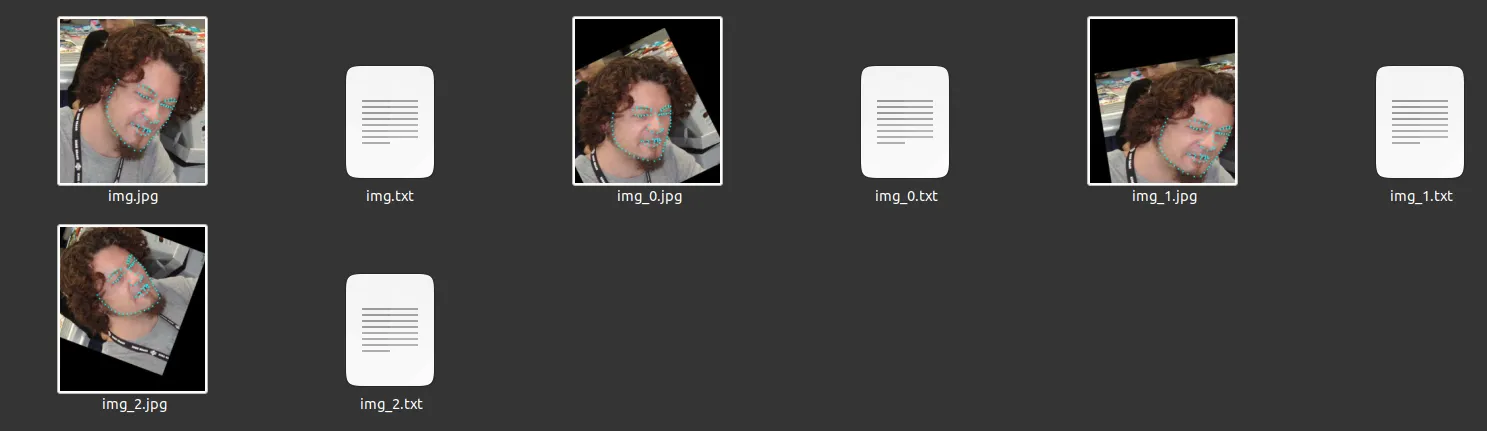
augmentation_data_dir 是您想要保存输出的文件夹目录。程序将自动创建所有子文件夹,就像它们在输入目录中出现的那样。这是完全可选的,它可以通过在输入文件夹名称后附加字符串 _augmentation 来模拟输入文件夹生成输出文件夹。

keep_original 是另一个可选参数。在许多情况下,您可能希望在输出文件夹中保留原始图像和增强的图像。如果您希望如此,请将其设置为 True(默认值)。

num_of_augmentations_per_image是每张图像要生成的增广图像的总数。虽然您只想要旋转,但此程序还设计了其他增强功能,您可以根据需要更改、添加或删除它们。我还添加了一个文档链接,在其中您将找到可以在此代码中引入的其他增强功能。默认为3,如果保留原始图像,则输出中将生成3 + 1 = 4张图像。

discard_overflow_and_underflow用于处理由于空间变换,增强点以及其下方的图像可能超出图像的分辨率的情况,您可以选择保留它们。但是,默认情况下会将其丢弃。同样,它还会丢弃widthheight值为<= 0的图像。默认为True

put_landmarks表示是否希望在输出中显示地标。根据需要将其设置为TrueFalse。默认为False

希望您喜欢它!

import logging
import imgaug as ia
import imgaug.augmenters as iaa
from imgaug.augmentables import Keypoint
from imgaug.augmentables import KeypointsOnImage
import os
import cv2
import re

SEED = 31 # To reproduce the result

class ImageAugmentation:
    def __init__(self, original_data_dir, augmentation_data_dir = None, keep_original = True, num_of_augmentations_per_image = 3, discard_overflow_and_underflow = True, put_landmarks = False):
        self.original_data_dir = original_data_dir

        if augmentation_data_dir != None:
            self.augmentation_data_dir = augmentation_data_dir
        else:
            self.augmentation_data_dir = self.original_data_dir + '_augmentation'

        # Most of the time you will want to keep the original images along with the augmented images
        self.keep_original = keep_original

        # For example for self.num_of_augmentations_per_image = 3, from 1 image we will get 3 more images, totaling 4 images.
        self.num_of_augmentations_per_image = num_of_augmentations_per_image

        # if discard_overflow_and_underflow is True, the program will discard all augmentation where landmark (and image underneath) goes outside of image resolution
        self.discard_overflow_and_underflow = discard_overflow_and_underflow

        # Optionally put landmarks on output images
        self.put_landmarks = put_landmarks
        

    def get_base_annotations(self):
        """This method reads all the annotation files (.txt) and make a list
        of annotations to be used by other methods.
        """
        # base_annotations are the annotations which has come with the original images.
        base_annotations = []

        def get_info(content):
            """This utility function reads the content of a single annotation
            file and returns the count of total number of points and a list of coordinates
            of the points inside a dictionary. 
            
            As you have provided in your question, the annotation file looks like the following:

            106
            282.000000 292.000000
            270.000000 311.000000
            259.000000 330.000000
            .....
            .....

            Here, the first line is the number of points.
            The second and the following lines gives their coordinates.
            """

            # As all the lines newline separated, hence splitting them
            # accordingly first
            lines = content.split('\n')

            # The first line is the total count of the point, we can easily get it just by counting the points
            # so we are not taking this information.

            # From the second line to the end all lines are basically the coordinate values
            # of each point (in each line). So, going to each of the lines (from the second line)
            # and taking the coordinates as tuples.
            # We will end up with a list of tuples and which will be inserted to the dict "info"
            # under the key "point_coordinates"
            points = []
            for line in lines[1:]:
                # Now each of the line can be splitted into two numbers representing coordinates
                try:
                    # Keeping inside try block, as some of the lines might be accidentally contain
                    # a single number, or it can be the case that there might be some extra newlines
                    # where there is no number.
                    col, row = line.split(' ')
                    points.append((float(col), float(row)))
                except:
                    pass
            
            # Returns: List of tuples
            return points


        for subdir, dirs, files in os.walk(self.original_data_dir):
            for file in files:
                ext = os.path.splitext(file)[-1].lower()
                # Looping through image files (instead of annotation files which are in '.txt' format) 
                # because image files can have very different extensions and we have to preserve them.
                # Whereas, all the annotation files are assumed to be in '.txt' format.
                # Annotation file's (.txt) directory will be generated from here.
                if ext not in ['.txt']: 
                    input_image_file_dir = os.path.join(subdir, file)
                    # As the image filenames and associated annotation text filenames are the same,
                    # so getting the common portion of them, it will be used to generate the annotation
                    # file's directory.
                    # Also assuming, there are no dots (.) in the input_annotation_file_dir except before the file extension.
                    image_annotation_base_dir = self.split_extension(input_image_file_dir)[0]
                    # Generating annotation file's directory
                    input_annotation_file_dir = image_annotation_base_dir + '.txt'

                    try:
                        with open(input_annotation_file_dir, 'r') as f:
                            content = f.read()
                            image_annotation_base_dir = os.path.splitext(input_annotation_file_dir)[0]
                            
                            if os.path.isfile(input_image_file_dir):
                                image = cv2.imread(input_image_file_dir)
                                # Taking image's shape is basically surving dual purposes.
                                # First of all, we will need the image's shape for sanity checking after augmentation
                                # Again, if any of the input image is corrupt this following line will through exception
                                # and we will be able to skip that corrput image.
                                image_shape = image.shape # height (y), width (x), channels (depth)

                                # Collecting the directories of original annotation files and their contents.
                                # The same folder structure will be used to save the augmented data.
                                # As the image filenames and associated annotation text filenames are the same, so 
                                base_annotations.append({'image_file_dir': input_image_file_dir,
                                                        'annotation_data': get_info(content = content),
                                                        'image_resolution': image_shape})
                    except:
                        logging.error(f"Unable to read the file: {input_annotation_file_dir}...SKIPPED")
                    

        return base_annotations        

    
    def get_augmentation(self, base_annotation, seed):
        image_file_dir = base_annotation['image_file_dir']
        image_resolution = base_annotation['image_resolution']
        list_of_coordinates = base_annotation['annotation_data']
        ia.seed(seed)

        # We have to provide the landmarks in specific format as imgaug requires
        landmarks = []
        for coordinate in list_of_coordinates:
            # coordinate[0] is along x axis (horizontal axis) and coordinate[1] is along y axis (vertical axis) and (left, top) corner is (0, 0)
            landmarks.append(Keypoint(x = coordinate[0], y = coordinate[1])) 
            
        landmarks_on_original_img = KeypointsOnImage(landmarks, shape = image_resolution)

        original_image = cv2.imread(image_file_dir)

        """
        Here the magic happens. If you only want rotation then remove other transformations from here.
        You can even add other various types of augmentation, see documentation here: 
            # Documentation for image augmentation with keypoints
            https://imgaug.readthedocs.io/en/latest/source/examples_keypoints.html
            # Here you will find other possible transformations
            https://imgaug.readthedocs.io/en/latest/source/examples_basics.html
        """
        seq = iaa.Sequential([
                iaa.Affine(
                    scale={"x": (0.8, 1.2), "y": (0.8, 1.2)}, # scale images to 80-120% of their size, individually per axis
                    translate_percent={"x": (-0.2, 0.2), "y": (-0.2, 0.2)}, # translate by -20 to +20 percent (per axis)
                    rotate=(-90, 90), # rotate by -90 to +90 degrees; for specific angle (say 30 degree) use rotate = (30)
                    shear=(-16, 16), # shear by -16 to +16 degrees
                )
            ], random_order=True) # Apply augmentations in random order

        augmented_image, _landmarks_on_augmented_img = seq(image = original_image, keypoints = landmarks_on_original_img)

        # Now for maintaining consistency, making the augmented landmarks to maintain same data structure like base_annotation
        # i.e, making it a list of tuples.
        landmarks_on_augmented_img = []
        for index in range(len(landmarks_on_original_img)):
            landmarks_on_augmented_img.append((_landmarks_on_augmented_img[index].x,
                                               _landmarks_on_augmented_img[index].y))

        return augmented_image, landmarks_on_augmented_img

 
    def split_extension(self, path):
        # Assuming there is no dots (.) except just before extension
        # Returns [directory_of_file_without_extension, extension]
        return os.path.splitext(path) 


    def sanity_check(self, landmarks_aug, image_resolution):
        # Returns false if the landmark is outside of image resolution.
        # Or, if the resolution is faulty.
        for index in range(len(landmarks_aug)):
            if landmarks_aug[index][0] < 0 or landmarks_aug[index][1] < 0:
                return False
            if landmarks_aug[index][0] >= image_resolution[1] or landmarks_aug[index][1] >= image_resolution[0]:
                return False
            if image_resolution[0] <= 0:
                return False
            if image_resolution[1] <= 0:
                return False
        return True


    def serialize(self, serialization_data, image):
        """This method to write the annotation file and the corresponding image.
        """
        # Now it is time to actually writing the image file and the annotation file!
        # We have to make sure the output folder exists
        # and "head" is the folder's directory here.
        image_file_dir = serialization_data['image_file_dir']
        annotation_file_dir = self.split_extension(image_file_dir)[0] + '.txt'
        point_coordinates = serialization_data['annotation_data'] # List of tuples
        total_points = len(point_coordinates)

        # Getting the corresponding output folder for current image
        head, tail = os.path.split(image_file_dir) 

        # Creating the folder if it doesn't exist
        if not os.path.isdir(head):
            os.makedirs(head)

        # Writing annotation file
        with open(annotation_file_dir, 'w') as f:
            s = ""
            s += str(total_points)
            s += '\n'
            for point in point_coordinates:
                s += "{:.6f}".format(point[0]) + ' ' + "{:6f}".format(point[1]) + '\n'

            f.write(s)

        if self.put_landmarks:
            # Optionally put landmarks in the output images.
            for index in range(total_points):
                cv2.circle(image, (int(point_coordinates[index][0]), int(point_coordinates[index][1])), 2, (255, 255, 0), 2)
        cv2.imwrite(image_file_dir, image)


    def augmentat_with_landmarks(self):
        base_annotations = self.get_base_annotations()
        
        for base_annotation in base_annotations:
            if self.keep_original == True:
                # As we are basically copying the same original data in new directory, changing the original image's directory with the new one with re.sub()
                base_data = {'image_file_dir': re.sub(self.original_data_dir, self.augmentation_data_dir, base_annotation['image_file_dir']), 
                                      'annotation_data': base_annotation['annotation_data']}
                self.serialize(serialization_data = base_data, image = cv2.imread(base_annotation['image_file_dir']))


            for index in range(self.num_of_augmentations_per_image):
                # Getting a new augmented image in each iteration from the same base image.
                # Seeding (SEED) for reproducing same result across all execution in the future.
                # Also seed must be different for each iteration, otherwise same looking augmentation will be generated.
                image_aug, landmarks_aug = self.get_augmentation(base_annotation, seed = SEED + index)
                
                # As for spatial transformations for some images, the landmarks can go outside of the image.
                # So, we have to discard those cases (optionally).
                if self.sanity_check(landmarks_aug, base_annotation['image_resolution']) or not self.discard_overflow_and_underflow:
                    # Getting the filename without extension to insert an index number in between to generate a new filename for augmented image
                    filepath_without_ext, ext = self.split_extension(base_annotation['image_file_dir'])
                    # As we are writing newly generated images to similar sub folders (just in different base directory)
                    # that is replacing original_data_dir with augmentation_data_dir.
                    # So, to do this we are using, re.sub(what_to_replace, with_which_to_replace, from_where_to_replace)
                    filepath_for_aug_img_without_ext = re.sub(self.original_data_dir, self.augmentation_data_dir, filepath_without_ext)
                    new_filepath_wo_ext = filepath_for_aug_img_without_ext + '_' + str(index)
                    augmentation_data = {
                        'image_file_dir': new_filepath_wo_ext + ext,
                        'annotation_data': landmarks_aug
                    }
                    self.serialize(serialization_data = augmentation_data, image = image_aug)


# Make put_landmarks = False if you do not want landmarks to be shown in output
# original_data_dir is the single parent folder directory inside of which all image folder(s) exist.
img_aug = ImageAugmentation(original_data_dir = 'parent/folder/directory/of/img/folder', put_landmarks = True) 
img_aug.augmentat_with_landmarks()
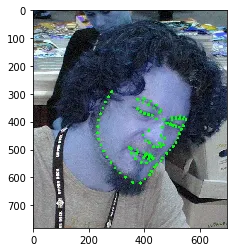
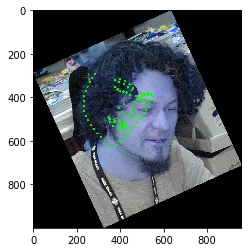
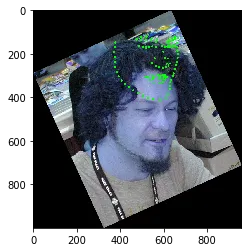
以下是代码示例的快照: sample-output 请注意,我使用了一个名为imgaug的包。建议您安装0.4.0版本,因为我发现它可以正常工作。请参见此处及其被接受的答案。

0

当你尝试这样的事情时,选择适当的坐标系非常重要。在您的情况下,您必须将原点(0,0)放置在图像中心。

一旦您将旋转应用于以中心原点为基准的坐标,面部点将正确对齐在新图像上。


网页内容由stack overflow 提供, 点击上面的
可以查看英文原文,
原文链接