我已经使用新的导航抽屉对象创建了一个项目。
我想自定义菜单布局,添加另一个对象,如TextView、ImageView等。首先,我想修改默认布局,该布局仅由一个ListView组成,通过在ListView中添加2或3个标题来进行修改。
今天,我尝试使用"addHeaderView",但我认为只能将其用于添加一个标题。
如何添加头文件并真正自定义我的布局菜单?因为从开发者API来看,似乎在"android.support.v4.widget.DrawerLayout"下只允许两个子元素。
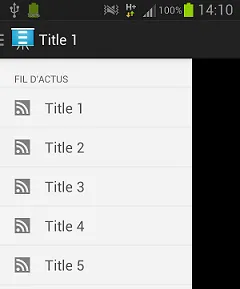
这是我今天布局的截图:
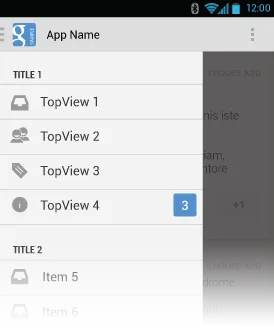
这是我想创建的截图:
这是我的MainActivity代码片段:
public class MainActivity extends Activity {
private DrawerLayout mDrawerLayout;
private ListView mDrawerList;
private ActionBarDrawerToggle mDrawerToggle;

private CharSequence mDrawerTitle;
private CharSequence mTitle;
private String[] mPlanetTitles;

@Override
protected void onCreate(Bundle savedInstanceState) {
    super.onCreate(savedInstanceState);
    setContentView(R.layout.activity_main);

    mTitle = mDrawerTitle = getTitle();
    mPlanetTitles = getResources().getStringArray(R.array.planets_array);
    mDrawerLayout = (DrawerLayout) findViewById(R.id.drawer_layout);

    // Declaration of the 2 listview's
    mDrawerList = (ListView) findViewById(R.id.dernieres_news);

    LayoutInflater inflater = getLayoutInflater();

    // Add header news title
    ViewGroup header_news = (ViewGroup)inflater.inflate(R.layout.header_dernieres_news, mDrawerList, false);
    mDrawerList.addHeaderView(header_news, null, false);

    // set a custom shadow that overlays the main content when the drawer opens
    mDrawerLayout.setDrawerShadow(R.drawable.drawer_shadow, GravityCompat.START);

    String[] names=new String[]{"Title 1", "Title 2", "Title 3", "Title 4", "Title 5"};

    /*Array of Images*/
    int[] image = new int[] {R.drawable.ic_action_feed, R.drawable.ic_action_feed, R.drawable.ic_action_feed, R.drawable.ic_action_feed, R.drawable.ic_action_feed};

    List<HashMap<String, String>> listinfo = new ArrayList<HashMap<String, String>>();
    listinfo.clear();
    for(int i=0;i<5;i++){
        HashMap<String, String> hm = new HashMap<String, String>();
        hm.put("name", names[i]);
        hm.put("image", Integer.toString(image[i]));
        listinfo.add(hm);
    }

    // Keys used in Hashmap
    String[] from = { "image", "name" };
    int[] to = { R.id.img, R.id.txt };
    SimpleAdapter adapter = new SimpleAdapter(getBaseContext(), listinfo, R.layout.drawer_list_item, from, to);
    mDrawerList.setAdapter(adapter);

    mDrawerList.setOnItemClickListener(new DrawerItemClickListener());

    // enable ActionBar app icon to behave as action to toggle nav drawer
    getActionBar().setDisplayHomeAsUpEnabled(true);
    getActionBar().setHomeButtonEnabled(true);

    // ActionBarDrawerToggle ties together the the proper interactions
    // between the sliding drawer and the action bar app icon
    mDrawerToggle = new ActionBarDrawerToggle(
            this,                  /* host Activity */
            mDrawerLayout,         /* DrawerLayout object */
            R.drawable.ic_drawer,  /* nav drawer image to replace 'Up' caret */
            R.string.drawer_open,  /* "open drawer" description for accessibility */
            R.string.drawer_close  /* "close drawer" description for accessibility */
            ) {
        public void onDrawerClosed(View view) {
            getActionBar().setTitle(mTitle);
            invalidateOptionsMenu(); // creates call to onPrepareOptionsMenu()
        }

        public void onDrawerOpened(View drawerView) {
            getActionBar().setTitle(mDrawerTitle);
            invalidateOptionsMenu(); // creates call to onPrepareOptionsMenu()
        }
    };
    mDrawerLayout.setDrawerListener(mDrawerToggle);

    if (savedInstanceState == null) {
        selectItem(0);
    }
}
以及 activity_main.xml 的代码:
<android.support.v4.widget.DrawerLayout xmlns:android="http://schemas.android.com/apk/res/android"
android:id="@+id/drawer_layout"
android:layout_width="match_parent"
android:layout_height="match_parent" >

<FrameLayout
    android:id="@+id/content_frame"
    android:layout_width="match_parent"
    android:layout_height="match_parent" />


    <ListView
        android:id="@+id/dernieres_news"
        android:layout_width="240dp"
        android:layout_height="match_parent"
        android:layout_gravity="start"
        android:background="#F3F3F4"
        android:choiceMode="singleChoice"
        android:divider="#E3E9E3"
        android:dividerHeight="1dp" />
int[] to = { R.id.img, R.id.txt };这个定义在哪里了? - DroidLearner