水平线性布局中的右对齐按钮

142
如果您查看附加的图像,我需要我的按钮右对齐,但由于某种原因,它与“gravity:right”无法正常工作...

Cancel Add

这是我为该布局编写的代码:
<LinearLayout
    xmlns:android="http://schemas.android.com/apk/res/android"
    android:layout_width="fill_parent"
    android:layout_height="wrap_content"
    android:orientation="horizontal"
    android:layout_marginTop="35dp">

    <TextView
        android:id="@+id/lblExpenseCancel"
        android:layout_width="wrap_content"
        android:layout_height="wrap_content"
        android:text="@string/cancel"
        android:textColor="#404040"
        android:layout_marginLeft="10dp"
        android:textSize="20sp"
        android:layout_marginTop="9dp" />

    <Button
        android:id="@+id/btnAddExpense"
        android:layout_width="wrap_content"
        android:layout_height="45dp"
        android:background="@drawable/stitch_button"
        android:layout_marginLeft="10dp"
        android:text="@string/add"
        android:layout_gravity="right"
        android:layout_marginRight="15dp" />

</LinearLayout>

为什么不工作?!
6
在这种情况下,尝试使用相对布局(Relative layout)。线性布局(LL)不适用。 - AAnkit
4
如果您想使用LinearLayout,请使用两个内部的LinearLayout, 并使用layout_weight和layout_gravity属性。这样可以正常工作。 - Vamsi Challa
@VamsiChalla,只需要一个就可以实现,请查看我下面的新答案。 - TWiStErRob
18个回答

169

使用单一的 LinearLayout 解决方案。 只需要添加一个简单的间距 view:
(貌似没有人提到过这个,只有更复杂的多布局解决方案。)

<LinearLayout
    xmlns:android="http://schemas.android.com/apk/res/android"
    android:layout_width="fill_parent"
    android:layout_height="wrap_content"
    android:orientation="horizontal"
    android:layout_marginTop="35dp">

    <TextView
        android:id="@+id/lblExpenseCancel"
        android:layout_width="wrap_content"
        android:layout_height="wrap_content"
        android:text="@string/cancel"
        android:textColor="#404040"
        android:layout_marginLeft="10dp"
        android:textSize="20sp"
        android:layout_marginTop="9dp" />

    <!-------------------------  ADDED SPACER VIEW -------------------->
    <View
        android:layout_width="0dp"
        android:layout_height="0dp"
        android:layout_weight="1"
        />
    <!------------------------- /ADDED SPACER VIEW -------------------->

    <Button
        android:id="@+id/btnAddExpense"
        android:layout_width="wrap_content"
        android:layout_height="45dp"
        android:background="@drawable/stitch_button"
        android:layout_marginLeft="10dp"
        android:text="@string/add"
        android:layout_gravity="right"
        android:layout_marginRight="15dp" />

</LinearLayout>

注意"highlighted"的视图,我没有修改其他任何内容。Height=0确保它不可见。Width=0是因为宽度是由LinearLayout根据weight=1确定的。这意味着空间视图将尽可能地在LinearLayout方向(方向)上伸展。

请注意,如果您的API级别和/或依赖项允许,您应该使用android.widget.Spaceandroid.support.v4.widget.Space而不是ViewSpace以更便宜的方式完成任务,因为它只测量而不像View那样尝试绘制任何东西;它也更具表现力传达了意图。


2
只需在R.id.lblExpenseCancel中添加android:layout_weight="1",就可以了。 - hector6872
1
@h_rules 这适用于想要进行黑客攻击的人,但是当您向 TextView 添加背景时,请想象会发生什么。 - TWiStErRob
3
我不知道为什么这个答案受到了负评,它是有效的且很好,我一定会尝试。 - Elvedin Hamzagic
作为移动开发者来说,这是非常完美的。 - Shivanand Darur
1
@GeoMint layout_weight="1" 给了它动态大小,这意味着“尽可能宽”(因为LinearLayout是水平的)。宽度为0dp只是为了性能,它实际上不会为0宽。我感觉你甚至没有尝试过这段代码... - TWiStErRob
显示剩余5条评论

145

可以使用以下代码实现

<RelativeLayout xmlns:android="http://schemas.android.com/apk/res/android"
    android:layout_width="fill_parent"
    android:layout_height="wrap_content"
    android:layout_marginTop="35dp"
    android:orientation="horizontal" >

    <TextView
        android:id="@+id/lblExpenseCancel"
        android:layout_width="wrap_content"
        android:layout_height="wrap_content"
        android:layout_marginLeft="10dp"
        android:layout_marginTop="9dp"
        android:text="@string/cancel"
        android:textColor="#404040"
        android:textSize="20sp" />

    <Button
        android:id="@+id/btnAddExpense"
        android:layout_width="wrap_content"
        android:layout_height="45dp"
        android:layout_alignParentRight="true"
        android:layout_marginLeft="10dp"
        android:layout_marginRight="15dp"
        android:background="@drawable/stitch_button"
        android:text="@string/add" />

</RelativeLayout>

3
在这种情况下,似乎按钮的属性'layout_alignParentRight'不可用?可能已经被弃用了? - user818700
23
你是否使用了RelativeLayout而不是LinearLayout? - Dipak Keshariya
1
啊,糟糕...对不起,我完全忽略了那个。谢谢! - user818700
4
仍然让我惊讶的是,看似简单的东西在尝试使用线性布局时变得如此困难。 - AlvaroSantisteban
2
@DipakKeshariya,对于未来的观众,您可以使用“android:layout_gravity =”top | right“ linearlayout”。 - SupimpaAllTheWay
1
这不应该被接受为答案,因为他在询问LinearLayout中的对齐方式,而你提供了一个使用RelativeLayout的答案。 - HB.

44

IT案例的真正解决方案:

android:layout_weight="1"应用于TextView,即可使您的按钮移至右侧!


30

我知道这个问题早就被问过了,但我以前做过类似的事情,它可以允许更多地控制对齐项。如果您将其视为Web编程,这将有所帮助。只需嵌套另一个LinearLayout,其中包含您的按钮。然后,您可以更改按钮布局的重力,并使其向右移动,而TextView仍在左侧。

尝试这段代码:

<LinearLayout
xmlns:android="http://schemas.android.com/apk/res/android"
android:layout_width="fill_parent"
android:layout_height="wrap_content"             
android:orientation="horizontal" 
android:layout_marginTop="35dp">

<TextView
    android:id="@+id/lblExpenseCancel"
    android:layout_width="wrap_content"
    android:layout_height="wrap_content"
    android:text="@string/cancel" 
    android:textColor="#404040"         
    android:layout_marginLeft="10dp" 
    android:textSize="20sp" 
    android:layout_marginTop="9dp"/>

<LinearLayout
    android:layout_width="fill_parent"
    android:layout_height="wrap_content"
    android:gravity="right"
    android:orientation="horizontal" >

    <Button
        android:id="@+id/btnAddExpense"
        android:layout_width="wrap_content"
        android:layout_height="45dp"
        android:background="@drawable/stitch_button"
        android:layout_marginLeft="10dp"                    
        android:text="@string/add" 
        android:layout_gravity="right" 
        android:layout_marginRight="15dp"/>

</LinearLayout>

您可能需要调整嵌套布局的填充(padding),以便它按照您的要求起作用。


2
你应该在嵌套布局中使用FrameLayout。它的作用是定位单个元素。此外,给它一个权重,使其填充父容器的右侧。不要使用RelativeLayout,这样做加1分。 - Hjalmar

11

试一下这个

 <?xml version="1.0" encoding="utf-8"?>
 <LinearLayout
    xmlns:android="http://schemas.android.com/apk/res/android"
    android:layout_width="fill_parent"
    android:layout_gravity="right" 
    android:layout_height="wrap_content"             
    android:orientation="horizontal"  >

  <RelativeLayout xmlns:android="http://schemas.android.com/apk/res/android"
    android:layout_width="fill_parent"
   android:layout_height="wrap_content"   
   android:orientation="horizontal" >

<TextView
    android:id="@+id/lblExpenseCancel"
    android:layout_width="wrap_content"
    android:layout_height="wrap_content"
    android:layout_marginLeft="10dp"
    android:layout_marginTop="9dp"
    android:text="cancel"
    android:textColor="#ffff0000"
    android:textSize="20sp" />

<Button
    android:id="@+id/btnAddExpense"
    android:layout_width="wrap_content"
    android:layout_height="45dp"
    android:layout_alignParentRight="true"
    android:layout_marginLeft="10dp"
    android:layout_marginRight="15dp"
     android:textColor="#ff0000ff"
    android:text="add" />

 </RelativeLayout>
  </LinearLayout>

10

如前所述:从LinearLayout切换到RelativeLayout可以解决问题,但您也可以解决问题而不是避免它。使用LinearLayout提供的工具:为TextView设置weight=1(请参见下面的代码),按钮的权重应保持为0或无。在这种情况下,TextView将占用所有剩余的空间,该空间未用于显示TextView或ButtonView的内容,并将按钮推向右侧。

<LinearLayout
        xmlns:android="http://schemas.android.com/apk/res/android"
        android:layout_width="fill_parent"
        android:layout_height="wrap_content"
        android:orientation="horizontal"
        android:layout_marginTop="35dp">

        <TextView
            android:id="@+id/lblExpenseCancel"
            android:layout_width="wrap_content"
            android:layout_height="wrap_content"
            android:text="@string/cancel"
            android:textColor="#404040"
            android:layout_marginLeft="10dp"
            android:textSize="20sp"
            android:layout_marginTop="9dp"

            **android:layout_weight="1"**

            />

        <Button
            android:id="@+id/btnAddExpense"
            android:layout_width="wrap_content"
            android:layout_height="45dp"
            android:background="@drawable/stitch_button"
            android:layout_marginLeft="10dp"
            android:text="@string/add"
            android:layout_gravity="right"
            android:layout_marginRight="15dp" />

    </LinearLayout>

2
这是最好的答案。我之前想写类似的东西,直到我看到了你的帖子。 - codingdave
这比因为内存问题而切换到RelativeLayout要好得多,因为RelativeLayout消耗的内存比LinearLayout多得多。 - ThunderWiring

7
您需要将重力添加到布局而不是按钮,按钮设置中的重力是用于按钮内部的文本。
<LinearLayout
xmlns:android="http://schemas.android.com/apk/res/android"
android:layout_width="fill_parent"
android:layout_gravity="right" 
android:layout_height="wrap_content"             
android:orientation="horizontal" 
android:layout_marginTop="35dp">

3
那样会不会把TextView也右对齐呢?我只需要将按钮右对齐... - user818700
1
如果您只需要对齐按钮,请使用RelativeLayout。 - goodm
1
即使您想要所有按钮对齐,这也不起作用(API 16)。子视图仍然在左侧对齐。 - m0skit0

5
只需要在父布局中添加android:gravity="right"这一行代码,就可以实现此效果。
<LinearLayout
        android:id="@+id/withdrawbuttonContainer"
        android:layout_width="match_parent"
        android:layout_height="wrap_content"
        android:layout_alignParentBottom="true"
        android:background="@color/colorPrimary"
        android:orientation="horizontal"
        **android:gravity="right"**
        android:weightSum="5"
        android:visibility="visible">

        <Button
            android:id="@+id/bt_withDraw"
            android:layout_width="0dp"
            android:layout_height="wrap_content"
            android:layout_weight="1"
            android:text="@string/BTN_ADD"
            app:delay="1500" />

        <Button
            android:id="@+id/btn_orderdetail_amend"
            android:layout_width="0dp"
            android:layout_height="wrap_content"
            android:layout_weight="1"
            android:text="@string/BTN_CANCEL"
            app:delay="1500" />
</LinearLayout>

5

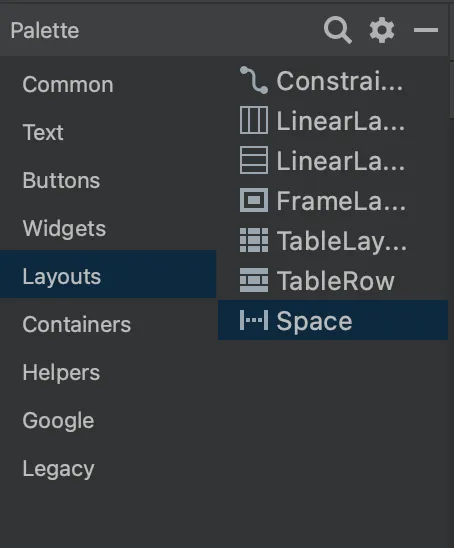
虽然加入得比较晚,但标准的方法是使用 <Space>,这个标签字面上就是为此目的而创建的。

所以在你的代码中,在 TextView 和 Button 之间插入以下内容即可:

<Space
     android:layout_width="wrap_content"
     android:layout_height="wrap_content"
     android:layout_weight="1" 
/>

或者从调色板中选择 Layouts > Space。它会将其转储为上面的代码一样,你只需要指定权重即可。

输入图像描述


5
<LinearLayout
    xmlns:android="http://schemas.android.com/apk/res/android"
    android:layout_width="fill_parent"
    android:layout_height="wrap_content"             
    android:orientation="horizontal" 
    android:layout_marginTop="35dp">

    <TextView
        android:id="@+id/lblExpenseCancel"
        android:layout_width="0dp"
        android:layout_weight="0.5"
        android:layout_height="wrap_content"
        android:text="@string/cancel" 
        android:textColor="#404040"         
        android:layout_marginLeft="10dp" 
        android:textSize="20sp" 
        android:layout_marginTop="9dp"/>              

    <Button
        android:id="@+id/btnAddExpense"
        android:layout_width="0dp"
        android:layout_weight="0.5"
        android:layout_height="wrap_content"
        android:background="@drawable/stitch_button"
        android:layout_marginLeft="10dp"                    
        android:text="@string/add" 
        android:layout_gravity="right" 
        android:layout_marginRight="15dp"/>

</LinearLayout>

这将解决您的问题。

网页内容由stack overflow 提供, 点击上面的
可以查看英文原文,
原文链接