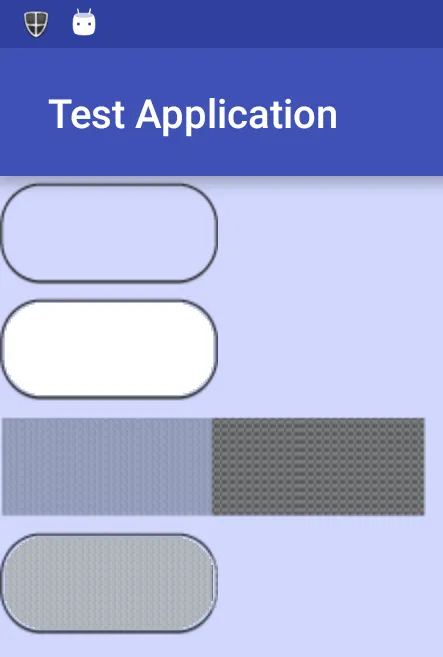
我有两个位图。这是位图1:
 这是位图2:
 最终的结果应该是:
 我希望获得一段代码,但我更希望获得一个文档或教程的参考。我想完全理解这段代码,但我在开发者网站上搜索了很久也没有找到。谢谢。
这是位图2:
最终的结果应该是:
我希望获得一段代码,但我更希望获得一个文档或教程的参考。我想完全理解这段代码,但我在开发者网站上搜索了很久也没有找到。谢谢。
这是位图2:
最终的结果应该是:
我希望获得一段代码,但我更希望获得一个文档或教程的参考。我想完全理解这段代码,但我在开发者网站上搜索了很久也没有找到。谢谢。超过3年还没有答案?我可以解决这个问题。
正如评论中所述,位图2在边缘和中间是透明的(只有轮廓存在),因此第一步是用白色填充中心。有很多泛洪填充算法可供选择。我使用了https://dev59.com/_moy5IYBdhLWcg3wD53G#8925653,因为它很容易,虽然肯定有其他更快的算法。这是必要的,因为它使下一步成为可能。
第二步是使用Porter/Duff Composting将填充的位图2与位图1组合。PorterDuff.Mode.SRC_ATOP会将位图1有效地绘制到位图2的白色区域中,同时使轮廓外的区域保持透明。
以下是代码:
package test.testapplication;

import android.content.Context;
import android.graphics.Bitmap;
import android.graphics.BitmapFactory;
import android.graphics.Canvas;
import android.graphics.Color;
import android.graphics.Paint;
import android.graphics.Point;
import android.graphics.PorterDuff;
import android.graphics.PorterDuffXfermode;
import android.os.Bundle;
import android.support.v7.app.AppCompatActivity;
import android.view.View;
import android.graphics.Bitmap.Config;

import java.util.LinkedList;
import java.util.Queue;

public class MainActivity extends AppCompatActivity {

    Bitmap mask, background, filledMask, overlay;
    Canvas c;

    @Override
    protected void onCreate(Bundle savedInstanceState) {
        super.onCreate(savedInstanceState);

        mask = BitmapFactory.decodeResource(getResources(), R.drawable.mask);
        background = BitmapFactory.decodeResource(getResources(), R.drawable.background);

        // get the mask, copy it to filledMask and then flood from the center with CYAN
        filledMask = Bitmap.createBitmap(mask.getWidth(), mask.getHeight(), Config.ARGB_8888);
        c = new Canvas(filledMask);
        c.drawBitmap(mask, 0, 0, new Paint());
        Point center = new Point(filledMask.getWidth() / 2, filledMask.getHeight() / 2);
        floodFill(filledMask, center, Color.TRANSPARENT, Color.WHITE);


        // create new overlay Bitmap, draw the filledMask and then add the background using PorterDuff
        overlay = Bitmap.createBitmap(filledMask.getWidth(), filledMask.getHeight(), Config.ARGB_8888);
        c = new Canvas(overlay);
        Paint p = new Paint();
        p.setXfermode(new PorterDuffXfermode(PorterDuff.Mode.SRC_ATOP));
        c.drawBitmap(filledMask, 0, 0, new Paint());
        c.drawBitmap(background, 0, 0, p);

        DrawView drawView = new DrawView(this);
        // set background to light blue in order to see transparent areas
        drawView.setBackgroundColor(0xffd2d7fe);
        setContentView(drawView);
        drawView.requestFocus();
    }

    public class DrawView extends View {
        Paint p = new Paint();
        int top = 0;

        public DrawView(Context context) {
            super(context);
        }

        protected void onDraw(Canvas canvas) {
            super.onDraw(canvas);
            canvas.drawBitmap(mask, 0, 0, p);
            top += mask.getHeight();

            canvas.drawBitmap(filledMask, 0, top, p);
            top += filledMask.getHeight();

            canvas.drawBitmap(background, 0, top, p);
            top += background.getHeight();

            canvas.drawBitmap(overlay, 0, top, p);
        }
    }

    // method from https://dev59.com/_moy5IYBdhLWcg3wD53G#8925653
    public void floodFill(Bitmap bmp, Point pt, int targetColor, int replacementColor) {

        Queue<Point> q = new LinkedList<>();
        q.add(pt);
        while (q.size() > 0) {
            Point n = q.poll();
            if (bmp.getPixel(n.x, n.y) != targetColor) continue;

            Point w = n, e = new Point(n.x + 1, n.y);
            while ((w.x > 0) && (bmp.getPixel(w.x, w.y) == targetColor)) {
                bmp.setPixel(w.x, w.y, replacementColor);
                if ((w.y > 0) && (bmp.getPixel(w.x, w.y - 1) == targetColor)) q.add(new Point(w.x, w.y - 1));
                if ((w.y < bmp.getHeight() - 1) && (bmp.getPixel(w.x, w.y + 1) == targetColor)) q.add(new Point(w.x, w.y + 1));
                w.x--;
            }
            while ((e.x < bmp.getWidth() - 1) && (bmp.getPixel(e.x, e.y) == targetColor)) {
                bmp.setPixel(e.x, e.y, replacementColor);

                if ((e.y > 0) && (bmp.getPixel(e.x, e.y - 1) == targetColor)) q.add(new Point(e.x, e.y - 1));
                if ((e.y < bmp.getHeight() - 1) && (bmp.getPixel(e.x, e.y + 1) == targetColor)) q.add(new Point(e.x, e.y + 1));
                e.x++;
            }
        }
    }
}