如何为按钮添加样式?
<input type="file" />查看示例! - 它在 Chrome/FF/IE (IE10/9/8/7)中工作。
最好的方法是使用一个自定义标签元素,该元素带有附加到一个隐藏文件输入元素上的for属性。(为了使其正常工作,标签的for属性必须与文件元素的id匹配)。
<label for="file-upload" class="custom-file-upload">
    Custom Upload
</label>
<input id="file-upload" type="file"/>
作为一种替代方式,您还可以直接使用标签将文件输入元素包装起来:(示例)
<label class="custom-file-upload">
    <input type="file"/>
    Custom Upload
</label>
在样式方面,只需使用属性选择器隐藏输入元素即可。1
input[type="file"] {
    display: none;
}
接下来你需要做的就是给自定义的 label 元素添加样式。 (示例).
.custom-file-upload {
    border: 1px solid #ccc;
    display: inline-block;
    padding: 6px 12px;
    cursor: pointer;
}
1 - 值得注意的是,如果你使用 display: none 来隐藏元素,在 IE8 及以下版本中将无法正常工作。另外要注意的是,默认情况下 jQuery validate 不会验证隐藏字段。如果这些问题对你有影响,以下是两种在这些情况下可用的隐藏输入框的方法 (1, 2)。
input[type=file] 的 display: none 被设置了,如何显示所选文件的名称? - Sarthak Singhalbutton和input不同,label元素无法通过键盘访问。添加tabindex并不是解决方案,因为当用户按下回车键时,即使label具有焦点,它仍然无法被操作。我通过视觉上隐藏输入框来解决这个问题,这样它仍然可以聚焦,并在label的父元素上使用:focus-within:http://jsbin.com/fokexoc/2/edit?html,css,output - Oliver Joseph Ash样式化文件输入框非常困难,因为大多数浏览器不会根据CSS或JavaScript更改其外观。
即使是输入框的大小也无法响应以下样式:
<input type="file" style="width:200px">
相反,你需要使用 size 属性:
<input type="file" size="60" />
如果你想要更为复杂的样式(比如改变浏览按钮的外观),你需要采用一种巧妙的方法,在原生文件输入框上叠加一个带有样式的按钮和输入框。rm在www.quirksmode.org/dom/inputfile.html中提到的文章是我见过的最好的。
更新
虽然直接为<input>标签添加样式很困难,但是通过使用<label>标签可以轻松实现。请参考@JoshCrozier的答案:https://dev59.com/dXRB5IYBdhLWcg3wn4UL#25825731
按照以下步骤,您可以为文件上传表单创建自定义样式:
this is the simple HTML form(please read the HTML comments I have written here below)
<form action="#type your action here" method="POST" enctype="multipart/form-data">
  <div id="yourBtn" style="height: 50px; width: 100px;border: 1px dashed #BBB; cursor:pointer;" onclick="getFile()">Click to upload!</div>
  <!-- this is your file input tag, so i hide it!-->
  <div style='height: 0px;width:0px; overflow:hidden;'><input id="upfile" type="file" value="upload"/></div>
  <!-- here you can have file submit button or you can write a simple script to upload the file automatically-->
  <input type="submit" value='submit' >
</form>
then use this simple script to pass the click event to file input tag.
function getFile(){
     document.getElementById("upfile").click();
}
Now you can use any type of styling without worrying about how to change default styles.
我非常清楚这一点,因为我已经尝试了一个半月来更改默认样式。相信我,这非常困难,因为不同的浏览器有不同的上传输入标签。因此,请使用这个来构建您自定义的文件上传表单。以下是完整的自动化上传代码。
function getFile() {
  document.getElementById("upfile").click();
}

function sub(obj) {
  var file = obj.value;
  var fileName = file.split("\\");
  document.getElementById("yourBtn").innerHTML = fileName[fileName.length - 1];
  document.myForm.submit();
  event.preventDefault();
}
#yourBtn {
position: relative;
top: 150px;
font-family: calibri;
width: 150px;
padding: 10px;
-webkit-border-radius: 5px;
-moz-border-radius: 5px;
border: 1px dashed #BBB;
text-align: center;
background-color: #DDD;
cursor: pointer;
}<form action="#type your action here" method="POST" enctype="multipart/form-data" name="myForm">
<div id="yourBtn" onclick="getFile()">click to upload a file</div>
<!-- this is your file input tag, so i hide it!-->
<!-- i used the onchange event to fire the form submission-->
<div style='height: 0px;width: 0px; overflow:hidden;'><input id="upfile" type="file" value="upload" onchange="sub(this)" /></div>
<!-- here you can have file submit button or you can write a simple script to upload the file automatically-->
<!-- <input type="submit" value='submit' > -->
</form>::文件选择按钮https://developer.mozilla.org/en-US/docs/Web/CSS/::file-selector-button
这是一个新的选择器,可以用来为文件选择按钮设置样式。input[type=file]::file-selector-button {
border: 2px solid #6c5ce7;
padding: .2em .4em;
border-radius: .2em;
background-color: #a29bfe;
transition: 1s;
}
input[type=file]::file-selector-button:hover {
background-color: #81ecec;
border: 2px solid #00cec9;
}<form>
<label for="fileUpload">Upload file</label>
<input type="file" id="fileUpload">
</form>这里有另一个片段,展示了不同的样式:
.input_container {
  border: 1px solid #e5e5e5;
}

input[type=file]::file-selector-button {
  background-color: #fff;
  color: #000;
  border: 0px;
  border-right: 1px solid #e5e5e5;
  padding: 10px 15px;
  margin-right: 20px;
  transition: .5s;
}

input[type=file]::file-selector-button:hover {
  background-color: #eee;
  border: 0px;
  border-right: 1px solid #e5e5e5;
}<form>
<div class="input_container">
<input type="file" id="fileUpload">
</div>
</form>如果您想要自定义文件选择按钮的文本,这里有一个代码片段:
document.querySelector("#files").onchange = function() {
  const fileName = this.files[0]?.name;
  const label = document.querySelector("label[for=files]");
  label.innerText = fileName ?? "Browse Files";
};
label {
border: 1px solid #e5e5e5;
border-radius: 10px;
padding: 5px 10px;
font-family: 'Helvetica', sans-serif;
transition: .5s;
}
label:hover {
background-color: #eee;
}<div class="input_container">
<label for="files" class="btn">Browse Files</label>
<input id="files" style="display:none;" type="file">
</div><input type="file">时都会自动生成一个按钮。历史上,该按钮是无法进行样式设计的。然而,Trident和WebKit通过伪元素添加了钩子。
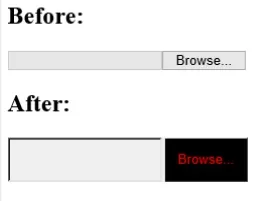
::-ms-browse伪元素可以用于样式化IE10及以上版本中的文件输入按钮。基本上,所有应用到常规按钮的CSS规则都可以应用到这个伪元素。例如:
::-ms-browse {
  background: black;
  color: red;
  padding: 1em;
}<input type="file">在Windows 8上的IE10中,它的显示如下:
WebKit
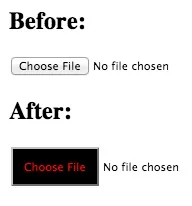
WebKit提供了一个伪元素::-webkit-file-upload-button用于其文件输入按钮。同样,几乎可以应用任何CSS规则,因此Trident示例在此也适用:
::-webkit-file-upload-button {
  background: black;
  color: red;
  padding: 1em;
}<input type="file">这在 OS X 上的 Chrome 26 中显示如下:
使用CSS隐藏它,并使用自定义按钮和 `$(selector).click()` 来激活浏览按钮。然后设置一个间隔来检查文件输入类型的值。该间隔可以为用户显示正在上传的内容。当表单提交时,间隔将被清除。[编辑]抱歉我一直很忙,本意是更新这篇文章,这里是一个例子
<form action="uploadScript.php" method="post" enctype="multipart/form-data">
<div>
    <!-- filename to display to the user -->
    <p id="file-name" class="margin-10 bold-10"></p>

    <!-- Hide this from the users view with css display:none; -->
    <input class="display-none" id="file-type" type="file" size="4" name="file"/>

    <!-- Style this button with type image or css whatever you wish -->
    <input id="browse-click" type="button" class="button" value="Browse for files"/>

    <!-- submit button -->
    <input type="submit" class="button" value="Change"/>
</div>
$(window).load(function () {
    var intervalFunc = function () {
        $('#file-name').html($('#file-type').val());
    };
    $('#browse-click').on('click', function () { // use .live() for older versions of jQuery
        $('#file-type').click();
        setInterval(intervalFunc, 1);
        return false;
    });
});
$('.new_Btn').click(function() {
  $('#html_btn').click();
});
.new_Btn {
// your css propterties
}
#html_btn {
display: none;
}<script src="https://cdnjs.cloudflare.com/ajax/libs/jquery/3.3.1/jquery.min.js"></script>
<div class="new_Btn">SelectPicture</div><br>
<input id="html_btn" type='file' /><br>你也可以使用普通的JavaScript而不是jQuery来达成你的目标。
现在,newBtn与html_btn链接起来了,你可以像想要的那样自定义你的新按钮 :D
document.getElementById('id_inputButtonReal').files.item(0).name 给出上传的文件名。将来参考 -- https://dev59.com/ZnI95IYBdhLWcg3wtwRe#43209669 - Aseem.btn-file {
position: relative;
overflow: hidden;
}
.btn-file input[type=file] {
position: absolute;
top: 0;
right: 0;
min-width: 100%;
min-height: 100%;
font-size: 100px;
text-align: right;
filter: alpha(opacity=0);
opacity: 0;
outline: none;
background: white;
cursor: inherit;
display: block;
}<link href="https://cdnjs.cloudflare.com/ajax/libs/twitter-bootstrap/3.3.7/css/bootstrap.min.css" rel="stylesheet" />
<span class="btn btn-primary btn-file">
Browse...<input type="file">
</span>
当样式化文件输入框时,不能破坏该输入框提供的任何原生交互功能。
display: none 方法会破坏原生的拖放支持。
为了不破坏任何功能,你应该使用 opacity: 0 方法来处理输入框,并将其通过相对/绝对定位方式置于包装器中。
使用此技术,您可以轻松地为用户样式化一个单击/拖放区域,并在 dragenter 事件上添加自定义类以更新样式并向用户提供反馈,让他看到可以拖放文件。
HTML:
<label for="test">
  <div>Click or drop something here</div>
  <input type="file" id="test">
</label>
CSS:
input[type="file"] {
  position: absolute;
  left: 0;
  opacity: 0;
  top: 0;
  bottom: 0;
  width: 100%;
}

div {
  position: absolute;
  left: 0;
  top: 0;
  bottom: 0;
  width: 100%;
  display: flex;
  align-items: center;
  justify-content: center;
  background: #ccc;
  border: 3px dotted #bebebe;
  border-radius: 10px;
}

label {
  display: inline-block;
  position: relative;
  height: 100px;
  width: 400px;
}
这里有一个可用的示例(包括处理 dragover 事件和接收文件的额外JS代码)。
https://jsfiddle.net/j40xvkb3/
希望这能有所帮助!
我可以使用下面的纯CSS代码完成它。我使用了Bootstrap和Font Awesome。
<link href="https://cdnjs.cloudflare.com/ajax/libs/twitter-bootstrap/3.3.7/css/bootstrap.min.css" rel="stylesheet" />
<link href="https://cdnjs.cloudflare.com/ajax/libs/font-awesome/4.7.0/css/font-awesome.css" rel="stylesheet" />

<label class="btn btn-default btn-sm center-block btn-file">
  <i class="fa fa-upload fa-2x" aria-hidden="true"></i>
  <input type="file" style="display: none;">
</label>
input type="submit">。我将相同的样式应用于两种输入类型,这就是我得到的结果:https://i.imgur.com/7MI1Poh.jpg。 - carloswm85