好的,最后我自己想出了如何做。这是我的代码:
#include <opencv2/core/core.hpp>
#include <opencv2/highgui/highgui.hpp>
#include <opencv2/imgproc/imgproc.hpp>
#define THRESHOLD 150
#define BRIGHT 0.7
#define DARK 0.2
using namespace std;
using namespace cv;
int main()
{
Mat img = imread("roi.png", CV_LOAD_IMAGE_GRAYSCALE);
Mat enhanced, float_gray, blur, num, den;
img.convertTo(float_gray, CV_32F, 1.0/255.0);
cv::GaussianBlur(float_gray, blur, Size(0,0), 10);
num = float_gray - blur;
cv::GaussianBlur(num.mul(num), blur, Size(0,0), 20);
cv::pow(blur, 0.5, den);
enhanced = num / den;
cv::normalize(enhanced, enhanced, 0.0, 255.0, NORM_MINMAX, -1);
enhanced.convertTo(enhanced, CV_8UC1);
Mat gaussian;
cv::GaussianBlur(enhanced, gaussian, Size(0,0), 3);
Mat laplace;
Laplacian(gaussian, laplace, CV_32F, 19);
double lapmin, lapmax;
minMaxLoc(laplace, &lapmin, &lapmax);
double scale = 127/ max(-lapmin, lapmax);
laplace.convertTo(laplace, CV_8U, scale, 128);
Mat mask;
cv::threshold(laplace, mask, THRESHOLD, 255, CV_THRESH_BINARY);
morphologyEx(mask,mask,cv::MORPH_OPEN,
getStructuringElement(cv::MORPH_ELLIPSE, cv::Size(5,5)));
Mat connected;
morphologyEx(mask,mask,cv::MORPH_CLOSE,
getStructuringElement(cv::MORPH_ELLIPSE, cv::Size(11,11)));
cv::GaussianBlur(mask, mask, Size(15,15), 0);
cv::GaussianBlur(enhanced, enhanced, Size(3,3), 0);
Mat result(enhanced);
ushort new_pixel;
double coeff;
for(int i=0;i<mask.rows;i++){
for(int j=0;j<mask.cols;j++){
coeff = (1.0-(mask.at<uchar>(i,j)/255.0))*BRIGHT + (1-DARK);
new_pixel = coeff * enhanced.at<uchar>(i,j);
result.at<uchar>(i,j) = (new_pixel>255) ? 255 : new_pixel;
}
}
imshow("frame", img);
waitKey();
imshow("frame", result);
waitKey();
return 0;
}
所以该论文的主要步骤在此处遵循。对于一些部分,我受到了我发现的代码的启发。这是我找到的第一个处理应用的情况,链接在
这里。对于高通滤波器(拉普拉斯)我也受到了给定的
OpenCV 2计算机视觉应用程序编程食谱中的代码的启发。
最后,我通过允许修改背景亮度和静脉暗度(见定义BRIGHT和DARK)做了一些小改进。我还决定模糊一下掩模,以更自然地增强图像。
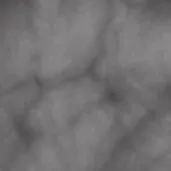
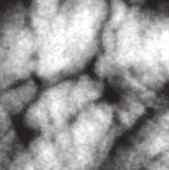
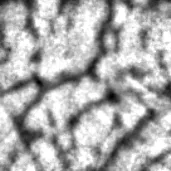
这里是结果(源/论文结果/我的结果):