PHP 中的图像拼贴虚拟网格/调整大小

13

我正在寻找一个成品解决方案或可能使用一些数学/算法来创建由较小的产品图片组成的大图片拼贴品?

我知道如何用gd/imagemagick从同样大小的图片中以正方形方式完成它,但我想内置一些变化。

例如,有些图片可能稍微更高,如果所有图片都是相同大小和正方形 - 我可能希望其中1个占用更多空间,以混合设计。保持有趣。

越想这个问题,就越难用公式解决。预定义所有可能情况的“模板”不起作用,因为图片数量可以从1个(不需要工作)到10个以上。

我不需要任何旋转或特殊效果,只需要在网格中放置图片,之间可能有一些间距,而且不能重叠。

有什么想法可以实现这一点吗?现成的解决方案是否真的没有可用的?

4个回答

29

哇,可能是有史以来最详尽的答案。非常感谢您!这肯定会为我节省很多时间,让我可以开始做一些基础工作!我现在的主要问题是如何计算图像将如何放置在网格中...我需要尝试跟踪不同的图像大小,并动态计算最优化的布局,以便使用"$imageGrid->putImage($blue, 6, 2, 0, 0);"放置它们 - 有什么想法吗? - Christoffer Bubach
很高兴看到这个答案对你有帮助。是的,你可以通过以下方式动态确定权重:1)计算所有图像的宽度/高度之和,2)使用此总和获取每个图像宽度/高度的百分比,3)创建一个100x100的网格并使用这些百分比。我现在正在工作,无法为您提供更多帮助,如果需要示例,请告诉我,我将能够在今晚(gmt+2)编写它。 - Alain Tiemblo
嗨,谢谢!我不确定这如何帮助动态确定定位 - 所以一个例子会很好。也许我只需要再思考一下,并重新阅读你写的所有内容。但在你刚给我写了那么多东西之后,再向你请教有点让我感到不好意思,哈哈。别担心,我不急。 - Christoffer Bubach
也许我可以随机选择一张图片,然后将其大小简单地加倍?否则,计算百分比时不会引入任何布局的错觉,因为大多数图像的大小相同,或者在高度上最多有2-3种不同的大小。嗯...我会继续考虑这个问题,也许当你有空闲时间时,你可以帮助我 :) - Christoffer Bubach
2
+1 只是为了感谢你抽出时间写下这些!我只能说哇! - Deep Frozen

24

使用虚拟网格进行工作

创建一个新的图像,具有实际的宽度/高度(例如:600x800),但也具有网格的宽度/高度(例如:10x10)。然后,您可以为图像提供虚拟大小和虚拟位置。我将尝试逐步解释,以便您理解我的意思。

首先,我们需要一个环境来实现这个目标。

class imageGrid
{

    private $realWidth;
    private $realHeight;
    private $gridWidth;
    private $gridHeight;
    private $image;

    public function __construct($realWidth, $realHeight, $gridWidth, $gridHeight)
    {
        $this->realWidth = $realWidth;
        $this->realHeight = $realHeight;
        $this->gridWidth = $gridWidth;
        $this->gridHeight = $gridHeight;

        // create destination image
        $this->image = imagecreatetruecolor($realWidth, $realHeight);

        // set image default background
        $white = imagecolorallocate($this->image, 255, 255, 255);
        imagefill($this->image, 0, 0, $white);
    }

    public function __destruct()
    {
        imagedestroy($this->image);
    }

    public function display()
    {
        header("Content-type: image/png");
        imagepng($this->image);
    }

}

$imageGrid = new imageGrid(800, 600, 10, 10);
$imageGrid->display();

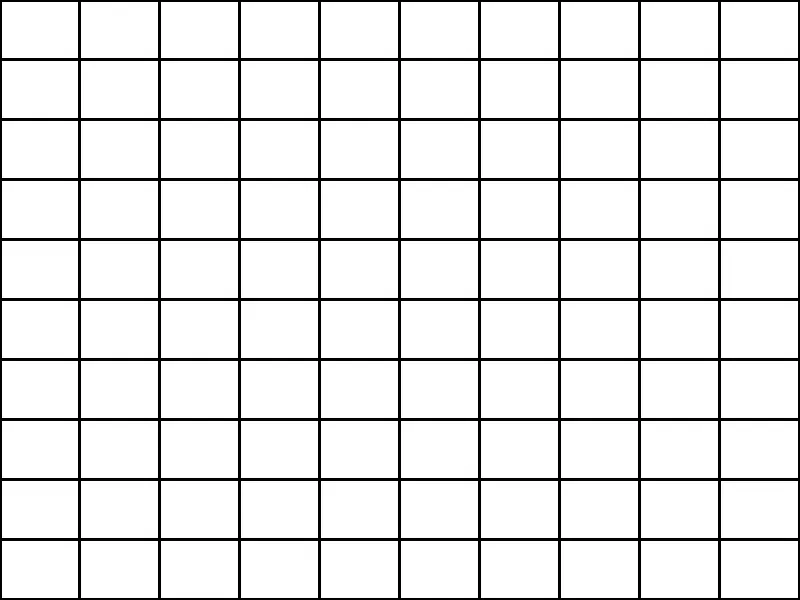
这将为我们提供一个漂亮的白色正方形。然后,我们需要一个网格来显示图像。因为这可能很难想象,让我们显示它。
public function demoGrid()
{
    $black = imagecolorallocate($this->image, 0, 0, 0);
    imagesetthickness($this->image, 3);
    $cellWidth = ($this->realWidth - 1) / $this->gridWidth;   // note: -1 to avoid writting
    $cellHeight = ($this->realHeight - 1) / $this->gridHeight; // a pixel outside the image
    for ($x = 0; ($x <= $this->gridWidth); $x++)
    {
        for ($y = 0; ($y <= $this->gridHeight); $y++)
        {
            imageline($this->image, ($x * $cellWidth), 0, ($x * $cellWidth), $this->realHeight, $black);
            imageline($this->image, 0, ($y * $cellHeight), $this->realWidth, ($y * $cellHeight), $black);
        }
    }
}

通过调用:
$imageGrid = new imageGrid(800, 600, 10, 10);
$imageGrid->demoGrid();
$imageGrid->display();

我们可以看到:

enter image description here

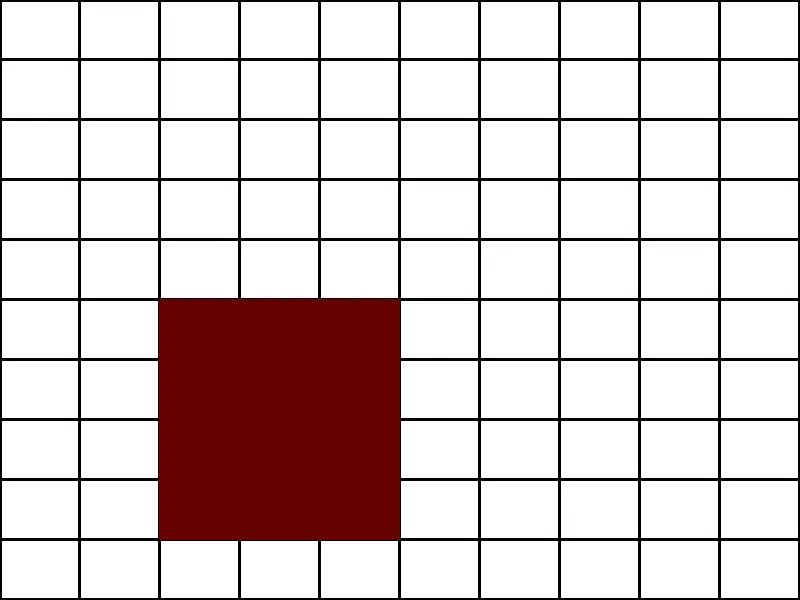
现在,我们想知道如何绘制一个3x4的矩形,并将其粘贴到虚拟测量中的(2,5)位置。我们需要查找如何获取矩形的实际大小和位置。
public function demoPutSquare($sizeW, $sizeH, $posX, $posY)
{
    // Cell width
    $cellWidth = $this->realWidth / $this->gridWidth;
    $cellHeight = $this->realHeight / $this->gridHeight;

    // Conversion of our virtual sizes/positions to real ones
    $realSizeW = ($cellWidth * $sizeW);
    $realSizeH = ($cellHeight * $sizeH);
    $realPosX = ($cellWidth * $posX);
    $realPosY = ($cellHeight * $posY);

    // Getting top left and bottom right of our rectangle
    $topLeftX = $realPosX;
    $topLeftY = $realPosY;
    $bottomRightX = $realPosX + $realSizeW;
    $bottomRightY = $realPosY + $realSizeH;

    // Displaying rectangle
    $red = imagecolorallocate($this->image, 100, 0, 0);
    imagefilledrectangle($this->image, $topLeftX, $topLeftY, $bottomRightX, $bottomRightY, $red);
}

通过调用:
$imageGrid = new imageGrid(800, 600, 10, 10);
$imageGrid->demoGrid();
$imageGrid->demoPutSquare(3, 4, 2, 5);
$imageGrid->display();

我们在网格中得到一个位于(2,5)的3x4正方形:

enter image description here

现在让我们更认真地来看待它,我们有很好的措施,因此我们可以粘贴一张图片。
public function putImage($img, $sizeW, $sizeH, $posX, $posY)
{
    // Cell width
    $cellWidth = $this->realWidth / $this->gridWidth;
    $cellHeight = $this->realHeight / $this->gridHeight;

    // Conversion of our virtual sizes/positions to real ones
    $realSizeW = ceil($cellWidth * $sizeW);
    $realSizeH = ceil($cellHeight * $sizeH);
    $realPosX = ($cellWidth * $posX);
    $realPosY = ($cellHeight * $posY);

    // Copying the image
    imagecopyresampled($this->image, $img, $realPosX, $realPosY, 0, 0, $realSizeW, $realSizeH, imagesx($img), imagesy($img));
}

通过调用:
$imageGrid = new imageGrid(800, 600, 10, 10);
$imageGrid->demoGrid();
$img = imagecreatefromjpeg("ninsuo.jpg");
$imageGrid->putImage($img, 3, 4, 2, 5);
$imageGrid->display();

我们得到:

enter image description here

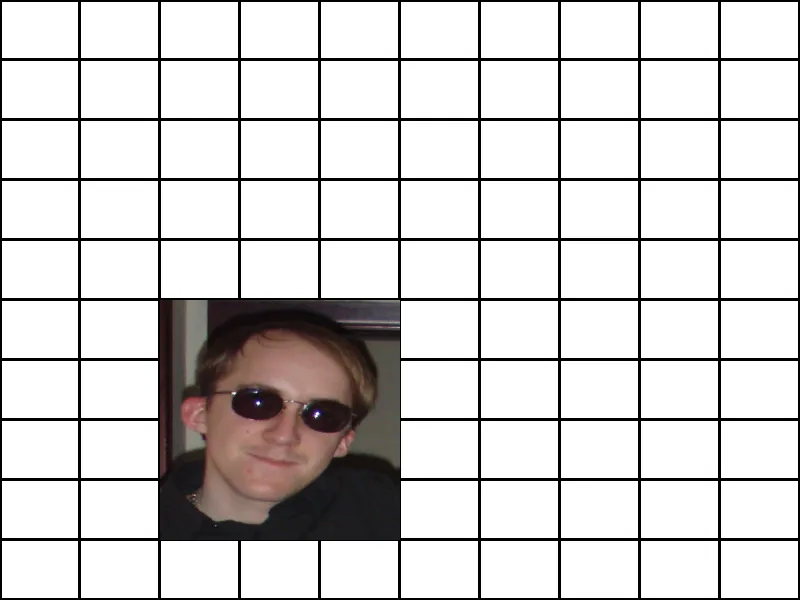
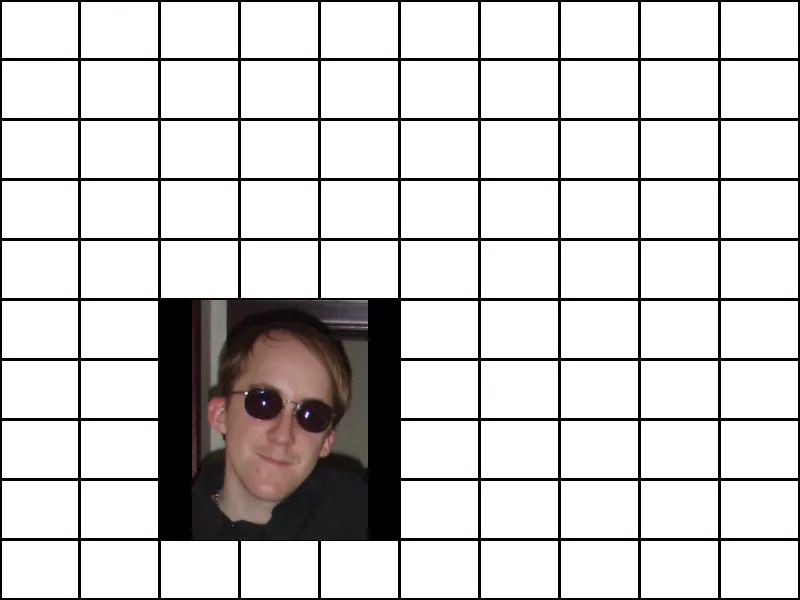
这样我们的图片就在正确的位置了,但是我们失去了宽高比。让我们添加一个方法来正确调整图片大小。

public function resizePreservingAspectRatio($img, $targetWidth, $targetHeight)
{
    $srcWidth = imagesx($img);
    $srcHeight = imagesy($img);

    $srcRatio = $srcWidth / $srcHeight;
    $targetRatio = $targetWidth / $targetHeight;
    if (($srcWidth <= $targetWidth) && ($srcHeight <= $targetHeight))
    {
        $imgTargetWidth = $srcWidth;
        $imgTargetHeight = $srcHeight;
    }
    else if ($targetRatio > $srcRatio)
    {
        $imgTargetWidth = (int) ($targetHeight * $srcRatio);
        $imgTargetHeight = $targetHeight;
    }
    else
    {
        $imgTargetWidth = $targetWidth;
        $imgTargetHeight = (int) ($targetWidth / $srcRatio);
    }

    $targetImg = imagecreatetruecolor($targetWidth, $targetHeight);

    imagecopyresampled(
       $targetImg,
       $img,
       ($targetWidth - $imgTargetWidth) / 2, // centered
       ($targetHeight - $imgTargetHeight) / 2, // centered
       0,
       0,
       $imgTargetWidth,
       $imgTargetHeight,
       $srcWidth,
       $srcHeight
    );

    return $targetImg;
}

而就在此之前:

    imagecopyresampled($this->image, $img, $realPosX, $realPosY, 0, 0, $realSizeW, $realSizeH, imagesx($img), imagesy($img));

我们放置:
    $img = $this->resizePreservingAspectRatio($img, $realSizeW, $realSizeH);

这看起来像这样:

enter image description here

现在我们有一个完整的功能类来完成你的工作。
class imageGrid
{

    private $realWidth;
    private $realHeight;
    private $gridWidth;
    private $gridHeight;
    private $image;

    public function __construct($realWidth, $realHeight, $gridWidth, $gridHeight)
    {
        $this->realWidth = $realWidth;
        $this->realHeight = $realHeight;
        $this->gridWidth = $gridWidth;
        $this->gridHeight = $gridHeight;

        // create destination image
        $this->image = imagecreatetruecolor($realWidth, $realHeight);
        $black = imagecolorallocate($this->image, 0, 0, 0);
        imagecolortransparent($this->image, $black);
    }

    public function __destruct()
    {
        imagedestroy($this->image);
    }

    public function display()
    {
        header("Content-type: image/png");
        imagepng($this->image);
    }

    public function putImage($img, $sizeW, $sizeH, $posX, $posY)
    {
        // Cell width
        $cellWidth = $this->realWidth / $this->gridWidth;
        $cellHeight = $this->realHeight / $this->gridHeight;

        // Conversion of our virtual sizes/positions to real ones
        $realSizeW = ceil($cellWidth * $sizeW);
        $realSizeH = ceil($cellHeight * $sizeH);
        $realPosX = ($cellWidth * $posX);
        $realPosY = ($cellHeight * $posY);

        $img = $this->resizePreservingAspectRatio($img, $realSizeW, $realSizeH);

        // Copying the image
        imagecopyresampled($this->image, $img, $realPosX, $realPosY, 0, 0, $realSizeW, $realSizeH, imagesx($img), imagesy($img));
    }

    public function resizePreservingAspectRatio($img, $targetWidth, $targetHeight)
    {
        $srcWidth = imagesx($img);
        $srcHeight = imagesy($img);

        $srcRatio = $srcWidth / $srcHeight;
        $targetRatio = $targetWidth / $targetHeight;
        if (($srcWidth <= $targetWidth) && ($srcHeight <= $targetHeight))
        {
            $imgTargetWidth = $srcWidth;
            $imgTargetHeight = $srcHeight;
        }
        else if ($targetRatio > $srcRatio)
        {
            $imgTargetWidth = (int) ($targetHeight * $srcRatio);
            $imgTargetHeight = $targetHeight;
        }
        else
        {
            $imgTargetWidth = $targetWidth;
            $imgTargetHeight = (int) ($targetWidth / $srcRatio);
        }

        $targetImg = imagecreatetruecolor($targetWidth, $targetHeight);

        imagecopyresampled(
           $targetImg,
           $img,
           ($targetWidth - $imgTargetWidth) / 2, // centered
           ($targetHeight - $imgTargetHeight) / 2, // centered
           0,
           0,
           $imgTargetWidth,
           $imgTargetHeight,
           $srcWidth,
           $srcHeight
        );

        return $targetImg;
    }

}

我们现在可以尝试运行它,以查看是否有效:
$imageGrid = new imageGrid(800, 400, 12, 2);

$blue = imagecreatefrompng("cheers_blue.png");
$imageGrid->putImage($blue, 6, 2, 0, 0);
imagedestroy($blue);

$green = imagecreatefrompng("cheers_green.png");
$imageGrid->putImage($green, 2, 1, 6, 0);
imagedestroy($green);

$red = imagecreatefrompng("cheers_red.png");
$imageGrid->putImage($red, 2, 1, 8, 0);
imagedestroy($red);

$yellow = imagecreatefrompng("cheers_yellow.png");
$imageGrid->putImage($yellow, 2, 1, 10, 0);
imagedestroy($yellow);

$purple = imagecreatefrompng("cheers_purple.png");
$imageGrid->putImage($purple, 3, 1, 6, 1);
imagedestroy($purple);

$cyan = imagecreatefrompng("cheers_cyan.png");
$imageGrid->putImage($cyan, 3, 1, 9, 1);
imagedestroy($cyan);

$imageGrid->display();

enter image description here

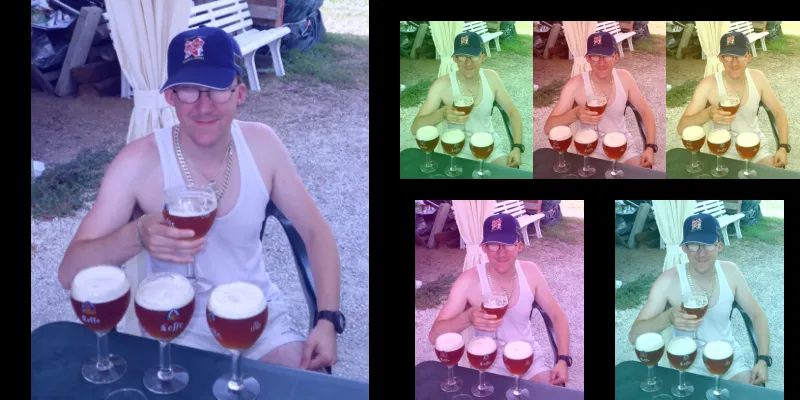
个人而言,我更喜欢不保留纵横比的那一个 :-)

enter image description here

干杯!(嗯,我想说享受!)


谢谢!有没有办法将拼贴图像保存到具有不同名称的目录中?@Alain Tiemblo - Zaid Bin Khalid

6

实现透明度

首先,在__construct方法中,替换:

    $white = imagecolorallocate($this->image, 255, 255, 255);
    imagefill($this->image, 0, 0, $white);

通过:

    $transparent = imagecolorallocate($this->image, 255, 0, 255);
    imagefill($this->image, 0, 0, $transparent);
    imagecolortransparent($this->image, $transparent);

然后,在resizePreservingAspectRatio方法中,在以下位置之后添加:
    $targetImg = imagecreatetruecolor($targetWidth, $targetHeight);

以下是需要翻译的内容:

以下几行:

    $targetTransparent = imagecolorallocate($targetImg, 255, 0, 255);
    imagefill($targetImg, 0, 0, $targetTransparent);
    imagecolortransparent($targetImg, $targetTransparent);

现在开始。

这里输入图片描述


5

将图像随机地放置在网格中

方法是:我们将抖动所有的图像以获取一个随机数组,并将它们随机排列在每行的 1 到 4 张图片上(您可以更改此值),并使用每行中最高的图像来确定每行的高度。因此,如果一张图片比另一张高 50%,如果它们不在同一行,则保留比例。

这有点困难,所以我决定在开发这部分时从不使用图形。这就是为什么会有很多步骤和调试,但这有助于逐步达到最终结果。

我们获取所有图像的高度和它们的总和:

$images = array ();
$totalHeight = 0;
foreach (glob("images/*.jpg") as $jpg)
{
    $img = imagecreatefromjpeg($jpg);
    $images[$jpg] = imagesy($img);
    $totalHeight += $images[$jpg];
    imagedestroy($img);
}

echo "image list with heights:\n";
var_dump($images);
echo "total heights: {$totalHeight}\n";

给我们:
image list with heights:
array(12) {
  ["images/image1.jpg"]=>
  int(392)
  ["images/image10.jpg"]=>
  int(640)
  ["images/image11.jpg"]=>
  int(364)
  ["images/image12.jpg"]=>
  int(324)
  ["images/image2.jpg"]=>
  int(533)
  ["images/image3.jpg"]=>
  int(360)
  ["images/image4.jpg"]=>
  int(768)
  ["images/image5.jpg"]=>
  int(330)
  ["images/image6.jpg"]=>
  int(360)
  ["images/image7.jpg"]=>
  int(338)
  ["images/image8.jpg"]=>
  int(600)
  ["images/image9.jpg"]=>
  int(391)
}
total heights: 5400

然后我们对图像数组进行洗牌,以获得随机的图像排列。我们需要保留键,而shuffle函数不会保留键,因此我们需要做一些小技巧。

// Shuffle image array of files preserving keys to get random image disposition
$keys = array_keys($images);
shuffle($keys);
$images = array_merge(array_flip($keys), $images);

// Separate image names and heights, will simplify our future work
$heights = array_values($images);
$images = array_keys($images);

echo "image list:\n";
var_dump($images);

echo "image heights:\n";
var_dump($heights);

给我们:
image list:
array(12) {
  [0]=>
  string(17) "images/image6.jpg"
  [1]=>
  string(17) "images/image5.jpg"
  [2]=>
  string(18) "images/image10.jpg"
  [3]=>
  string(17) "images/image2.jpg"
  [4]=>
  string(18) "images/image12.jpg"
  [5]=>
  string(17) "images/image3.jpg"
  [6]=>
  string(17) "images/image4.jpg"
  [7]=>
  string(17) "images/image1.jpg"
  [8]=>
  string(17) "images/image8.jpg"
  [9]=>
  string(17) "images/image9.jpg"
  [10]=>
  string(18) "images/image11.jpg"
  [11]=>
  string(17) "images/image7.jpg"
}
image heights:
array(12) {
  [0]=>
  int(360)
  [1]=>
  int(330)
  [2]=>
  int(640)
  [3]=>
  int(533)
  [4]=>
  int(324)
  [5]=>
  int(360)
  [6]=>
  int(768)
  [7]=>
  int(392)
  [8]=>
  int(600)
  [9]=>
  int(391)
  [10]=>
  int(364)
  [11]=>
  int(338)
}

重要的是要检查我们是否保留了图像/高度关联。
现在,我们需要将图像高度转换为百分比:如果您有2个图像,其中一个比第二个高50%,那么第一个图像的总高度将占66%,第二个图像将占33%。此虚拟高度将用作网格上的高度。
$count = count($heights);
for ($i = 0; ($i < $count); $i++)
{
    $heights[$i] = ($heights[$i] * 100) / $totalHeight
}

echo "image heights in percents\n";
var_dump($heights);
echo "check : " . array_sum($heights) . " = 100\n";

结果:

Image heights in percents
array(12) {
  [0]=>
  float(6.6666666666667)
  [1]=>
  float(6.1111111111111)
  [2]=>
  float(11.851851851852)
  [3]=>
  float(9.8703703703704)
  [4]=>
  int(6)
  [5]=>
  float(6.6666666666667)
  [6]=>
  float(14.222222222222)
  [7]=>
  float(7.2592592592593)
  [8]=>
  float(11.111111111111)
  [9]=>
  float(7.2407407407407)
  [10]=>
  float(6.7407407407407)
  [11]=>
  float(6.2592592592593)
}
check : 100 = 100

我们现在生成一组行,以查看每行将放置多少张图片。 对于这个示例,我们希望每行有 1 到 4 张图像。 在此处更改 rand() % 4 + 1,以获得您想要的每行图像数量。例如:rand() % 3 + 2 将给您 2 到 5 张图片。
$lines = array ();
while ($count > 0)
{
    $nbImages = rand() % 4 + 1;
    if (($count - $nbImages) < 0)
    {
        $nbImages = $count;
    }

    $lines[] = $nbImages;
    $count -= $nbImages;
}

echo "Number of lines : " . count($lines) . "\n";
echo "images per line disposition :\n";
var_dump($lines);

Result in :

Number of lines : 5
images per line disposition :
array(5) {
  [0]=>
  int(3)
  [1]=>
  int(1)
  [2]=>
  int(1)
  [3]=>
  int(4)
  [4]=>
  int(3)
}

我们需要将一张图片与一条线以及线上的位置关联起来。这将有助于我们在网格中确定图片的位置。
$imageLines = array();
foreach ($lines as $key => $numberImg)
{
    while ($numberImg--)
    {
        $imageLines[] = $key;
    }
}

echo "image / line association:\n";
var_dump($imageLines);

$imagePositions = array();
foreach ($lines as $numberImg)
{
    for ($i = 0; ($i < $numberImg); $i++)
    {
        $imagePositions[] = $i;
    }
}

echo "image / position in a line association:\n";
var_dump($imagePositions);

结果是:

image / line association:
array(12) {
  [0]=>
  int(0)
  [1]=>
  int(0)
  [2]=>
  int(0)
  [3]=>
  int(1)
  [4]=>
  int(2)
  [5]=>
  int(3)
  [6]=>
  int(3)
  [7]=>
  int(3)
  [8]=>
  int(3)
  [9]=>
  int(4)
  [10]=>
  int(4)
  [11]=>
  int(4)
}
image / position in a line association:
array(12) {
  [0]=>
  int(0)
  [1]=>
  int(1)
  [2]=>
  int(2)
  [3]=>
  int(0)
  [4]=>
  int(0)
  [5]=>
  int(0)
  [6]=>
  int(1)
  [7]=>
  int(2)
  [8]=>
  int(3)
  [9]=>
  int(0)
  [10]=>
  int(1)
  [11]=>
  int(2)
}

现在,我们需要获取图片的总宽度。我们有1到4张图片,为了获得每个图片的整数大小,无论每行有多少张图片,我们将4(最大值)乘以从4到1的所有值。在这种情况下:4 * 3 * 2 * 1 = 24,所以如果我们每行有1张图片,它的宽度将是24,每行有2张图片:24/2 = 12,每行有3张图片:24/3 = 8,每行有4张图片:24/4 = 6。所有都是有效的整数。
$i = 4;
$virtualWidth = 1;
while ($i)
{
    $virtualWidth *= $i--;
}

echo "virtual width: {$virtualWidth}\n";

这里没有什么难的,这会导致:

virtual width: 24

我们现在需要根据每行最高的图片确定每行的高度。我们可以通过这个计算推断出我们的网格高度。
// Determine the virtual height needed for each line and for the whole grid
$imageHeights = array();
$index = 0;
foreach ($lines as $key => $numberImages)
{
    $slice = array_slice($heights, $index, $numberImages);

    echo "at line {$key}, images heights are:\n";
    var_dump($slice);

    $imageHeights[] = max($slice);
    $index += $numberImages;
}
$virtualHeight = array_sum($imageHeights);

echo "heights for each line:\n";
var_dump($imageHeights);
echo "total height = {$virtualHeight}\n";

这会导致:
at line 0, images heights are:
array(3) {
  [0]=>
  float(6.6666666666667)
  [1]=>
  float(6.1111111111111)
  [2]=>
  float(11.851851851852)
}
at line 1, images heights are:
array(1) {
  [0]=>
  float(9.8703703703704)
}
at line 2, images heights are:
array(1) {
  [0]=>
  int(6)
}
at line 3, images heights are:
array(4) {
  [0]=>
  float(6.6666666666667)
  [1]=>
  float(14.222222222222)
  [2]=>
  float(7.2592592592593)
  [3]=>
  float(11.111111111111)
}
at line 4, images heights are:
array(3) {
  [0]=>
  float(7.2407407407407)
  [1]=>
  float(6.7407407407407)
  [2]=>
  float(6.2592592592593)
}
heights for each line:
array(5) {
  [0]=>
  float(11.851851851852)
  [1]=>
  float(9.8703703703704)
  [2]=>
  int(6)
  [3]=>
  float(14.222222222222)
  [4]=>
  float(7.2407407407407)
}
total height = 49.185185185185

我们在这个结果中检查每行是否有最高值,以及总和是否有效。

最后,我们拥有了所有需要展示随机定位图像的信息。

$imageGrid = new imageGrid(800, 800, $virtualWidth, $virtualHeight);
foreach (glob("images/*.jpg") as $jpg)
{
    $img = imagecreatefromjpeg($jpg);

    $index = array_search($jpg, $images);
    echo "image {$index}:\n";

    $line = $imageLines[$index];
    echo "image is at line {$line}\n";

    $sizeW = ($virtualWidth / $lines[$line]);
    echo "width = {$virtualWidth} / {$lines[$line]} = {$sizeW}\n";

    $sizeH = $imageHeights[$line];
    echo "height = {$imageHeights[$line]}\n";

    $posX = $imagePositions[$index] * ($virtualWidth / $lines[$line]);
    echo "pos X = {$imagePositions[$index]} * ({$virtualWidth} / {$lines[$line]}) = {$posX}\n";

    $slice = array_slice($imageHeights, 0, $line);
    echo "Slice to calc Y:\n";
    var_dump($slice);

    $posY = array_sum($slice);
    echo "pos Y = {$posY}\n";

    echo "\n";

    $imageGrid->putImage($img, $sizeW, $sizeH, $posX, $posY);
    imagedestroy($img);
}

这会导致:
image 7:
image is at line 3
width = 24 / 4 = 6
height = 14.222222222222
pos X = 2 * (24 / 4) = 12
Slice to calc Y:
array(3) {
  [0]=>
  float(11.851851851852)
  [1]=>
  float(9.8703703703704)
  [2]=>
  int(6)
}
pos Y = 27.722222222222

image 2:
image is at line 0
width = 24 / 3 = 8
height = 11.851851851852
pos X = 2 * (24 / 3) = 16
Slice to calc Y:
array(0) {
}
pos Y = 0

image 10:
image is at line 4
width = 24 / 3 = 8
height = 7.2407407407407
pos X = 1 * (24 / 3) = 8
Slice to calc Y:
array(4) {
  [0]=>
  float(11.851851851852)
  [1]=>
  float(9.8703703703704)
  [2]=>
  int(6)
  [3]=>
  float(14.222222222222)
}
pos Y = 41.944444444444

image 4:
image is at line 2
width = 24 / 1 = 24
height = 6
pos X = 0 * (24 / 1) = 0
Slice to calc Y:
array(2) {
  [0]=>
  float(11.851851851852)
  [1]=>
  float(9.8703703703704)
}
pos Y = 21.722222222222

image 3:
image is at line 1
width = 24 / 1 = 24
height = 9.8703703703704
pos X = 0 * (24 / 1) = 0
Slice to calc Y:
array(1) {
  [0]=>
  float(11.851851851852)
}
pos Y = 11.851851851852

image 5:
image is at line 3
width = 24 / 4 = 6
height = 14.222222222222
pos X = 0 * (24 / 4) = 0
Slice to calc Y:
array(3) {
  [0]=>
  float(11.851851851852)
  [1]=>
  float(9.8703703703704)
  [2]=>
  int(6)
}
pos Y = 27.722222222222

image 6:
image is at line 3
width = 24 / 4 = 6
height = 14.222222222222
pos X = 1 * (24 / 4) = 6
Slice to calc Y:
array(3) {
  [0]=>
  float(11.851851851852)
  [1]=>
  float(9.8703703703704)
  [2]=>
  int(6)
}
pos Y = 27.722222222222

image 1:
image is at line 0
width = 24 / 3 = 8
height = 11.851851851852
pos X = 1 * (24 / 3) = 8
Slice to calc Y:
array(0) {
}
pos Y = 0

image 0:
image is at line 0
width = 24 / 3 = 8
height = 11.851851851852
pos X = 0 * (24 / 3) = 0
Slice to calc Y:
array(0) {
}
pos Y = 0

image 11:
image is at line 4
width = 24 / 3 = 8
height = 7.2407407407407
pos X = 2 * (24 / 3) = 16
Slice to calc Y:
array(4) {
  [0]=>
  float(11.851851851852)
  [1]=>
  float(9.8703703703704)
  [2]=>
  int(6)
  [3]=>
  float(14.222222222222)
}
pos Y = 41.944444444444

image 8:
image is at line 3
width = 24 / 4 = 6
height = 14.222222222222
pos X = 3 * (24 / 4) = 18
Slice to calc Y:
array(3) {
  [0]=>
  float(11.851851851852)
  [1]=>
  float(9.8703703703704)
  [2]=>
  int(6)
}
pos Y = 27.722222222222

image 9:
image is at line 4
width = 24 / 3 = 8
height = 7.2407407407407
pos X = 0 * (24 / 3) = 0
Slice to calc Y:
array(4) {
  [0]=>
  float(11.851851851852)
  [1]=>
  float(9.8703703703704)
  [2]=>
  int(6)
  [3]=>
  float(14.222222222222)
}
pos Y = 41.944444444444

为了调试我们的代码,我们以以下方式结束它:
$debug = true;
if ($debug)
{
    echo ob_get_clean();
}
else
{
    ob_clean();
    $imageGrid->display();
}

好的,您在这里有所有的步骤。那结果呢?
F5...
Final code:
ob_start();

echo '<pre>';

// Get height of all images
$images = array ();
$totalHeight = 0;
foreach (glob("images/*.jpg") as $jpg)
{
    $img = imagecreatefromjpeg($jpg);
    $images[$jpg] = imagesy($img);
    $totalHeight += $images[$jpg];
    imagedestroy($img);
}

echo "image list with heights:\n";
var_dump($images);

// Shuffle image array of files preserving keys to get random image disposition
$keys = array_keys($images);
shuffle($keys);
$images = array_merge(array_flip($keys), $images);

// Separate image names and heights, will simplify our future work
$heights = array_values($images);
$images = array_keys($images);

echo "image list:\n";
var_dump($images);

echo "total heights: {$totalHeight}\n";

echo "image heights:\n";
var_dump($heights);

// Get percentage of image height compared to the total height
$count = count($heights);
for ($i = 0; ($i < $count); $i++)
{
    $heights[$i] = ($heights[$i] * 100) / $totalHeight; // becomes virtual height in a x100 grid
}

echo "image heights in percents\n";
var_dump($heights);
echo "check : " . array_sum($heights) . " = 100\n";

// Get random number of images per line and number of lines
// Between 1 to 4 images/line until there is no more image.
$lines = array ();
while ($count > 0)
{
    $nbImages = rand() % 4 + 1;
    if (($count - $nbImages) < 0)
    {
        $nbImages = $count;
    }

    $lines[] = $nbImages;
    $count -= $nbImages;
}

echo "Number of lines : " . count($lines) . "\n";
echo "images per line disposition :\n";
var_dump($lines);

// Associate an image with a line
$imageLines = array();
foreach ($lines as $key => $numberImg)
{
    while ($numberImg--)
    {
        $imageLines[] = $key;
    }
}

echo "image / line association:\n";
var_dump($imageLines);

// Associate an image with a position in a line
$imagePositions = array();
foreach ($lines as $numberImg)
{
    for ($i = 0; ($i < $numberImg); $i++)
    {
        $imagePositions[] = $i;
    }
}

echo "image / position in a line association:\n";
var_dump($imagePositions);

// We have from 1 to 4 images/line so we create a grid with a virtual width of 1*2*3*4.
// In this case, 1 image/line = 24, 2/line =24/2=12, 3/line=24/3=8, all are valid integers.
$i = 4;
$virtualWidth = 1;
while ($i)
{
    $virtualWidth *= $i--;
}

echo "virtual width: {$virtualWidth}\n";

// Determine the virtual height needed for each line and for the whole grid
$imageHeights = array();
$index = 0;
foreach ($lines as $key => $numberImages)
{
    $slice = array_slice($heights, $index, $numberImages);

    echo "at line {$key}, images heights are:\n";
    var_dump($slice);

    $imageHeights[] = max($slice);
    $index += $numberImages;
}
$virtualHeight = array_sum($imageHeights);

echo "heights for each line:\n";
var_dump($imageHeights);
echo "total height = {$virtualHeight}\n";


// Create a grid and place logically all images in the virtual area
$imageGrid = new imageGrid(800, 800, $virtualWidth, $virtualHeight);
foreach (glob("images/*.jpg") as $jpg)
{
    $img = imagecreatefromjpeg($jpg);

    // Determine position
    $index = array_search($jpg, $images);
    echo "image {$index}:\n";

    $line = $imageLines[$index];
    echo "image is at line {$line}\n";

    $sizeW = ($virtualWidth / $lines[$line]);
    echo "width = {$virtualWidth} / {$lines[$line]} = {$sizeW}\n";

    $sizeH = $imageHeights[$line];
    echo "height = {$imageHeights[$line]}\n";

    $posX = $imagePositions[$index] * ($virtualWidth / $lines[$line]);
    echo "pos X = {$imagePositions[$index]} * ({$virtualWidth} / {$lines[$line]}) = {$posX}\n";

    $slice = array_slice($imageHeights, 0, $line);
    echo "Slice to calc Y:\n";
    var_dump($slice);

    $posY = array_sum($slice);
    echo "pos Y = {$posY}\n";

    echo "\n";

    $imageGrid->putImage($img, $sizeW, $sizeH, $posX, $posY);
    imagedestroy($img);
}

$debug = false;
if ($debug)
{
    echo ob_get_clean();
}
else
{
    ob_clean();
    $imageGrid->display();
}

我的方法可能不是最佳的,但至少它可以给你的图片在保持图片权重的情况下随机定位到网格中。这个主题很难处理,所以我希望这对你的情况足够有效。


这比我想象的更好,真是太棒了!谢谢。 - Christoffer Bubach

网页内容由stack overflow 提供, 点击上面的
可以查看英文原文,
原文链接