ImageButton:强制使用正方形图标(高度=WRAP_CONTENT,宽度=?)

8
在我的水平LinearLayout中,我有一个TextEdit和一个ImageButton。 ImageButton的高度与TextEdit相同。
我希望ImageButton的宽度恰好等于其长度。
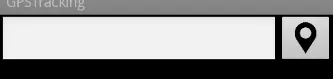
目前,它看起来像当没有缩放时ImageButton的宽度(ImageButton宽度[px] =未缩放的可绘制宽度[px]):
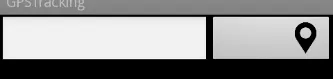
 example
<LinearLayout
    android:layout_width="match_parent"
    android:layout_height="wrap_content"
    android:orientation="horizontal" >

    <EditText
        android:id="@+id/txtName"
        android:layout_width="1dp"
        android:layout_height="wrap_content"
        android:layout_weight="1" />

    <ImageButton
        android:id="@+id/btSet"
        android:layout_width="wrap_content"
        android:layout_height="match_parent"
        android:scaleType="fitEnd"
        android:src="@drawable/pin2" />

</LinearLayout>

它应该是这个样子:

目标


2
只是一个小提示。当您为视图设置layout_weight时,将宽度设置为0dp可以更快地渲染。 - Zaid Daghestani
12个回答

23

试一下这个,我认为这应该可以解决问题:

<RelativeLayout
    android:layout_width="match_parent"
    android:layout_height="40dp"
    android:orientation="horizontal" >

    <ImageButton
        android:id="@+id/btSet"
        android:layout_width="wrap_content"
        android:layout_height="match_parent"
        android:layout_alignParentRight="true"
        android:scaleType="centerInside"
        android:adjustViewBounds="true"
        android:src="@drawable/pin2" />

    <EditText
        android:id="@+id/txtName"
        android:layout_width="match_parent"
        android:layout_height="match_parent"
        android:layout_toLeftOf="@id/btSet" />

</RelativeLayout>

说明: centerInside 可以确保图片在 ImageButton 的范围内按比例缩放。adjustViewBounds="true" 可以...嗯,如果需要对图像进行缩放,则调整视图的边界。


谢谢您的建议。不幸的是,它不能正常工作(截图:http://i.imgur.com/W8iFu.png)。您知道其他的解决方案吗? - SecStone
我编辑了我的回答,请尝试一下。如果这不起作用,您能上传您正在使用的按钮可绘制对象吗? - Jason Robinson
感谢更新的答案。它似乎还没有起作用(截图:http://i.imgur.com/Awbat.png)。我的可绘制对象(_pin2_):http://i.imgur.com/eflnh.png - SecStone
获取可绘制链接时出现502(错误网关)错误。 - Jason Robinson
如果你想的话,我知道一种编程方法可以解决这个问题,但它需要屏幕重新绘制一次,所以在短暂的时间内你会看到尺寸不正确。 - Jason Robinson
显示剩余2条评论

6

尝试在ImageButton中添加

adjustViewBounds="true"

这样可以剪裁多余的宽度。


<LinearLayout
    android:layout_width="match_parent"
    android:layout_height="wrap_content"
    android:orientation="horizontal" >

    <EditText
        android:id="@+id/txtName"
        android:layout_width="0dp"
        android:layout_height="wrap_content"
        android:layout_weight="1" />

    <ImageButton
        android:id="@+id/btSet"
        android:layout_width="wrap_content"
        android:layout_height="wrap_content"
        android:adjustViewBounds="true"
        android:src="@drawable/pin" />
</LinearLayout>

谢谢您的建议。不幸的是,它不能正常工作(截图:http://i.imgur.com/W8iFu.png)。您知道其他的解决方案吗? - SecStone
尝试移除scaleType标签,并将layout_width和height设置为wrap_content。 - Mark Pazon
不幸的是,它不起作用。截图:http://i.imgur.com/2456h.png 你确定它能工作吗? - SecStone
1
如果您将PNG物理缩放到所需的大小,它将会精确适配。 - Prizoff
1
将adjustViewBounds="true"设置对我的情况起作用,我猜测图片本身需要是正方形才能起作用。 - Bruce

2

我可能有点晚了。

然而,通过重写onMeasure()函数可以很容易地实现此行为。

以下是代码示例:

public class MySquareImageButton extends ImageButton {
    public MySquareImageButton(Context context) {
        super(context);
    }

    public MySquareImageButton(Context context, AttributeSet attrs) {
        super(context, attrs);
    }

    public MySquareImageButton(Context context, AttributeSet attrs, int defStyleAttr) {
        super(context, attrs, defStyleAttr);
    }

    @Override
    protected void onMeasure(int widthMeasureSpec, int heightMeasureSpec) {
        //(1)if you want the height to match the width
        super.onMeasure(widthMeasureSpec, widthMeasureSpec);
        //(2)if you want the width to match the height
        //super.onMeasure(heightMeasureSpec, heightMeasureSpec);
    }
}

然后,您只需将自己的XML中的ImageButton替换为此自定义组件:

<LinearLayout
    android:layout_width="match_parent"
    android:layout_height="wrap_content"
    android:orientation="horizontal" >

    <EditText
        android:id="@+id/txtName"
        android:layout_width="1dp"
        android:layout_height="wrap_content"
        android:layout_weight="1" />

    <com.whatever_your_package.MySquareImageButton
        android:id="@+id/btSet"
        android:layout_width="wrap_content"
        android:layout_height="match_parent"
        android:scaleType="fitEnd"
        android:src="@drawable/pin2" />

</LinearLayout>

你只需将wrap_content用于宽度或高度,具体取决于你想要通过哪个参数来确定按钮的大小。 如果你想让按钮的高度根据图像自适应,而宽度则与高度相匹配,那么你可以使用

        android:layout_width="wrap_content"
        android:layout_height="wrap_content"

同时使用

        //(2)if you want the width to match the height
        //super.onMeasure(heightMeasureSpec, heightMeasureSpec);

2

使用

android:scaleType="fitCenter"

在xml文件中的ImageButton中,或android:scaleType="centerInside"。

谢谢您的建议。我应该使用什么值来设置 android:layout_widthandroid:layout_height - SecStone
您可以根据需要使用fill parent或wrap content...!!!并请检查答案是否令您满意...!!! - user1294888

1
我遇到了相同的问题。 我试图创建一个看起来像这样的东西: enter image description here 但是我得到的是这个: enter image description here ImageButton被水平拉伸了。 所有顶部答案都对我没用。但我注意到人们提到了layout_weight,出于好奇我查了一下,在Android文档中找到了以下内容:

布局权重

LinearLayout也支持使用android:layout_weight属性为每个子项分配权重。此属性根据视图在屏幕上占用的空间大小,分配一个“重要性”值。较大的权重值允许它扩展以填满父视图中的任何剩余空间。子视图可以指定权重值,然后视图组中任何剩余空间都按其声明的权重比例分配给子视图。默认权重为零。

例如,如果有三个文本字段,其中两个声明了权重1,而另一个没有权重,则没有权重的第三个文本字段不会增长,只会占用其内容所需的区域。其他两个将平等地扩展以填充测量所有三个字段后剩余的空间。如果然后将第三个字段的权重更改为2(而不是0),则现在它被声明为比其他两个更重要,因此它获得总剩余空间的一半,而前两个平均分享其余部分。

基本上,如果您将元素的layout_width设置为0,则它将根据其内容的尺寸显示。
如果将其设置为其他任何值,则该元素将争取在包含它的父元素中获得额外的空间;具有更高权重的元素将占用更多的空间。
因此,在我的示例中,当我将TextViewImageButtonlayout_width = 0时,它们都不会占用任何额外的空间,并且它们都靠在左边。

enter image description here

但是,当我将TextView的权重设置为1,将ImageButton的权重设置为0时,ImageButton不会占用超过其内容所需的空间;而TextView占用了所有额外的空间,并将ImageButton推到右侧。
正如我想要的那样。 enter image description here 最初,发生的情况是两个元素都设置了默认的layout_weight为1,因此两者都在竞争额外的空间。 enter image description here

0

只需使用weightSum来相应地分配控件的大小...

<?xml version="1.0" encoding="utf-8" ?>

<LinearLayout xmlns:android="http://schemas.android.com/apk/res/android"
     android:orientation="vertical" android:layout_width="fill_parent"
      android:layout_height="fill_parent">

   <LinearLayout
     android:layout_width="fill_parent"
     android:layout_height="wrap_content"
     android:orientation="horizontal"
     android:weightSum="1.0" >

   <EditText
       android:id="@+id/txtName"
       android:layout_weight="0.8"
       android:layout_height="wrap_content"
       android:layout_width="0dp" 
       android:inputType="text"
       android:singleLine="true"/>

   <ImageButton
       android:id="@+id/btSet"
       android:layout_weight="0.2"
       android:layout_height="wrap_content"
       android:layout_width="0dp"
       android:scaleType="fitEnd"
       android:src="@drawable/pin2" />

  </LinearLayout>
</LinearLayout>

希望这能帮到你。

谢谢您的建议。如果应用程序在小屏幕上运行,我可能需要25%或30%的空间来将按钮显示为正方形。这个问题也有解决方案吗? - SecStone

0

刚遇到了类似的问题,其他建议都没有帮助。有用的是在ImageButton中设置填充:

android:padding="5dp"

除此之外,我没有改动原始布局。在我测试的三个模拟器上(3.2、4.4.2、5.1),按钮变成了正方形。


0
<LinearLayout
 android:layout_width="fill_parent"
 android:layout_height="wrap_content"
 android:orientation="horizontal"
 android:weightSum="1.0" >

<EditText
   android:id="@+id/txtName"
   android:layout_weight="0.75" // this work like percentage adjust as u want 70 or 75
   android:layout_height="wrap_content"
   android:layout_width="0dp" 
   android:inputType="text"
   android:singleLine="true"/>

<ImageButton
   android:id="@+id/btSet"
   android:layout_weight="0.25" // this work like percentage adjust as u want 25 or 30
   android:layout_height="wrap_content"
   android:layout_width="0dp"
   android:scaleType="fitEnd"
   android:src="@drawable/pin2" />

</LinearLayout>

0

我自己试过了,它可行

只需要按照以下步骤...

<LinearLayout
        android:layout_width="match_parent"
        android:layout_height="wrap_content"
        android:orientation="horizontal">

    <EditText
        android:id="@+id/editText1"
        android:layout_width="0dp"
        android:layout_weight="5"
        android:layout_height="wrap_content"
        android:inputType="text"/>

    <ImageButton
        android:id="@+id/imageButton"
        android:layout_width="0dp"
        android:layout_weight="1"
        android:layout_height="match_parent" />

</LinearLayout>

LinearLayout中使用布局权重比5:1,用于EditTextImageButton

OUTPUT


0

网页内容由stack overflow 提供, 点击上面的
可以查看英文原文,
原文链接