在Bitbucket上以编程方式创建Pull Request?

8

更新:好吧,我之前是在 Bash 脚本中运行这个程序,但我想知道我得到了什么错误代码,现在我可以看到我得到了一个 401 未授权 的错误。我正在使用我的用户名,并且我已经创建了具有 admin 访问权限的 Bitbucket 个人访问令牌,所以我应该能够创建 PR,对吗?我可以通过相同的仓库的 Web UI 来完成这个操作吗?

我正在运行一个 Bash 脚本来在 Bitbucket 上创建 pull request。我已经通过编程方式克隆了仓库、编辑了文件、进行了 git add/commit 操作,现在我只需要使用 CURL 来创建 PR。似乎 Bitbucket API 提供了一个使用 POST 请求来完成此操作的端点:

Creates a new pull request where the destination repository is this repository and the author is the authenticated user.

The minimum required fields to create a pull request are title and source, specified by a branch name.

curl https://api.bitbucket.org/2.0/repositories/my-username/my-repository/pullrequests \
    -u my-username:my-password \
    --request POST \
    --header 'Content-Type: application/json' \
    --data '{
        "title": "My Title",
        "source": {
            "branch": {
                "name": "staging"
            }
        }
    }'

https://developer.atlassian.com/bitbucket/api/2/reference/resource/repositories/%7Bworkspace%7D/%7Brepo_slug%7D/pullrequests#post

这是我在Bitbucket上的存储库情况,我挡住了真实的名称,但左侧格式相同(第一个名称是项目名称,
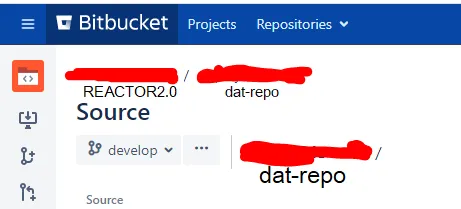
REACTOR2.0,而我认为第二个名称是存储库名称,dat-repo):

enter image description here

我正在尝试许多不同的变化,并检查远程的Bitbucket服务器是否有新的拉取请求,但是我什么也没看到。

我确定我的“标题”和“分支”是正确的。我唯一的问题是关于URL;我正在输入来自Bitbucket的用户名,如果您转到“管理帐户”,然后是“名称”,那就是我用于URL中my-username部分的字段,我正在添加存储库名称作为my-repository部分。但是,我需要注意的是,这是一个位于名为“REACTOR2.0”的项目内的Bitbucket存储库,因此我不确定项目名称是否需要在URL中指定。

有人成功使用过这个API吗?我在谷歌上搜索了一下,但很多问题都使用旧的1.0 API,不适用,或者人们正在进行GET请求以简单地获取拉取请求列表....


可以使用 git request-pull 来完成吗?链接 - samkart
嗯,那看起来不是我想做的。他们已经有了一个用于创建PR的公共API;我在上面发布了它。但是我使用的一些参数可能是错误的,因为正如我上面所说的,我几乎每次发出请求都会收到401-未经授权的响应,即使我完全弄错了URL... - ennth
请使用双引号将 URL 包裹起来。用户名或仓库名称中是否有像“/”这样的特殊字符? - ElpieKay
1个回答

15

我使用了错误的API。有一个用于托管在bitbucket上并具有类似bitbucket.com/的URL的BitBucket云API,以及一个用于类似https://bitbucket.mycompanyname.com/这样的URL的BitBucket服务器API,这是我需要使用的API。

最终,URL应该像这样(您需要填写YourCompanyNameYourProjectKeyYourRepositoryName参数):

https://bitbucket.YourCompanyHostName.com/rest/api/1.0/projects/YourProjectKey/repos/YourRepositoryName/pull-requests 

并使用JSON发布:

{
    "title": "Talking Nerdy",
    "description": "It’s a kludge, but put the tuple from the database in the cache.",
    "state": "OPEN",
    "open": true,
    "closed": false,
    "fromRef": {
        "id": "refs/heads/feature-ABC-123",
        "repository": {
            "slug": "my-repo",
            "name": null,
            "project": {
                "key": "PRJ"
            }
        }
    },
    "toRef": {
        "id": "refs/heads/master",
        "repository": {
            "slug": "my-repo",
            "name": null,
            "project": {
                "key": "PRJ"
            }
        }
    },
    "locked": false,
    "reviewers": [
        {
            "user": {
                "name": "reviewersName1"    
            }
        },
         {
            "user": {
                "name": "reviewerName2" 
            }
        }
    ]
}
如果您选择通过CURL访问API,您可以使用类似以下的方式构建请求:

If you choose to hit the API via CURL, you can formulate that request with something like this:


curl -H "Authorization: Basic EncryptedBase64UsernamePasswordHere" \
  -H "Content-Type: application/json" \
  "https://bitbucket.YourCompanyName.com/rest/api/1.0/projects/YourProjectKey/repos/YourRepositoryName/pull-requests" \
  -d JsonDataFromAboveHere

您可以在下面阅读有关身份验证的更多内容,但您可以在CURL请求中使用-u username:password进行身份验证或者您可以获取用户名:密码字符串并对其进行base64编码,然后使用-H "Authentication:Basic BASE64ENCODEDUSERNAMEPASSWORDHERE",由你决定。根据您正在进行此请求的计算机类型,您可能需要使用我以下所示的方式转义JSON双引号“"”,类似于这样:

"{\"title\": \"Talking Nerdy\",
    \"description\": \"It’s a kludge, but put the tuple from the database in the cache.\",
    \"state\": \"OPEN\",
    \"open\": true,
    \"closed\": false,
    \"fromRef\": {
        \"id\": \"refs/heads/feature-ABC-123\",
        \"repository\": {
            \"slug\": \"my-repo\",
            \"name\": null,
            \"project\": {
                \"key\": \"PRJ\"
            }
        }
    },
    \"toRef\": {
        \"id\": \"refs/heads/master\",
        \"repository\": {
            \"slug\": \"my-repo\",
            \"name\": null,
            \"project\": {
                \"key\": \"PRJ\"
            }
        }
    },
    \"locked\": false,
    \"reviewers\": [
        {
            \"user\": {
                \"name\": \"reviewerName1\" 
            }
        },
         {
            \"user\": {
                \"name\": \"reviewerName2\" 
            }
        }
    ]
}"
如果你想添加审阅人但不知道他们的名字,可以向上面相同的URL发起GET请求,它将提供用户列表,然后可以将他们的名称添加到审阅者数组中,这样当PR被创建时,他们已经被添加为审阅者。
身份验证: https://developer.atlassian.com/server/bitbucket/how-tos/example-basic-authentication/ Rest API: https://developer.atlassian.com/server/bitbucket/how-tos/command-line-rest/ PullRequest: https://docs.atlassian.com/bitbucket-server/rest/7.6.0/bitbucket-rest.html#idp291

网页内容由stack overflow 提供, 点击上面的
可以查看英文原文,
原文链接